Mason Partak Takes the Challenge Cream Cheese Challenge

A few weeks ago when I interviewed Mason Partak about his Chopped Junior experience and some of his future plans, I asked him to participate in a little something I call the Challenge Cream Cheese Challenge.
See, Challenge Butter (and Cream Cheese) sponsored my cookie exchange last year and sent me coupons for more butter and cream cheese than I could ever possibly use. Of course, the butter coupons I made very good use of and currently have about 15 pounds of butter in my freezer. However, cream cheese is not primal or paleo, so I sent the remainder of my cream cheese coupons to Mason Partak and asked him to come up with a recipe that I could publish on my website.
He gladly accepted the challenge, as he is such a great sport and takes advantage of most opportunities that come his way. I present to you his recipe for the Challenge Cream Cheese Challenge:

Challenge Cream Cheese Balls
2 pkg Challenge cream cheese
1 med yellow onion
1 sm red onion
1 lg head of garlic
6 sage leaves
2 springs of Rosemary
1 pkg chives
1 C Italian blend grated cheese
1.5 C fresh grated parmesan
1 C chopped or sliced nuts (we used almonds)
Olive oil
Salt and pepper
Preheat the oven to 400°F. Quarter the onions and top the head of garlic. Create a wrap around the garlic with foil so it sits up, it does not have to be closed up. Drizzle the onions and garlic with olive oil and sprinkle with salt and pepper. Roast until soft. Set aside and let cool. Once cool, squeeze the garlic cloves out of their casings. Isn’t itway fun how they pop right out?
Finely dice the chives and place them in a bowl, set aside. Dice the sage leaves and Rosemary. Once your roast onions and garlic are cool (don’t have to be cold, just not hot), place them in the food processor and pulse until they are almost a paste consistency – not quite though. Add the cream cheese, Italian blend, 1/2C parmesan, sage and rosemary and process unit it is all completely mixed. Taste and add salt and pepper to taste. You may need to scrape your food processor bowl and mix again to be sure you don’t have cream cheese lumps. Turn the whole thing out on to a cookie sheet being sure to scrape all the cheesy goodness out of your processor.
Form the cheese into four logs or balls and roll in the chives. When you start to run out of the chives, add the other cup of parmesan and coat with that. Do the same with nuts if you want. Refrigerate for 30 minutes before serving.
Serve with a French baguette and crackers, it’s delicious!
Mason says if you have leftovers, it adds a delicious layer of flavor to casseroles. The Partaks have also added it to their white chicken chili, it was so good!
Thanks so much for the recipe, Mason! I will be following up next week at some point with my stuffed sweet potatoes (also featuring Challenge Cream Cheese). You can find Mason Partak online here, on Facebook here and follow him on Twitter here and on Instagram here.
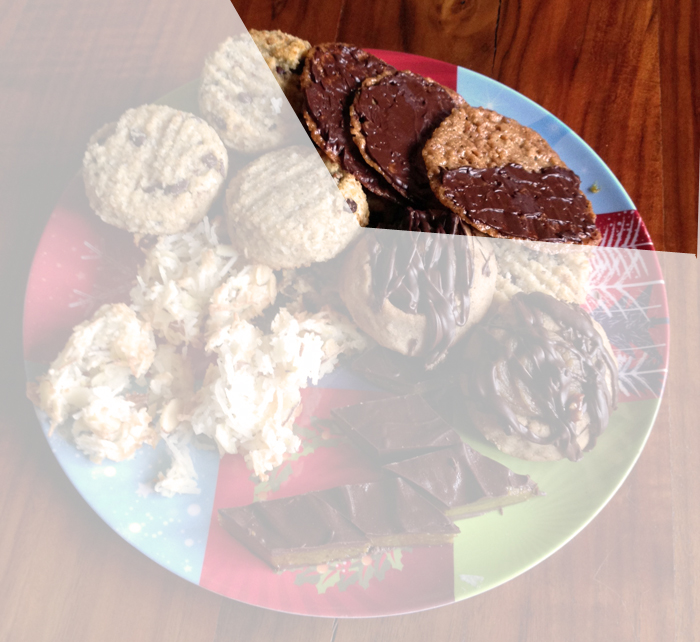
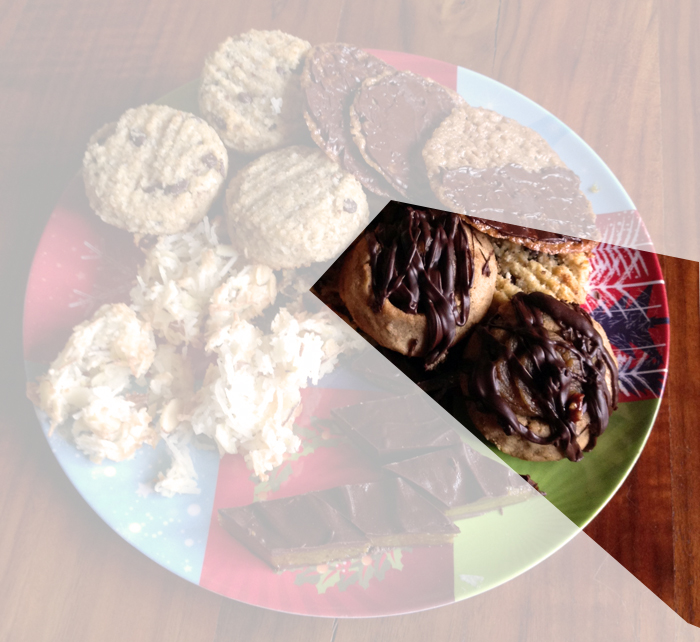
Recipes from the 1st Annual Ladies Holiday Party and Gluten Free Cookie Exchange Sponsored by Challenge Butter and Bob’s Red Mill

Special thanks to the suppliers of our ingredients for the First Annual Ladies Holiday Party and Gluten Free Cookie Exchange: Challenge Butter and Bob’s Red Mill. As you can see above, our ladies put together quite a spread with your line of products.
Challenge Butter sent all baking attendees coupons for their butter and new cream cheese products. Bob’s Red Mill sent 4 packages of coconut, almond and hazelnut flours our way as well. We used these products to make and share the following cookie recipes (I’ll also be sharing other treat and savory recipes using Challenge and Bob’s Red Mill products throughout 2015 as well!):
Grain Free “Oatmeal” Chocolate Chip Cookies

Ingredients
1/4 cup Challenge Butter
1 large egg at room temperature
1/3 cup honey
1 tsp vanilla extract
4 tsp cinnamon
3/4 tsp nutmeg
1 cup Bob’s Red Mill almond flour
2 Tbs Bob’s Red Mill coconut flour
1/2 tsp baking soda
1/2 tsp sea salt
2 tsp finely ground flax seeds
3/4 cup finely shredded coconut
1/2 cup Enjoy Life mini chocolate chips
Procedure
Preheat oven to 350°F
Place the Challenge Butter and the egg in the bowl of a stand mixer and cream for 1 minute on high. If you don’t have a stand mixer you can use an electric hand mixer.
Add the honey and vanilla and mix for another minute.
Place the cinnamon, nutmeg, Bob’s Red Mill flours, baking soda, salt, and flax seeds in a small bowl and stir to combine.
Slowly add the dry ingredients
Gluten-Free Orange-Cinnamon Lace Cookies
1/3 cup Bob’s Red Mill Gluten-Free All Purpose Flour
1/2 cup Bob’s Red Mill almond flour
1/8 teaspoon salt
1 teaspoon ground cinnamon
1 tablespoons grated orange rind (zest)
5 tablespoons unsalted Challenge Butter
1/3 cup Pyure Organic Stevia
2 tablespoons honey
1/4 teaspoon orange extract, optional
melted dark chocolate for drizzling, optional
Procedure
Preheat the oven to 350°F. Line two baking sheets with parchment paper or foil.
In a small bowl mix together the flours, salt, cinnamon, and orange zest until well blended.
Combine the Challenge Butter, Pyure Organic Stevia, and honey in a medium saucepan set over low heat. Stir until the butter melts and the stevia dissolves. Increase the heat to medium and bring just to a boil. Remove the pan from the heat.
Stir in the dry ingredients into the pan, followed by the orange extract.
Drop the batter onto the prepared baking sheet by teaspoonfuls, spacing the spoonfuls 4″ apart from one another. Bake no more than six cookies on a pan.
Bake the cookies for 7 to 9 minutes, until they’re an even golden brown. Transfer the cookies, on their parchment or foil, to a rack, and let them rest until they’re completely cool and crisp.
Bake succeeding batches while the first batch is cooling.
Once the cookies are completely cool, drizzle them with melted dark chocolate, if desired.
Caramel Date Thumbprints

Cookie Base
Ingredients
1 1/4 cups pecan halves
1 cup Bob’s Red Mill almond flour
1 1/3 cups Bob’s Red Mill gluten free all purpose flour
1/2 cup finely chopped plump Medjool dates
1/2 teaspoon kosher salt
2 sticks unsalted Challenge butter, softened
¾ cup Pyure Organic Stevia
1/2 teaspoon pure vanilla extract
Procedure
Pulse all ingredients together in a food processor. Remove dough from food processor and wrap in plastic wrap. Chill for at least an hour to firm up the dough. You can also place in the freezer for 10-15 minutes to speed up the process.
Preheat your oven to 350°F.
Shape cookies into little balls and press your thumb into them to make a deep impression. Bake at 350°F until they are golden brown. Take out the cookies and carefully (as the cookies are still hot) press them back down in the center to make sure the impressions are deep enough to hold the caramel date filling.
Caramel Date Filling
Ingredients
20 medjool dates soaked in hot water and drained
2 Tbs Challenge Butter
sea salt to taste
2 tsp vanilla extract
Procedure
Pulse in a food processor until the filling becomes a caramel texture.
When cookies have cooled, use a pastry bag to fill them with the caramel.
Chocolate Drizzle
Ingredients
2 cups chocolate (chips or semisweet)
2 Tbs coconut oil
Procedure
Melt the chocolate and the coconut oil in the microwave in 20 second bursts, stirring in between. When chocolate is melted, drizzle it over the finished cookies and set aside to dry.
Thanks again to Challenge Butter and Bob’s Red Mill for their awesome product supplies. You can find them on Facebook here and follow them on Twitter here. You can find Bob’s Red Mill on Facebook here and follow them on Twitter here.
If you would like to sponsor the 2015 Ladies Holiday Party and Gluten Free Cookie Exchange, you can contact me here. I am looking for wine sponsors, gluten free cookie ingredients, catered items for guests, and goodie bag items for attendees.
Recipe: Gluten Free, No Sugar Added Büche de Noel
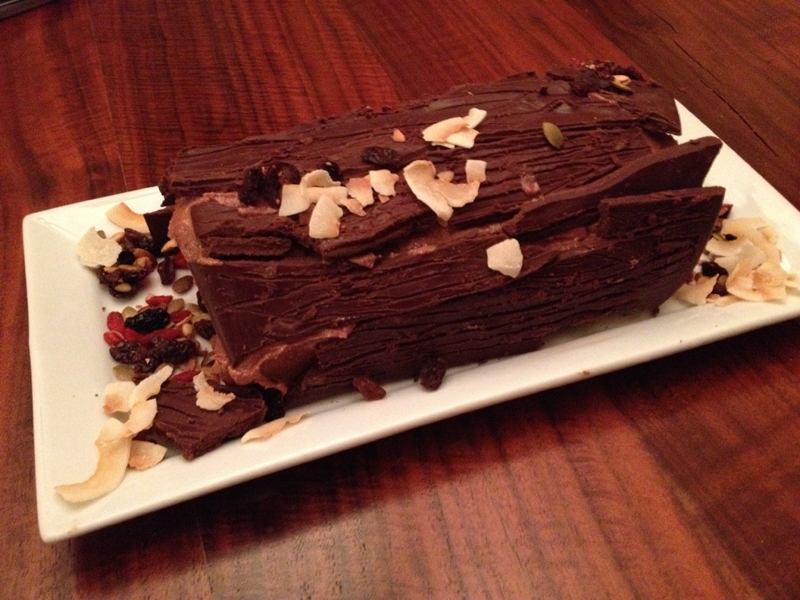
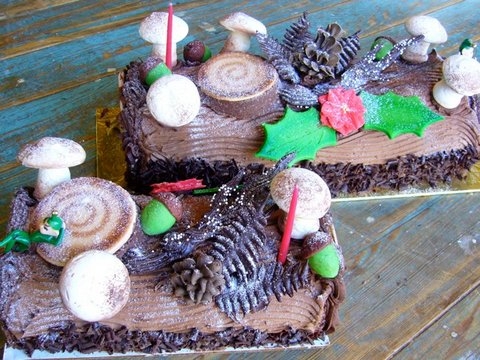
I used to work at The Bonbonerie in Cincinnati, Ohio and the most amazing thing they make (other than their masterpiece wedding cakes—many of them creations by the incomparable Richard Prince) is their Büche de Noel (pictured below).
I never attempted to make one myself until this year, and just to raise the stakes, I made it Primal friendly! 🙂 I used coconut flour and eggs and made a simple sponge cake that would roll without falling apart. I am posting the recipe and hope you will try it yourself because it really is not that hard, but it takes a little effort and patience. And great ingredients.
I’d like to thank Challenge Butter, Bob’s Red Mill, and Pyure Organic Stevia for helping make my Büche de Noel taste amazing. They all sent me products that were used in cookies for my annual Ladies Gluten Free Cookie Exchange, (I’ll be writing about that very soon) and I am continuing to use their ingredients in other recipes that will be featured here on my website throughout the year.
First, prepare your filling and frosting.
For the Filling
Ingredients:
20 Medjool dates soaked in hot water and drained
2 Tbs Challenge Butter
sea salt to taste
2 tsp vanilla extract
Procedure:
Pulse all ingredients in a food processor until the filling becomes a caramel texture.
For the Buttercream:
Ingredients
1 stick Challenge Butter
1 cup Pyure Organic Stevia
1/2 cup coconut oil (solid, not melted)
1/4 melted semisweet chocolate
1 Tbs unsweetened cocoa
1 tsp vanilla extract
Procedure
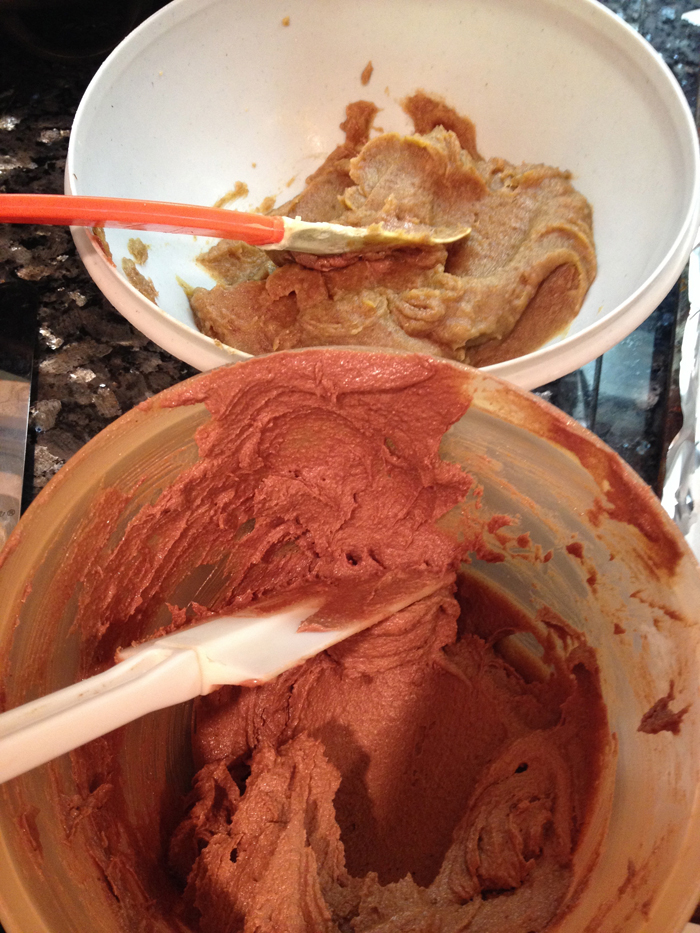
This is another food processor item. Start with the Pyure Organic Stevia. Pulse the product in the food processor until it becomes a fine powder. Then add the Challenge Butter and coconut oil and blend together until you have a buttercream-like substance. Add the cocoa and vanilla extract. When ingredients are combined completely, add in the melted chocolate. The chocolate will heat up the butter and coconut oil and mixture will look rather runny. Pour the mixture into a bowl and place into your refrigerator while you make the chocolate bark and the cake. Next, prepare your chocolate “bark”.
Chocolate Bark
Ingredients
2 cups dark or semisweet chocolate (broken into pieces)
1/2-3/4 cup coconut oil
Procedure
Melt your chocolate pieces and the coconut oil in the microwave 20 seconds at a time, stirring after each 20 seconds. Do not overheat. Stir until the mixture is completely smooth and spread on a parchment paper lined baking sheet. Place baking sheet in the refrigerator until semi-solid. Then take out the sheet and with the twines of a fork, drag lines across the chocolate to create a “bark” texture. Then return the pan to the refrigerator to solidify completely.
 Now it’s cake time.
Sponge Cake
Ingredients
8 large eggs (room temperature)
1 tsp lemon juice
½ tsp cream of tartar
2 tbsp Bob’s Red Mill coconut flour
(plus 1-2 Tbsp more for dusting your baking pan)
1 Tbsp unsweetened cocoa
4 tbsp Pyure Organic Stevia
2 tsp vanilla
1 tsp salt
Juice of 1 large orange
Rind of 1 large orange
Procedure:
Pre-heat oven to 350°F. Line a jelly roll pan with parchment paper and grease the sides of it with coconut oil or butter. Then lightly dust with Bob’s Red Mill coconut flour and tap off the excess.
Separate the eggs into 8 yolks and 8 whites. Whip the egg whites with the lemon juice and cream of tartar, until firm peaks can be formed. You can do this with a stand mixer, a hand mixer or you can do it like I did by hand. If you do it by hand it’s quite a workout!
In a separate bowl, whisk together the Pyure Organic Stevia, The Bob’s Red Mill coconut flour, the orange juice, orange zest, salt, vanilla and egg yolks. Once you have combined those ingredients completely fold in 1/4 of the egg white mixture. Once the first 1/4 has been folded in, fold in another 1/4 of the egg white mixture. Continue adding portions of the egg whites, while folding until you have a complete incorporation of the two mixtures.
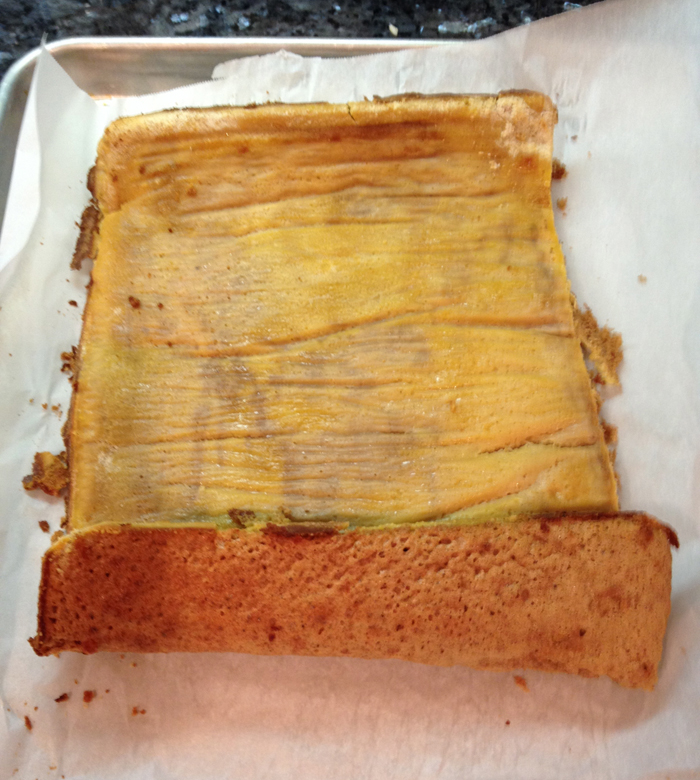
Pour your batter into your prepared pan and bake for 20 minutes, or until golden brown.
Remove from the oven and place a sheet of parchment paper directly over the top. Then roll the hot cake into a “jellyroll” and then let it cool while it’s still rolled tight. Remove your date paste and the buttercream from the refrigerator. The date paste will be a perfect spreading consistency, but the buttercream will be pretty solid. To get it to the right texture, simply stir it around and it will loosen up pretty well the closer it gets to room temperature.
Now it’s time to unroll and fill your Büche de Noel. At this point, the cake should look like this (below):
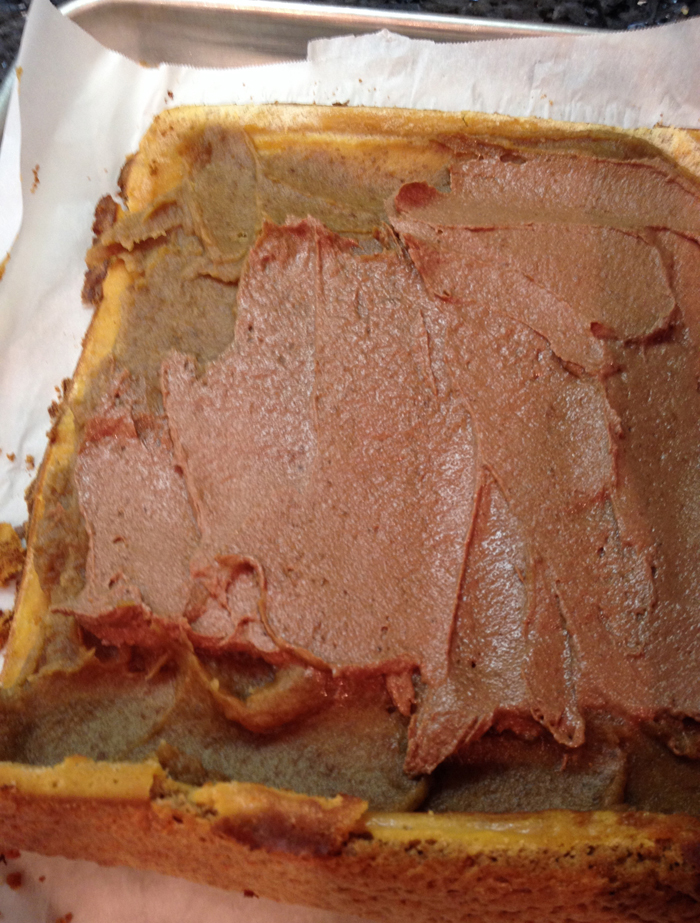
Fill your cake with the date paste and then spread a thin layer of chocolate buttercream over that. It should look like this (below):
Then roll up cake and frost with the remaining buttercream. Now it should look like this (below):

Next, break up the chocolate bark you made and place it on the cake so that the cake looks like a fallen log. I added some toasted coconut to resemble lichen and some seeds and dried fruit so it really looks like a little forest bed. When you slice the Büche de Noel it will look like this in the middle (pictured below).

I plan on making this cake every year (perhaps with different frostings and fillings, but keeping it free of gluten and added sugar). I hope you will attempt this recipe as it is not too tricky with practice and patience.
I hope all of you had a safe New Year’s and I wish you all the best for 2015! Cheers 🙂