
Primal Sweet Potato Salad Recipe and Pinot Noir Wine Pairing
Learn how to make my killer (and healthy) sweet potato salad recipe (that happens to also be PRIMAL!) and pair it with a 2018 Owl Box Pinot Noir from Grocery Outlet.
Recipe Ingredients:
3 to 4 medium-sized white sweet potatoes, peeled cut into 3/4-inch chunks
1 cup Greek yogurt
2 Tbsp. apple cider vinegar
1 tsp yellow mustard
Dash of paprika
1-1/2 tsp. salt
1/4 tsp. ground black pepper
1 tsp Garlic Powder
1/2 cup thinly sliced fennel bulb
1/2 cup chopped red onion
2 hard-boiled eggs, chopped (optional)
4 slices thick-cut cherrywood or applewood bacon
Recipe Preparation:
Cook the bacon in the microwave and drain on a paper towel.
Cover potatoes with water and bring to a boil. Reduce heat to low and cook until potatoes are tender, about 10 minutes. Drain and cool slightly. Combine the yogurt, vinegar, salt and pepper in large bowl. Add potatoes, fennel slices, onion, eggs, then the bacon.
If you like a little chill on your potato salad, you can refrigerate for about a half hour. However, I like mine room temperature so I pretty much eat the salad right after I put it together.
Kyra’s Bake Shop, a Gluten-Free Haven and Heaven in Lake Oswego, Oregon
Last weekend, I visited Lake Oswego, Oregon and the surrounding area on a media trip organized by Mt. Hood Territory. In the blog posts today and to come, I will be featuring some of the places on my itinerary that was specifically tailored to me and readers of this blog. I hope you enjoy my several mini-blogs from Mt. Hood Territory, Oregon.
One of my stops during the four days I spent in Mt. Hood Territory was a bakery in Lake Oswego called Kyra’s Bake Shop. Kyra’s Bake Shop is a completely gluten-free (and 100% celiac safe) bakery that sells gluten-free pastries, cakes, salads, sandwiches, and soups. The bakery is owned by Kyra Bussanich, the only four-time winner of Food Network’s popular show Cupcake Wars.


When I entered the shop, I noticed the steady stream of customers both in line and seated enjoying their gluten-free treats. I believe many of the people I saw were locals, although Kyra’s Bake Shop is definitely known for being a destination place (bringing in customers from as far as Florida and New York who long for celiac-safe goodies).
And I had come a long way from California, too. I made my way to the case, excited to order/try several things. I figured since it was already nearly 1pm (and I had another stop for lunch already planned), I would buy some items to take back to my hotel with me to enjoy later.
If you visit Kyra’s Bake Shop, I recommend getting there a little earlier than I did. Some of the items in the case were already sold out. Luckily, I picked up the last Chicken Pesto Galette, as well as the last two plain bagels. I was so happy to get them that you’d think they were the last two bagels on Earth! I was also tempted to try a Unicorn Cupcake, but opted for a Lemon Marionberry Donut instead (choosing only one sweet item for moderation’s sake). I also selected a Chicken Cobb Salad (for dinner in case I was too tired to go out later that evening). Kyra’s has various flavors of cupcakes and donuts available daily, as well as different kinds of galettes (As you will see in one of the photos below, a galette is like an open-faced savory hand pie.). You can visit Kyra’s website to see what flavors they offer on different days of the week.


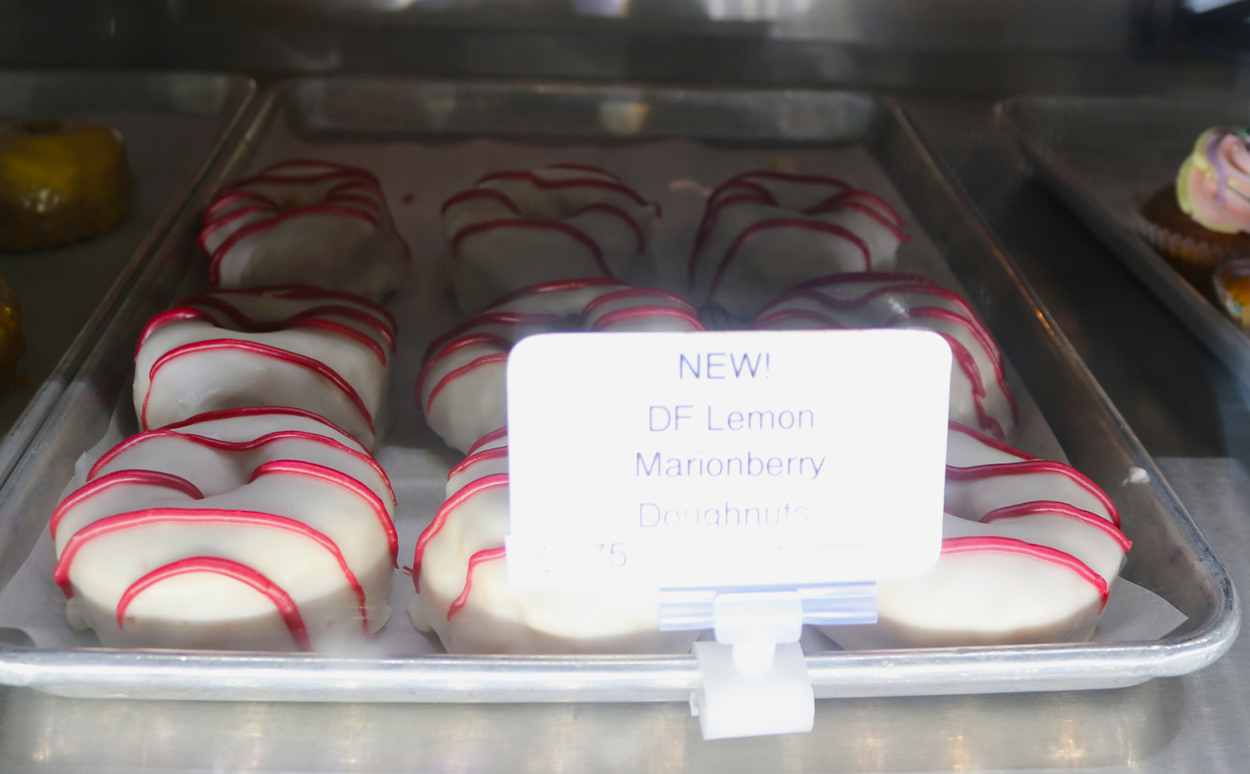

Below are photos of two of the items I bought. The Chicken Galette, and the Lemon Marionberry Donut. I decided they would photograph better back at my hotel, so I skipped taking any more pictures of the case, because the items just didn’t look as good in person through the glass. You can see how amazing both the galette and the donut look up close!

My prediction about being too tired to go out that evening came true, and luckily I had the Cobb Salad and the Chicken Galette to fall back on, as well as some wine to pair with them. The galette dough was buttery and chewy and slightly crisp in texture and unbelievably gluten-free! The pesto and chicken filling tasted perfect after having been slightly warmed in the microwave.

This was the first gluten-free donut I had ever tried. There’s a shop that makes them (gluten-free) in Sacramento, but only on Sundays, and it seems like I can never make it over there that day. So, I was very excited to try this one, because I have already had all sorts of gluten-free cookies and cakes. The donut itself had a cake-like texture underneath all that crunchy glaze. I don’t have any other word to describe it except delectable. It was so devilish that I ate it over three days. The glaze was exactly flavored the way anything advertising “lemon” should be. Like a “punch” of lemon, definitely from the use of lemon zest. The marionberry flavor was jammy and delightfully sweet, and a perfect complement to the sourness of the lemon.
I also bought two bagels, and though they were very good and I was so elated to get the last ones that I practically praised God for them, after all the tasting I prefered the galette and the donut! No matter what, though, I’m definitely coming back to Kyra’s Bake Shop next time I’m in Lake Oswego!
Kyra’s Bake Shop is located at 599 A Avenue, Lake Oswego, OR, 97034. They are open everyday from 7:00AM – 5:00PM. You can like Kyra’s Bake Shop on Facebook here, follow them on Twitter here, and follow them on Instagram here.
Disclaimer: Thank you to Mt. Hood Territory for arranging my trip to Oregon and this stop on my itinerary, as well as paying for the items I purchased at Kyra’s Bake Shop.
Fit Eats Café and Food Delivery Service Can Help You Reach Your Fitness Goals
Disclosure: I have partnered with Fit Eats to let you know about their awesome cafe and food delivery service that has helped me lose 15 pounds over the course of about a year. Results may vary from person to person. All opinions are my own. Use the promo code kristy65192 at check out to get a $10 credit towards your order!
Truth: I have battled my weight all my life. Correction. I have battled my weight since I was bullied about it in middle school, so let’s say pretty much most of my life. Although I have never been obese, I have been 30 pounds overweight in my lifetime and have yo-yo dieted (up ten pounds, down ten pounds) in the past.
In March of 2011, I adopted at Paleo/Primal diet of no sugar, no grains, and though it helped me overcome binging and helped curb my sugar cravings, I still could not lose the last 10 pounds. The reason why? Even though I rarely miss a day of exercise, quite simply I was eating too many calories than my body was burning off. I was rewarding myself like a dog with food for all the tough workouts I put myself through. Even though I got down to 117 on the Paleo diet, I never stayed there because I didn’t have any portion control. I think I peaked out last July at about 130 before I took major action. I could have actually weighed more than that, but I was too afraid to get on the scale until I lost some weight first!
I know, 130 pounds doesn’t sound overweight to most, but I am only 5’1″ and really do look my best between 110-115 . Plus, I was drinking ENTIRELY TOO MUCH every night and chasing that down with too many snacks (because I just LOVE to eat when I drink)! It was a vicious cycle of punishing workouts/eating and drinking to reward myself for the workouts/guilt/shame/repeat.
On July 5th of last year, I woke up with a major hangover. This is not usual for me, so I really must have tied one during our 4th of July block party. That’s when the shame set in so much I decided to do something about my weight because I truly felt like a marlin. Of course, I have lost weight a lot of times in the past, so I know what is involved and the science is quite easy. You don’t have to go on the Paleo diet to lose weight. You don’t have to go vegan. You don’t have to join Weight Watchers. You don’t have to do a cleanse or do Adkins or start a Keto program or cut everything out that you enjoy. You don’t even need to exercise. I say this carefully because exercise IS important, but if you have a lot of weight to lose, it can be more harmful than good. I truly believe it is more important to clean up your diet before you even consider exercising.
Creating a calorie deficit.
All of the above diets/food plans have been successful with one person or another because they in fact, created a calorie deficit in their bodies–their bodies used the stored calories/energy because they took in less than they needed for the day/week/month. But for most people, Paleo/Primal, Keto, Adkins, are not sustainable for the rest of your life (especially if you are a food blogger like me or have ANY sort of social life whatsoever). There are special occasions where you are going to have the birthday cake or the bread basket with dinner or the side of fries (God, do I love fries). What is most important, is that you don’t have ALL the cake or fries, etc. Trust me, there were plenty of fries that led to the weight gain!
Instead of cutting out everything, I decided I would log my calories (journal them, if you will) with an online food app. I happen to use My Fitness Pal. My calories right now per day are set at 1431. That means I have to eat less than that total in order to lose weight. Since it is challenging to stay under that amount (especially because I like to drink wine with dinner), I exercise 80-90 minutes a day to raise the calorie limit. I like to leave about 1500 calories for dinner.
It has long been argued that weight loss is not possible if most of the calories are eaten at night or if you drink alcohol, but I am here to tell you that is not the case. As long as you have a calorie deficit, your body will lose weight. The key is finding out how many calories YOU personally burn daily just to keep your body alive and running (or your BASAL METABOLIC RATE), and accurately logging everything you eat and drink to create a deficit. It will not matter if it is 100 calories less a day or even just 25 calories, eventually the deficit will add up to 3500 calories and that is roughly one pound. To find your basal metabolic rate (or BMR, and also called resting metabolic rate, click here.
Of course, logging everything you eat does take time, and meal prep takes a lot of time, so it can be a little daunting and seem overwhelming/like a part time job at first.
That’s where Fit Eats comes in!
Fit Eats is a café and food delivery service now serving Sacramento and anywhere within a 300 mile radius of Sacramento. They offer meals for breakfast, lunch and dinner and all of them are labeled with nutrition information. They also offer meals that are gluten free, dairy free, Paleo, freezable, and vegetarian. You can buy 1 meal at a time or buy meals for the whole week, as there is no membership or minimum order.
You can buy the meals in the Fit Eats café (they have a downtown location as well as a location in Roseville), but I recommend ordering online to make sure you get exactly the meals you want because they don’t always have everything in stock in the grab and go refrigerators. If you don’t feel like getting in a car, you have have your meals delivered to your home or office for a $2.99 delivery fee on Monday, Wednesday, or Friday, and the delivery fee is waived if your order is over $50.
Since I work fairly close to the downtown location, I like to pick up my meals. They come in an insulated Fit Eats totebag that you can choose to purchase or return to the store. My typical order is 4-5 meals, and I end up freezing one of them just to have an emergency meal on hand if my husband goes out of town or out with friends on a particular evening.
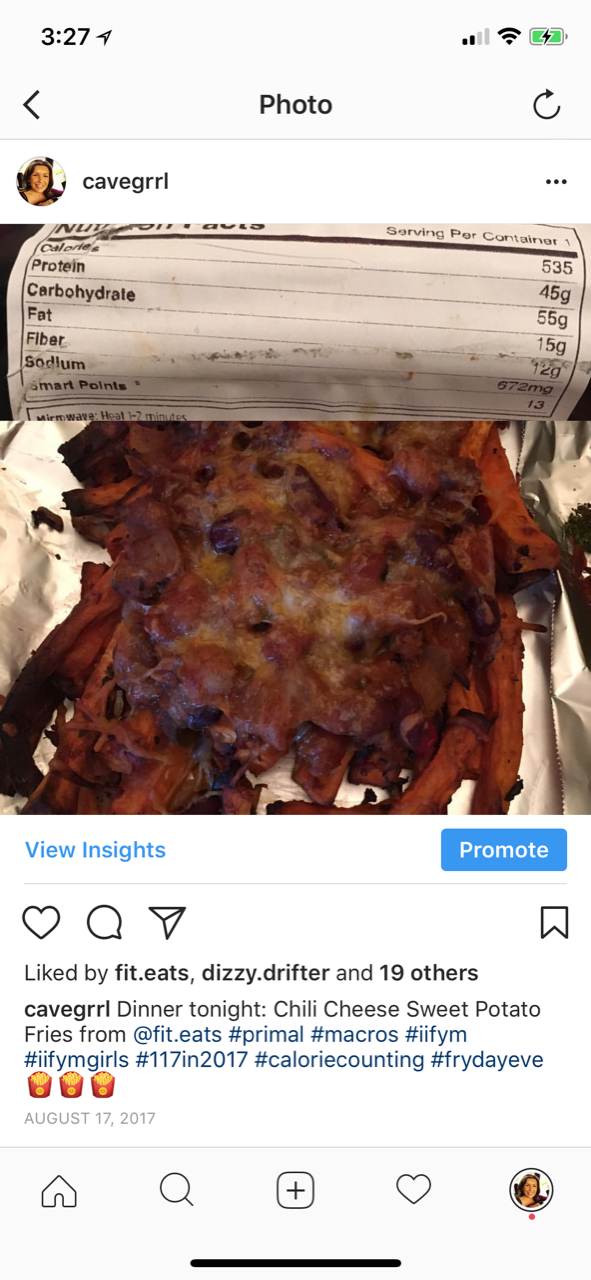
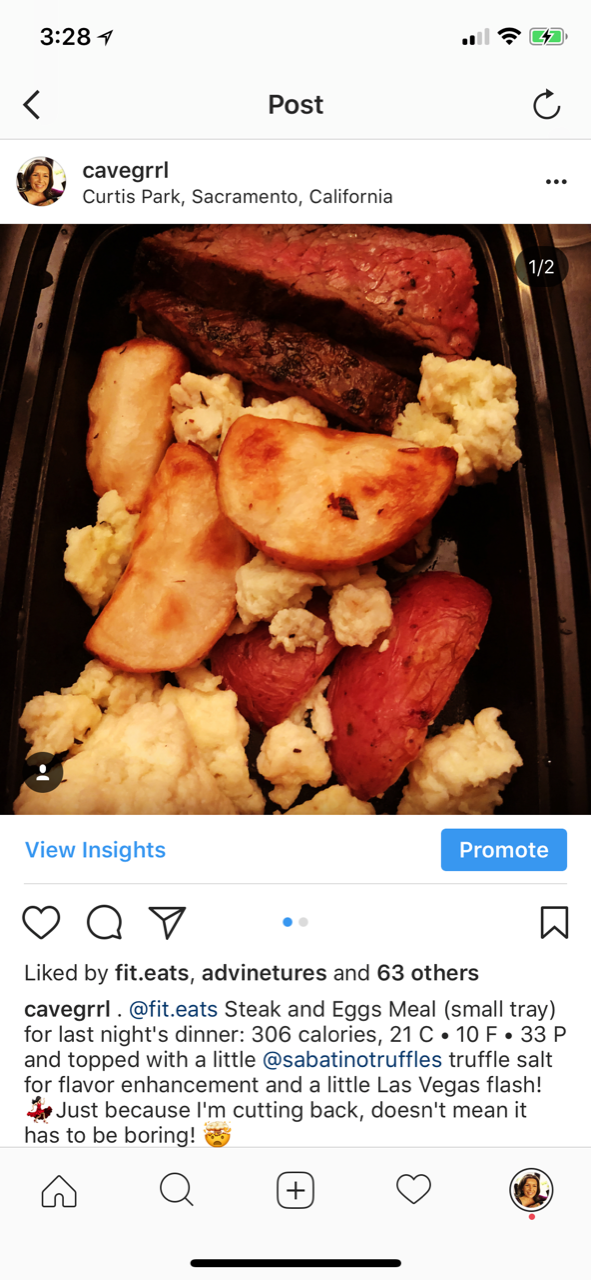
The menu rotates weekly, some menu items leave, some meals are added, some meals remain for a while. Like any good restaurant, this depends on the availability and seasonality of the ingredients being used. The meals come in small and large size and cost anywhere from $7.99 to $12.75. Again the nutritional info is printed on the package, and so are all of the ingredients. The same information is on the Fit Eats website so you can know exactly what you are getting before you order. In addition to macronutrient count, they also list Weight Watchers point values.
But I am all about the macros and calorie counting. When the Fit Eats menu comes out every Thursday, I try to choose meals that are the highest in protein, and labeled as Paleo or at the very least gluten free. Also a plus if it is freezable, but not a deal breaker. I mainly enjoy Fit Eats meals (large size) for dinner, as I usually eat a Quest bar for breakfast and steamed broccoli and egg whites for lunch. Sometimes, I’ll have a light cheese stick or turkey jerky for a snack.
Lastly, Fit Eats meals taste great! I have enjoyed every meal I have purchased so far. Some meals more than others, but everything has been above average and far better than any pre-portioned meal I have ever tried. It’s very hard to go back to anything in the freezer aisle at the grocery store after ordering from Fit Eats. Below are some of my favorite meals and examples of what you will find on the menu. Many of them are already on MyFitnessPal, so all you have to do is search for them! It’s that easy.
Steak Tacos with Corn Tortillas

Paleo Alla Carbonara with Spaghetti Squash
(one of my all-time favorites)

Chili Cheese Sweet Potato Fries
Rosemary Pork Loin with Red Potatoes and Butternut Squash
(another one of my favorites)

Steak and Eggs
Shepard’s Pie

Ready to count your macros and enjoy delicious food while doing it? To get a $10 credit to your Fit Eats account, use the promo code kristy65192 at check out.
You can find Fit Eats on Facebook here, follow them on Twitter here, and follow them on Instagram here.
You can follow my fitness journey and my other shenanigans in food, wine and travel on Instagram here.
Gluten Free Breakfast Pizza with Sweet Potato Crust
One of the things I miss the most being on a Paleo/Primal diet is BREAD. In that category would also be a nice, not too thin pizza crust that I have never been able to replicate with cauliflower. I also wanted to be able to PICK UP the slice of pizza and not have to use a utensil. A lot of gluten free pizza recipes require and knife and fork and leave me feeling like I am eating some sort of soggy polenta dish with tomato and cheese on top.
I finally came up with a ratio/blend of ingredients that make a great gluten free crust, and I will probably never make a cauliflower crust again. I felt confident enough about the crust recipe’s texture and flavor that I made it at the 2017 California State Fair Cooking Demo on the last morning of the fair. Try for yourself, and use the following crust recipe as a base for any kind of pizza you want to make. I am posting the exact recipe below that I made at the California State Fair. 🙂
PS: You’ll need a food processor, 3 sheet pans (at least 9 by 13) a cook top of some kind, and an oven to make this! (Just throwing that out there!) For the oven, place one rack in the middle and one nearer to the top.
Crust Ingredients:
2 large sweet potatoes (you can use orange or white, whatever you prefer)
1 1/4 cup nut flour of your choice (I used a ground pistachio/almond blend)
3 eggs
3/4 cup grated parmesan cheese
1/4 water
1/4 cup olive oil
1/2 Tbs garlic powder
1/2 Tbs dried oregano
1/2 tsp sea salt

Step One
Peel and cut your sweet potatoes into roughly 1-2 inch squares and pre-cook them. You can do this any way you want, but I would stay away from boiling them because this will leave them waterlogged and soggy. My shortcut is the microwave. Cook them until they will mush between your fingers with almost no effort. You can also bake them if you want. Tip: Cook potatoes the night before, or even a few days before to shave a little bit off your pizza prep time.
Step Two
If you are making the breakfast pizza, this is the part where I go ahead and PREHEAT the oven and cook my bacon for the topping at the same time. Even if you’re not making the breakfast version, SURELY you’ll want bacon on your pizza anyway! 🙂 This is an easy way to get the bacon super crispy without burning it. I use a sheet pan lined with parchment paper to cook the bacon. While you’re at, go ahead and line THREE sheet pans with parchment paper. Two you will need for the pizza crust, so parchment paper line them and set them aside for now. The remaining pan will get a layer of parchment and then your 6-10 slices of bacon. Don’t crowd the pan too much, or the bacon won’t cook evenly and it won’t render (get crispy). Once you’ve put the bacon on the sheet pan, place it in the oven and THEN turn the oven on. Heat it to 400°F. You’ll want to cook the bacon slow, so a cold oven is OK to begin with. By the time you’re ready to put your crust in the oven, your bacon will be almost ready and your oven will be the temp you need it. Now on to the crust!
Step Three
Grind the nuts of your choice (I used a mixture of pistachios and almonds–1 cup ground pistachios, 1/4 cup ground almonds) until they look like coarse sand/start sticking to the sides of the food processor bowl (we don’t want nut butter, just finely ground). Pulse in your parmesan cheese. Add the salt, garlic powder and the dried oregano. Then begin adding your sweet potatoes in stages. You will need to add the water, olive oil, and 3 eggs in between adding the potato pieces so that the mixture continues to blend well. Depending on the size of the potatoes, you might not need to add all of them. Consistency-wise you are looking for a thin cookie dough, but thick cake batter. It won’t be the consistency of pizza dough from a pizza parlor, it will be more loose than that.
Step Four
Spread the dough mixture onto the other parchment-lined pan. Spread evenly across the pan, no thinner than a 1/2 inch thick. At this time, you can check your bacon. It may or may not be done depending on the thickness of the bacon slices. If it is not done, you can leave it in on the top rack and set the timer to remind you to check it (I go in 5 minute increments). Also, make sure to pour any excess grease off of the pan. Pour the grease into a coffee cup or something you can retrieve it from for later use (I will get to that later!) Place the dough pan on the middle rack and bake for 10-12 minutes.
Sauce Ingredients:
15 oz can crushed tomatoes
3 Tbs tomato paste
1 Tbs chopped garlic
2 Tbs chopped fresh oregano
1/3 cup chopped fresh basil
1/2 tsp salt
Step Five
If you want, you can buy a jar of pizza sauce and skip this step all together. I do this when I am pressed for time. If not, add your crushed tomatoes, paste, and herbs and salt to a saucepan and cook together while the pizza crust does it’s first bake for the 10-12 minutes. You will be simmering the sauce until you need to use it. Also, the bacon should be getting done by now, so check it again and take it out if necessary.
Sausage and Shallots Preparation Ingredients:
2 shallots
Reserved bacon grease
1 lb ground turkey
Step Six
While the sauce is cooking and crust is baking, dice up the shallots. Then, in another saucepan separate from the one you used for the tomato sauce, pour some of the bacon grease you reserved from earlier, heat it up, and sauté the shallots until they are translucent. Add the ground sausage (turkey or pork, whatever your preference) and cook with the shallots, allowing the meat to cook through and brown. When the meat is browned, turn off the heat and set aside. At this point, the first bake of the crust is probably done, so go ahead and take out the crust and place the pan on a heat safe surface.
Step Seven
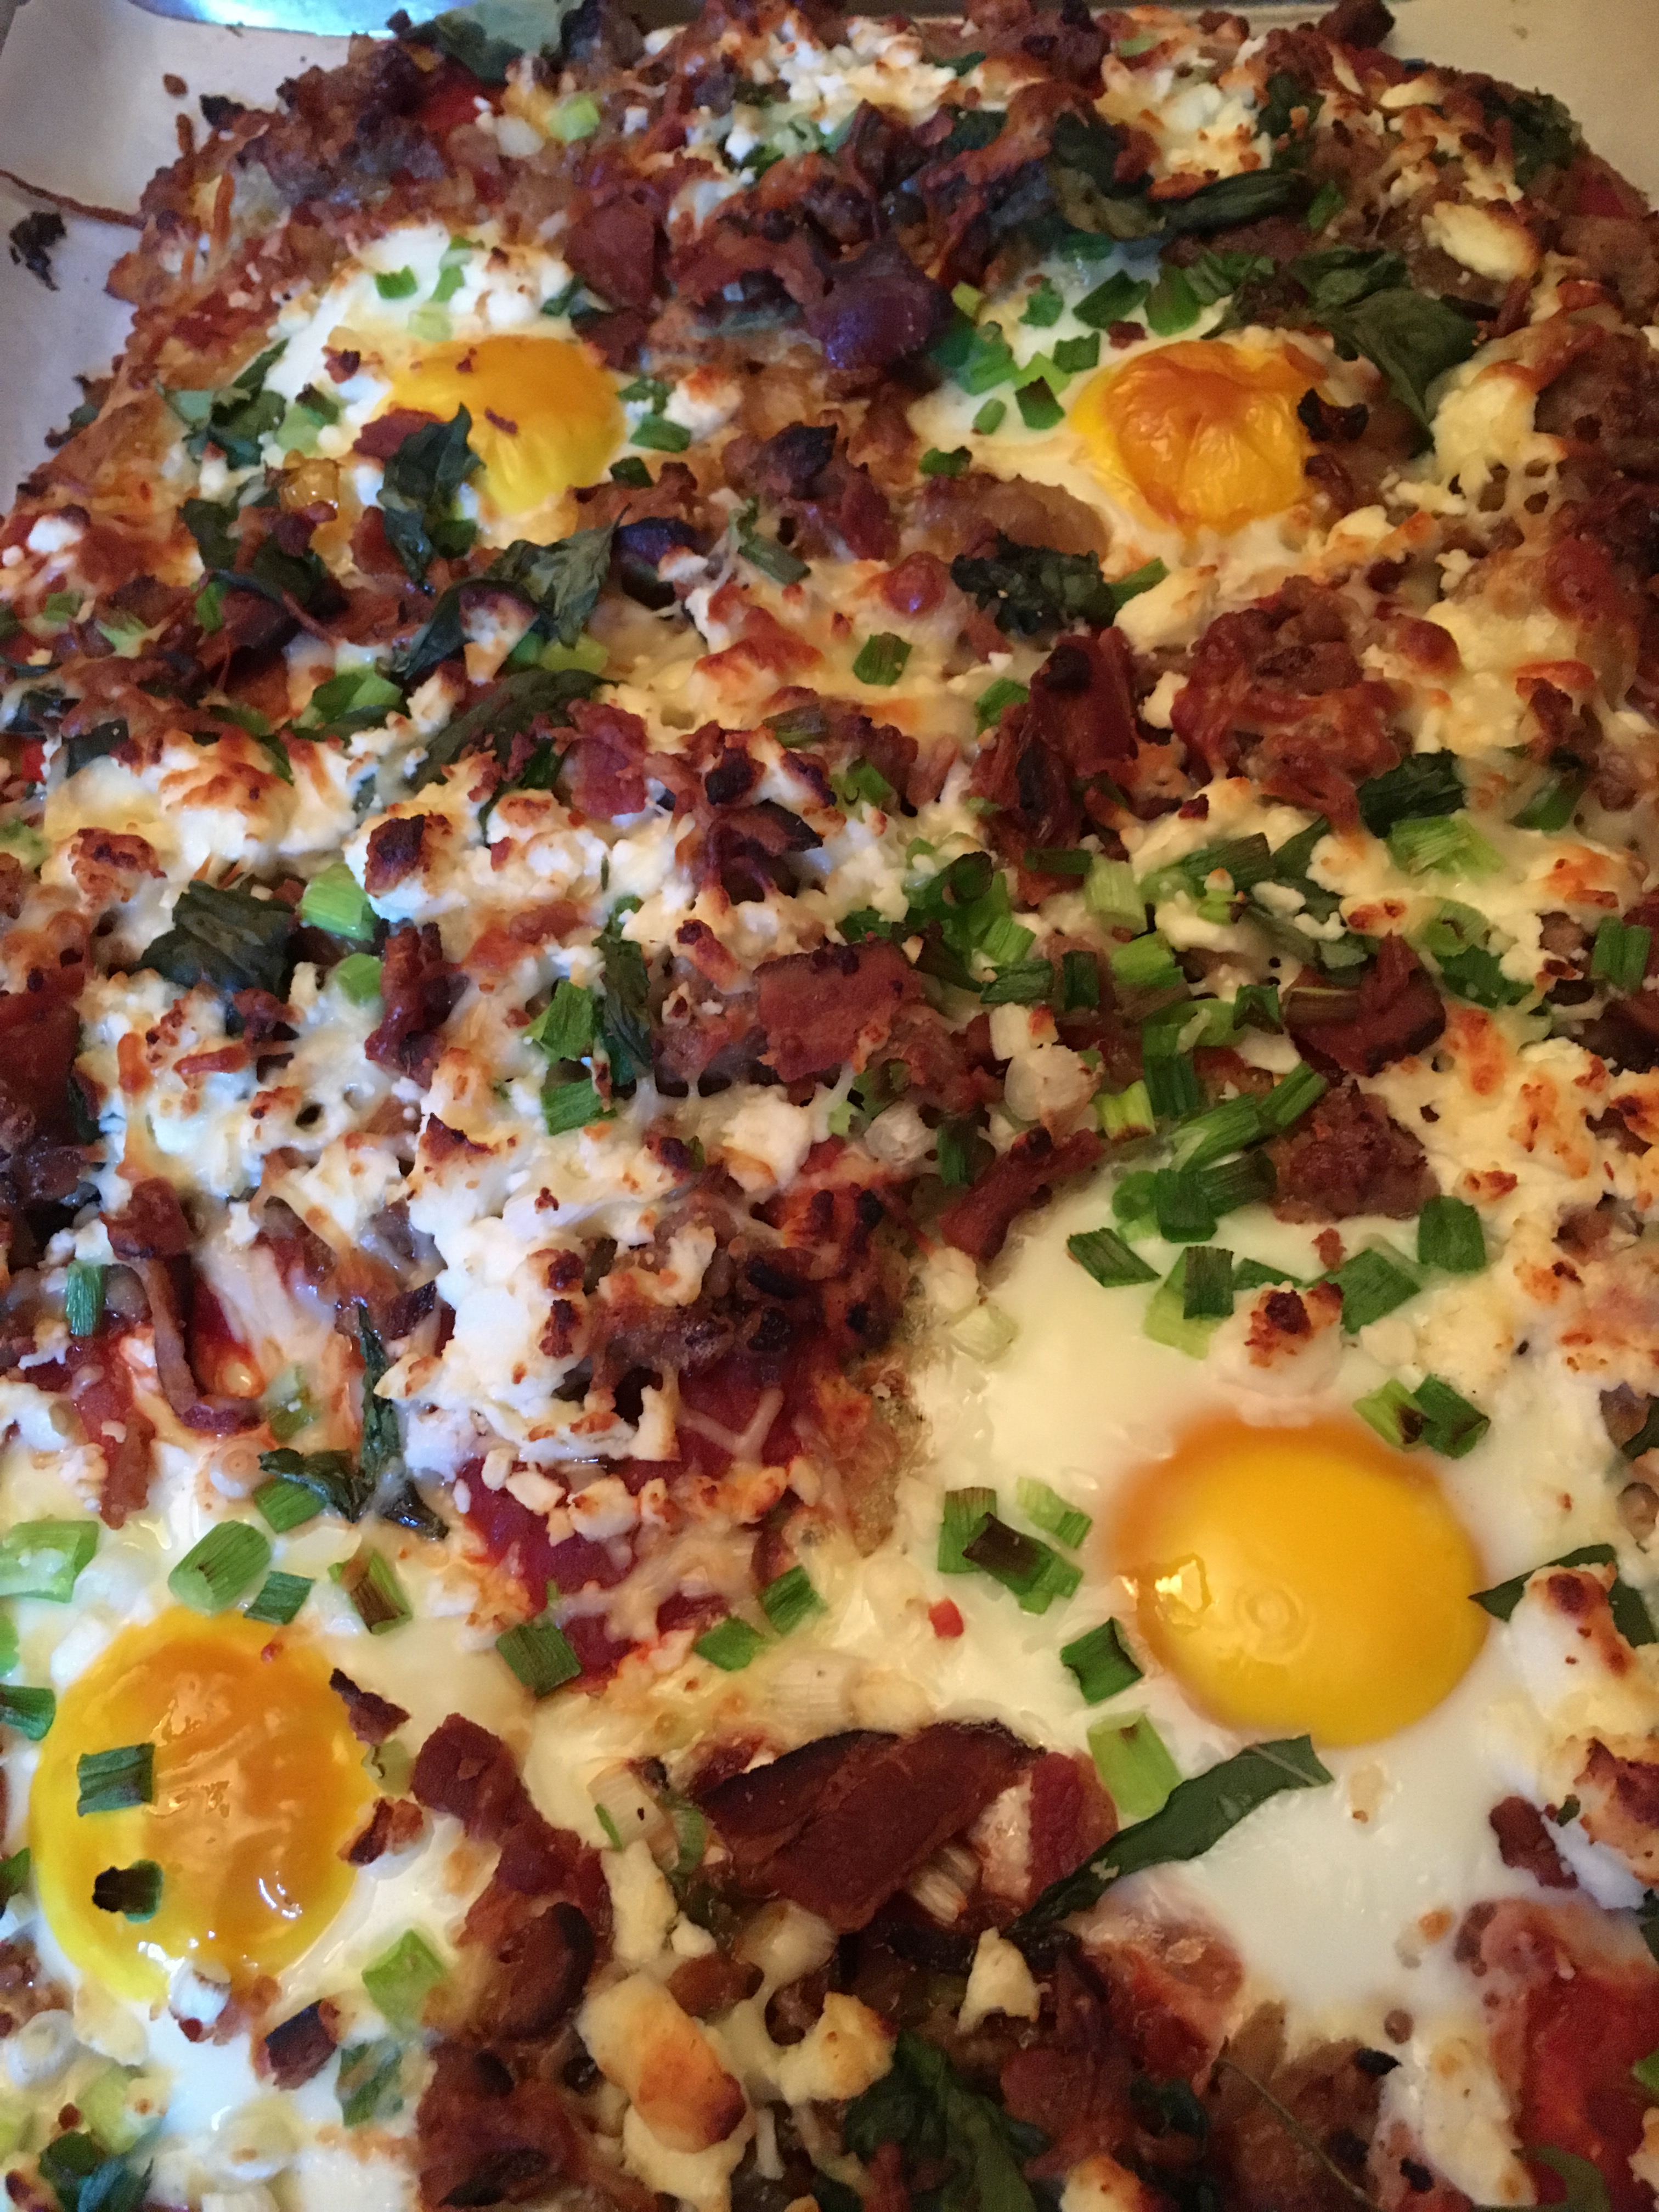
At this point, fetch the third parchment lined pan, and invert it, making sure the parchment paper stays put. Place it on the top of the crust and flip it over. This is so the pizza crust will cook through/dry out, and you will be able to pick up the pizza/not eat with a fork! Your oven should still be at 400°F. If you are making the breakfast pizza, this is the part where you will peel the parchment off the top of the crust, use the back of a spoon and make little “wells” on the pizza. I make 4 wells for 4 eggs. The wells I am describing are little indentations so that when you crack the egg on the pizza crust, it will not run all over the top. Instead, it will be captured in the little bowl you made for it. Once you have made the wells and cracked the eggs into them, carefully place the crust into the oven for another 10 minutes. This time, use the rack that is higher in the oven, so the eggs will set.
Toppings:
1 bunch green onions
½ cup sun dried tomatoes
6-10 slices bacon
2 cups grated mozzarella cheese
Step Eight
OK, we’re almost done! For final prep, chop the green onions and set aside. Also, chop the bacon you prepped earlier and set aside. I also like to measure out the sun dried tomatoes and the cheese and put everything in a row (so I don’t leave anything out). It’s like a little pizza assembly line. 🙂
Step Nine
Take the crust out (the eggs on top should be almost set). Turn the oven temp up to broil (low), you will need to use the oven one last time after you top the pizza (so that the cheese will melt). Begin with the tomato sauce and spread around the crust, being careful to avoid the eggs on top. Then add the sausage, bacon, sun dried tomatoes, green onions, and top with the mozzarella cheese. You should still be able to see the eggs through the toppings.
Step Ten
Place the pizza back in the oven until the cheese on top melts and browns. I like to keep an eye on the pizza through the window on the door of the oven to prevent over-browning. Once the cheese on top is melted, take the pizza out, allow to cool 5-10 minutes before cutting. This is the part where I set the table. By the time I am finished setting the table, the pizza is ready to cut and serve!
Did I leave out anything? Do you have questions? Contact me here!
For other adventures in gluten free pizza, you can click here and here. There’s even here.
If you don’t already, please follow me on Facebook here, on Twitter here, and on Instagram here. Thank you, and please enjoy the recipe! 🙂
Listen to Me Today on Serious Talk. Seriously.

Today I am a guest on the podcast Serious Talk. Seriously. hosted by Johnny Flores! We chatted about my rebranding of cakegrrl.com to cavegrrl.com, Paleo, gluten free, bread, Oprah, the importance of having a supportive significant other, alopecia, the changing roles of men and women and even vocal fry! Click below to have a listen and if you enjoy, you can subscribe to the podcast on iTunes HERE or on Stitcher here. Click the link below to listen! 🙂
http://app.stitcher.com/splayer/f/58636/48107684
You can like Serious Talk. Seriously. on Facebook here, follow on Twitter here.
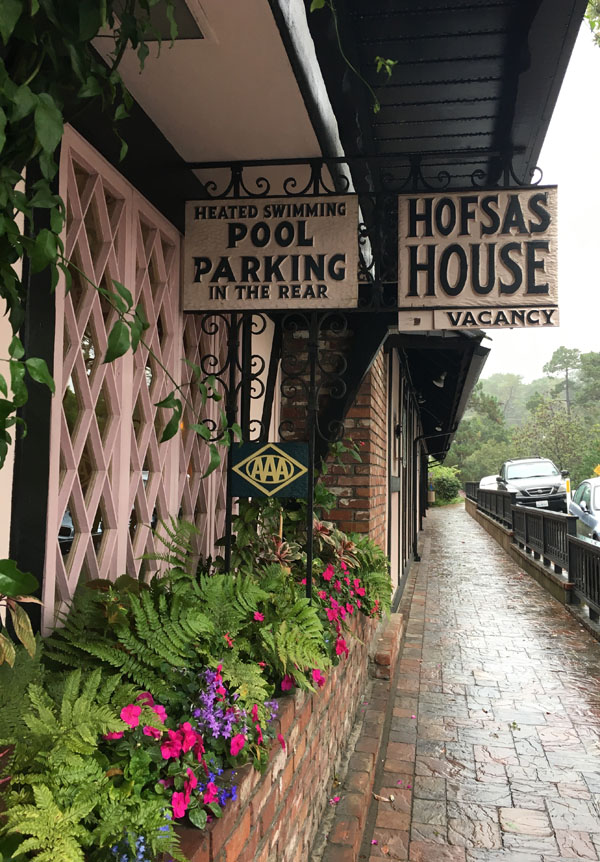
One-of-a-Kind Hofsas House Hotel Celebrates 70 Years

In Carmel-by-the-Sea, the Theis family is celebrating 70 years of European hospitality in their Bavarian-inspired Hofsas House Hotel.
The Hofsas House Hotel is within walking distance to the beach, multiple restaurants and shops, and several tasting rooms.
The hotel is also within just minutes driving distance to Monterey, Pebble Beach, Big Sur and Pacific Grove. The Hofsas House’s boasts 38 spacious rooms (all unique) with fireplaces, private balconies, wet bars, kitchens and patios, and the Dutch doors in every room allow guests to welcome in the ocean air.
Before I jump into all the amentities the Hofsas House has to offer, I want to talk about the hotel’s rich history, and what makes the hotel so special. On the Saturday morning of our stay, Andy and I met with Doris Theis, the mother of the current owner of the hotel, Carrie Theis. She was such a joy to interview and she filled me in on a lot of the history of Carmel as well as the Hofsas House.
The Hofsas House story begins with a woman named Donna Hofsas and her husband Fred. They moved to Carmel from Los Angeles in the late 1940s, and purchased four cottages in town. They lived in one of them and rented out the other three. The cottages were the humble beginnings of the hotel, as the main building was built in 1957, adding 25 more rooms.
Donna commissioned her friend, artist Maxine Albro (also famous for painting a fresco at Coit Tower in San Francisco) to paint a Bavarian-themed mural which has since been restored and still remains as a lovely welcome to guests. A swimming pool was also added at that time, making Hofsas House Hotel a Carmel destination.

Fred Hofsas created the mosaic coat of arms, the Latin inscription translates to English as “Leisure with Dignity”.

The various additions to the hotel proved to be very stressful on their marriage, and eventually Donna and Fred divorced. Donna retained ownership of the hotel and in the mid-1960s, she added the north wing and a meeting room. Also around that time, she built her house, and the cottage she had occupied became a family suite (Room 9/10) and is still available to guests today, as well as the three other original cottages.

In 1981, Donna passed away, and her only son Jack took over the Hofsas House Hotel. Which brings us to Doris, the incredible lady I spoke with about the history of the hotel. Doris was Jack’s wife. Together, they had two children: Carrie and Scott. The hotel was very much a family affair and Jack ran the hotel until 1996, when he passed away. Doris and Scott then took over the management from 1996-2000.
Then in 2000, Carrie Theis returned to Hofsas House to become general manager. Carrie was no stranger to the Hofsas House Hotel, because she had been escorting guests to their rooms since she was 8 and working behind the welcome desk at check-in since she was 12. Carrie had pursued a college education and a career path of her own, however, felt it was important to carry on her grandmother’s legacy of service and hospitality at the hotel.

And the hospitality is really what keeps the guests coming back to Hofsas House Hotel. I’m told that there are many guests that return because they know the history and the family and there is simply no other place in Carmel where they would rather stay.
I can understand that. My first visit to Carmel was in June of 2013 and I stayed at Hofsas House Hotel. It was my birthday weekend and incredibly special. I think once you know the family and the history of the hotel, you just have to stay there. For me, it’s like being part of the hotel’s legacy. Below is a shot of the bedroom in which we stayed during this visit.

Below is the incredible view from outside our room.

Hofsas House Hotel is located on San Carlos Street, north of Fourth Avenue in Carmel-by-the-Sea. For more information, call (831) 624-2745 or visit www.hofsashouse.com. You can like them on Facebook here and follow them on twitter here.
Before I go on to recommend some dining in the area, I’d like to list some add-ons the Hofsas House offers that you can book during your stay:
• First is the Monterey Wine and Cheese Pairing (which we enjoyed, there were two cheeses and a bottle of wine in our room upon arrival) for $30. It’s pretty wonderful to finally get to your hotel room and there’s a chilled bottle of wine with cheeses waiting for you!
• Champagne and Cheese Pairing with Hofsas House engraved flutes for $50.
• The Carmel Wine Walk-by-the-Sea Passport for $65.
• In-room his and her couples massage starting at $160 for 45 minutes.
• Decoration of room in a romantic, anniversary, or birthday theme for $75.
• Golf packages that start at $65 per person including cart.
• 2-day pass for the price of one Monterey Bay Aquarium tickets.
And right now and valid until December 31st, 2016, you can celebrate Carmel-by-the-Sea’s 100th Anniversary and Hofsas House Hotels 70th Anniversary with a History Tour! Delight in the special charms of Carmel on a leisurely, fun and informative two-hour guided walk past enchanting Fairy-tale cottages, through secret pathways, hidden courtyards and award-winning gardens. At the end of the tour, you’ll feel like a local. Cost is $25 per person. Guests who book this package will also receive a Carmel-by-the-Sea history book complimentary upon arrival (value $26.00). Learn about the 100-year history of Carmel-by-the-Sea. When booking use promotion code: HHWALKS. (Block out dates apply.)
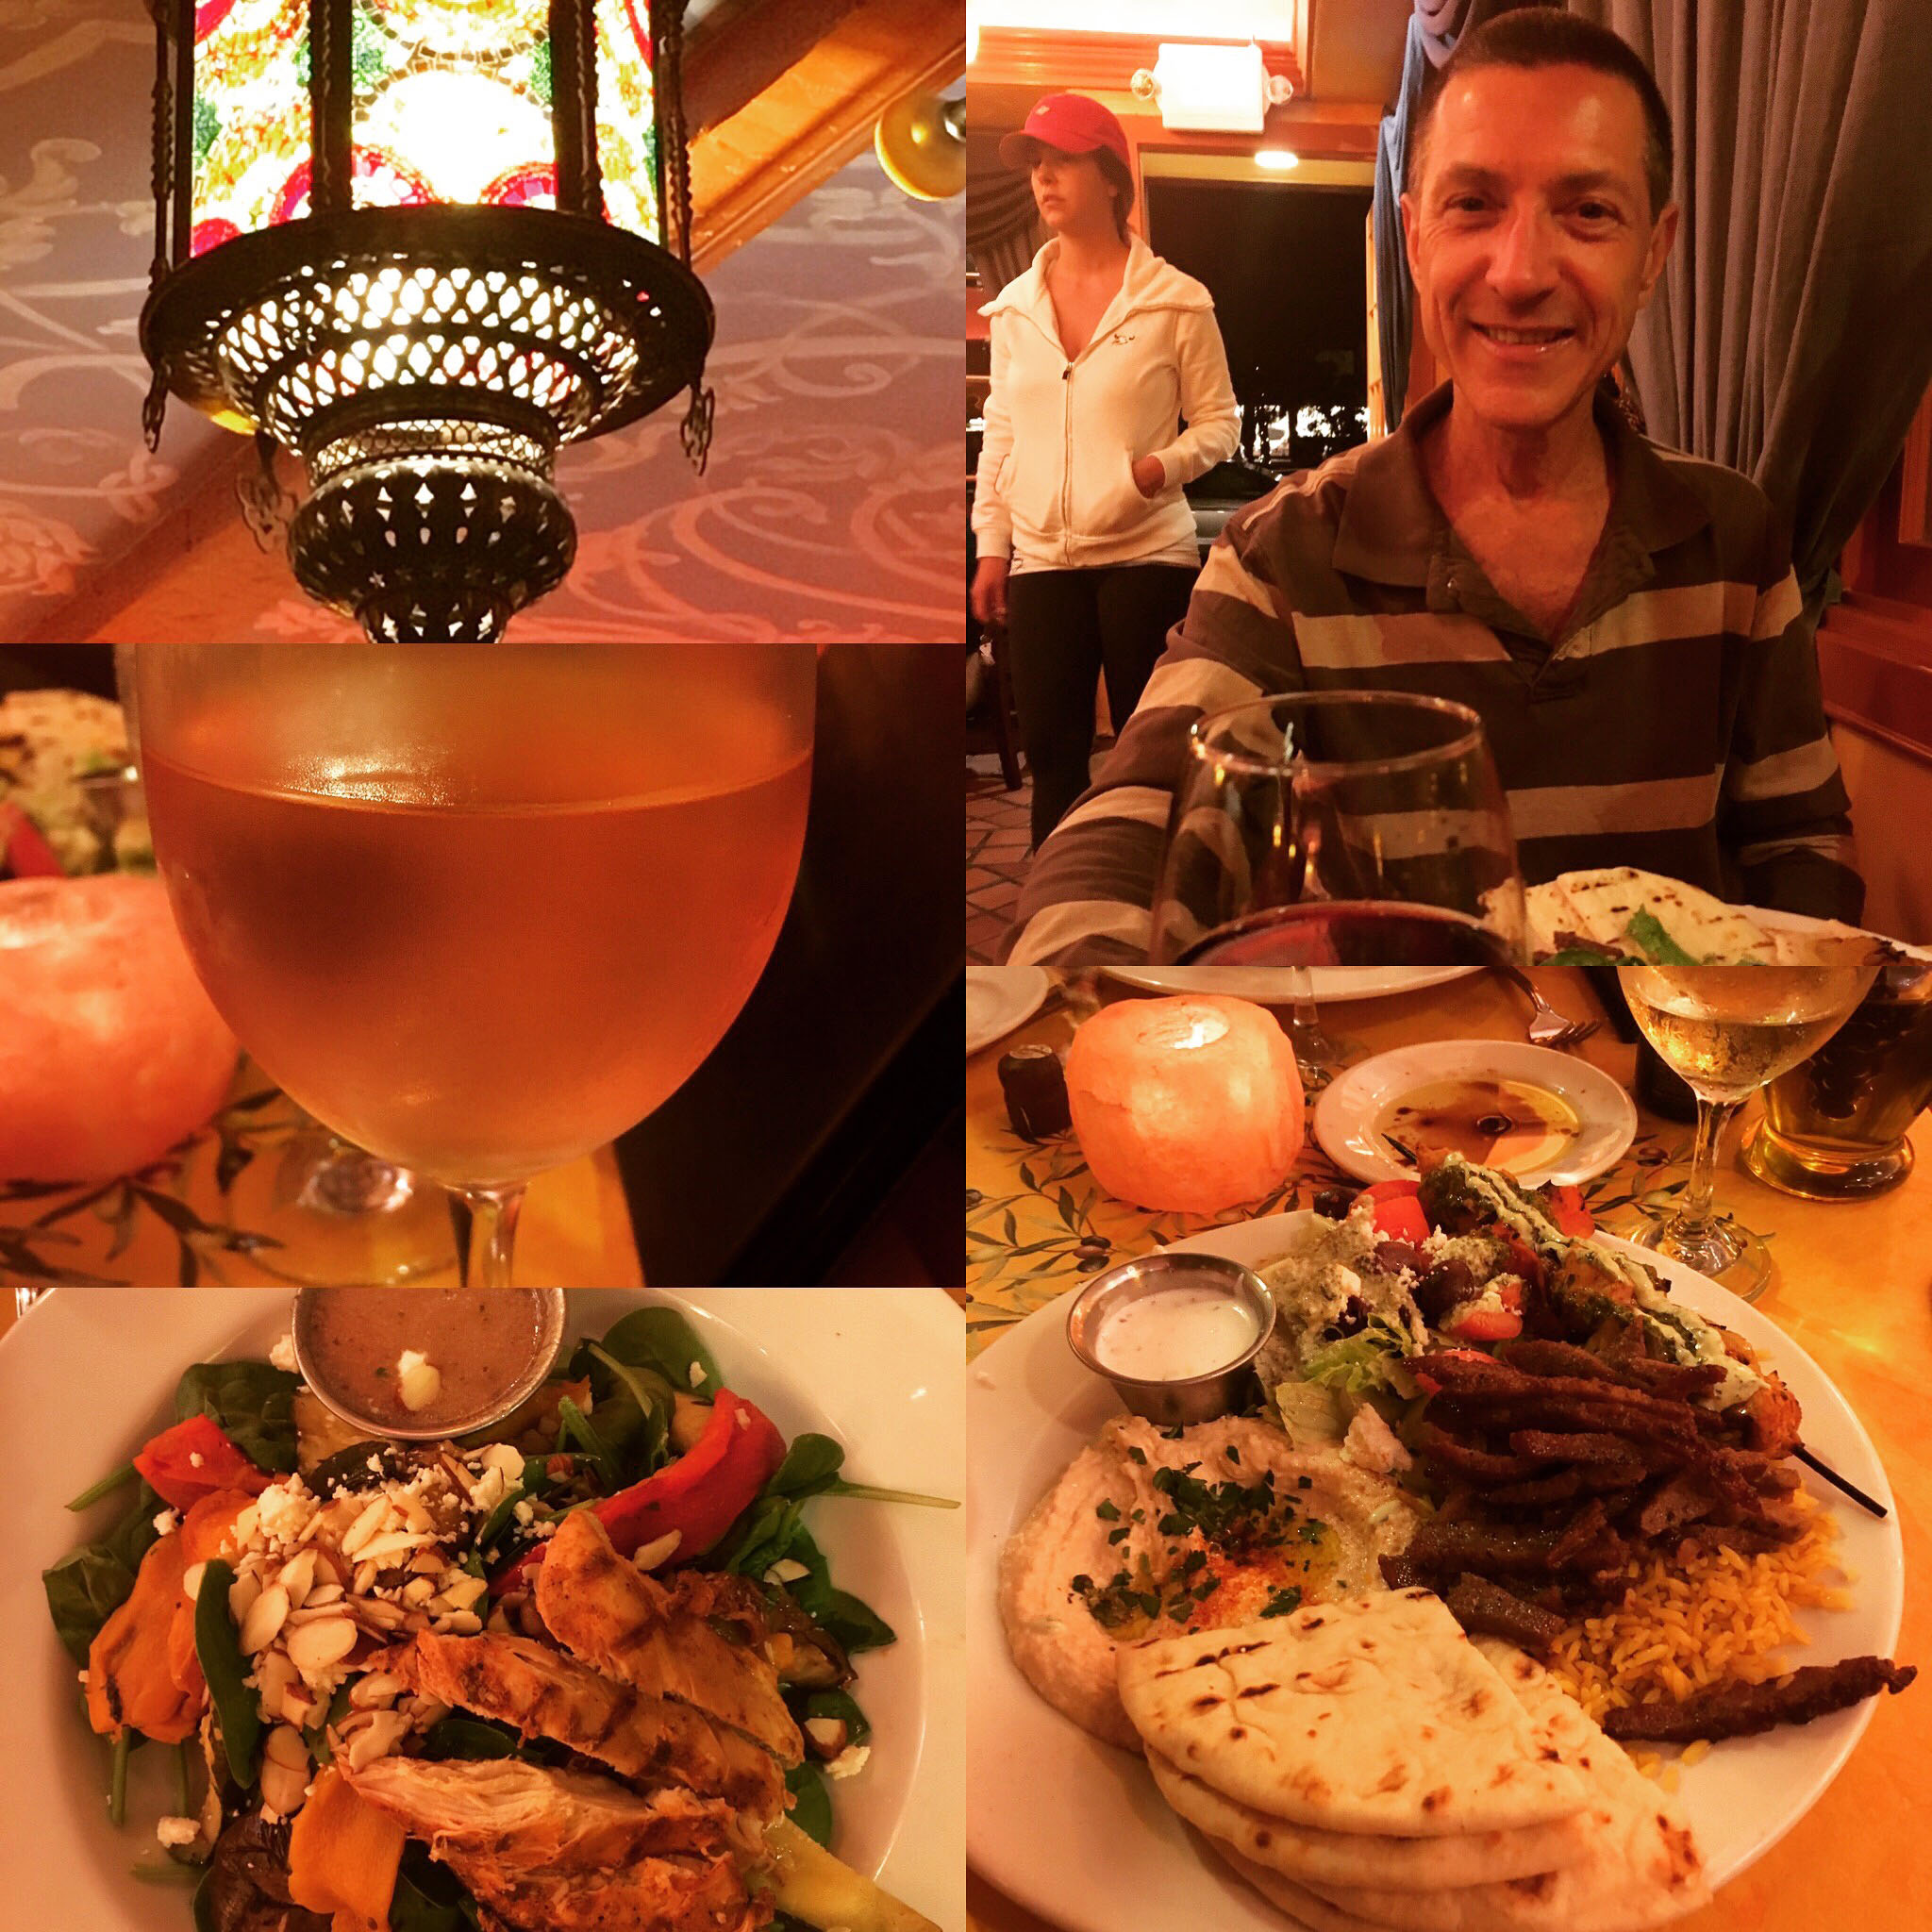
On Friday evening, we were hoping to visit, Dametra Cafe. Since the restaurant was completely booked, we ended up at Mediterranean Restaurant (the sister restaurant of Dametra and just a few doors down). I have to say, if you can’t get a table at Dametra, Mediterranean is the next best thing. OK, well, except for a few menu items, it’s exactly the same thing. And you even get the same live music! They did not host our dinner, but I am recommending them as a favor to YOU! If you like Greek-Italian-Middle Eastern food combined, you should check it out!
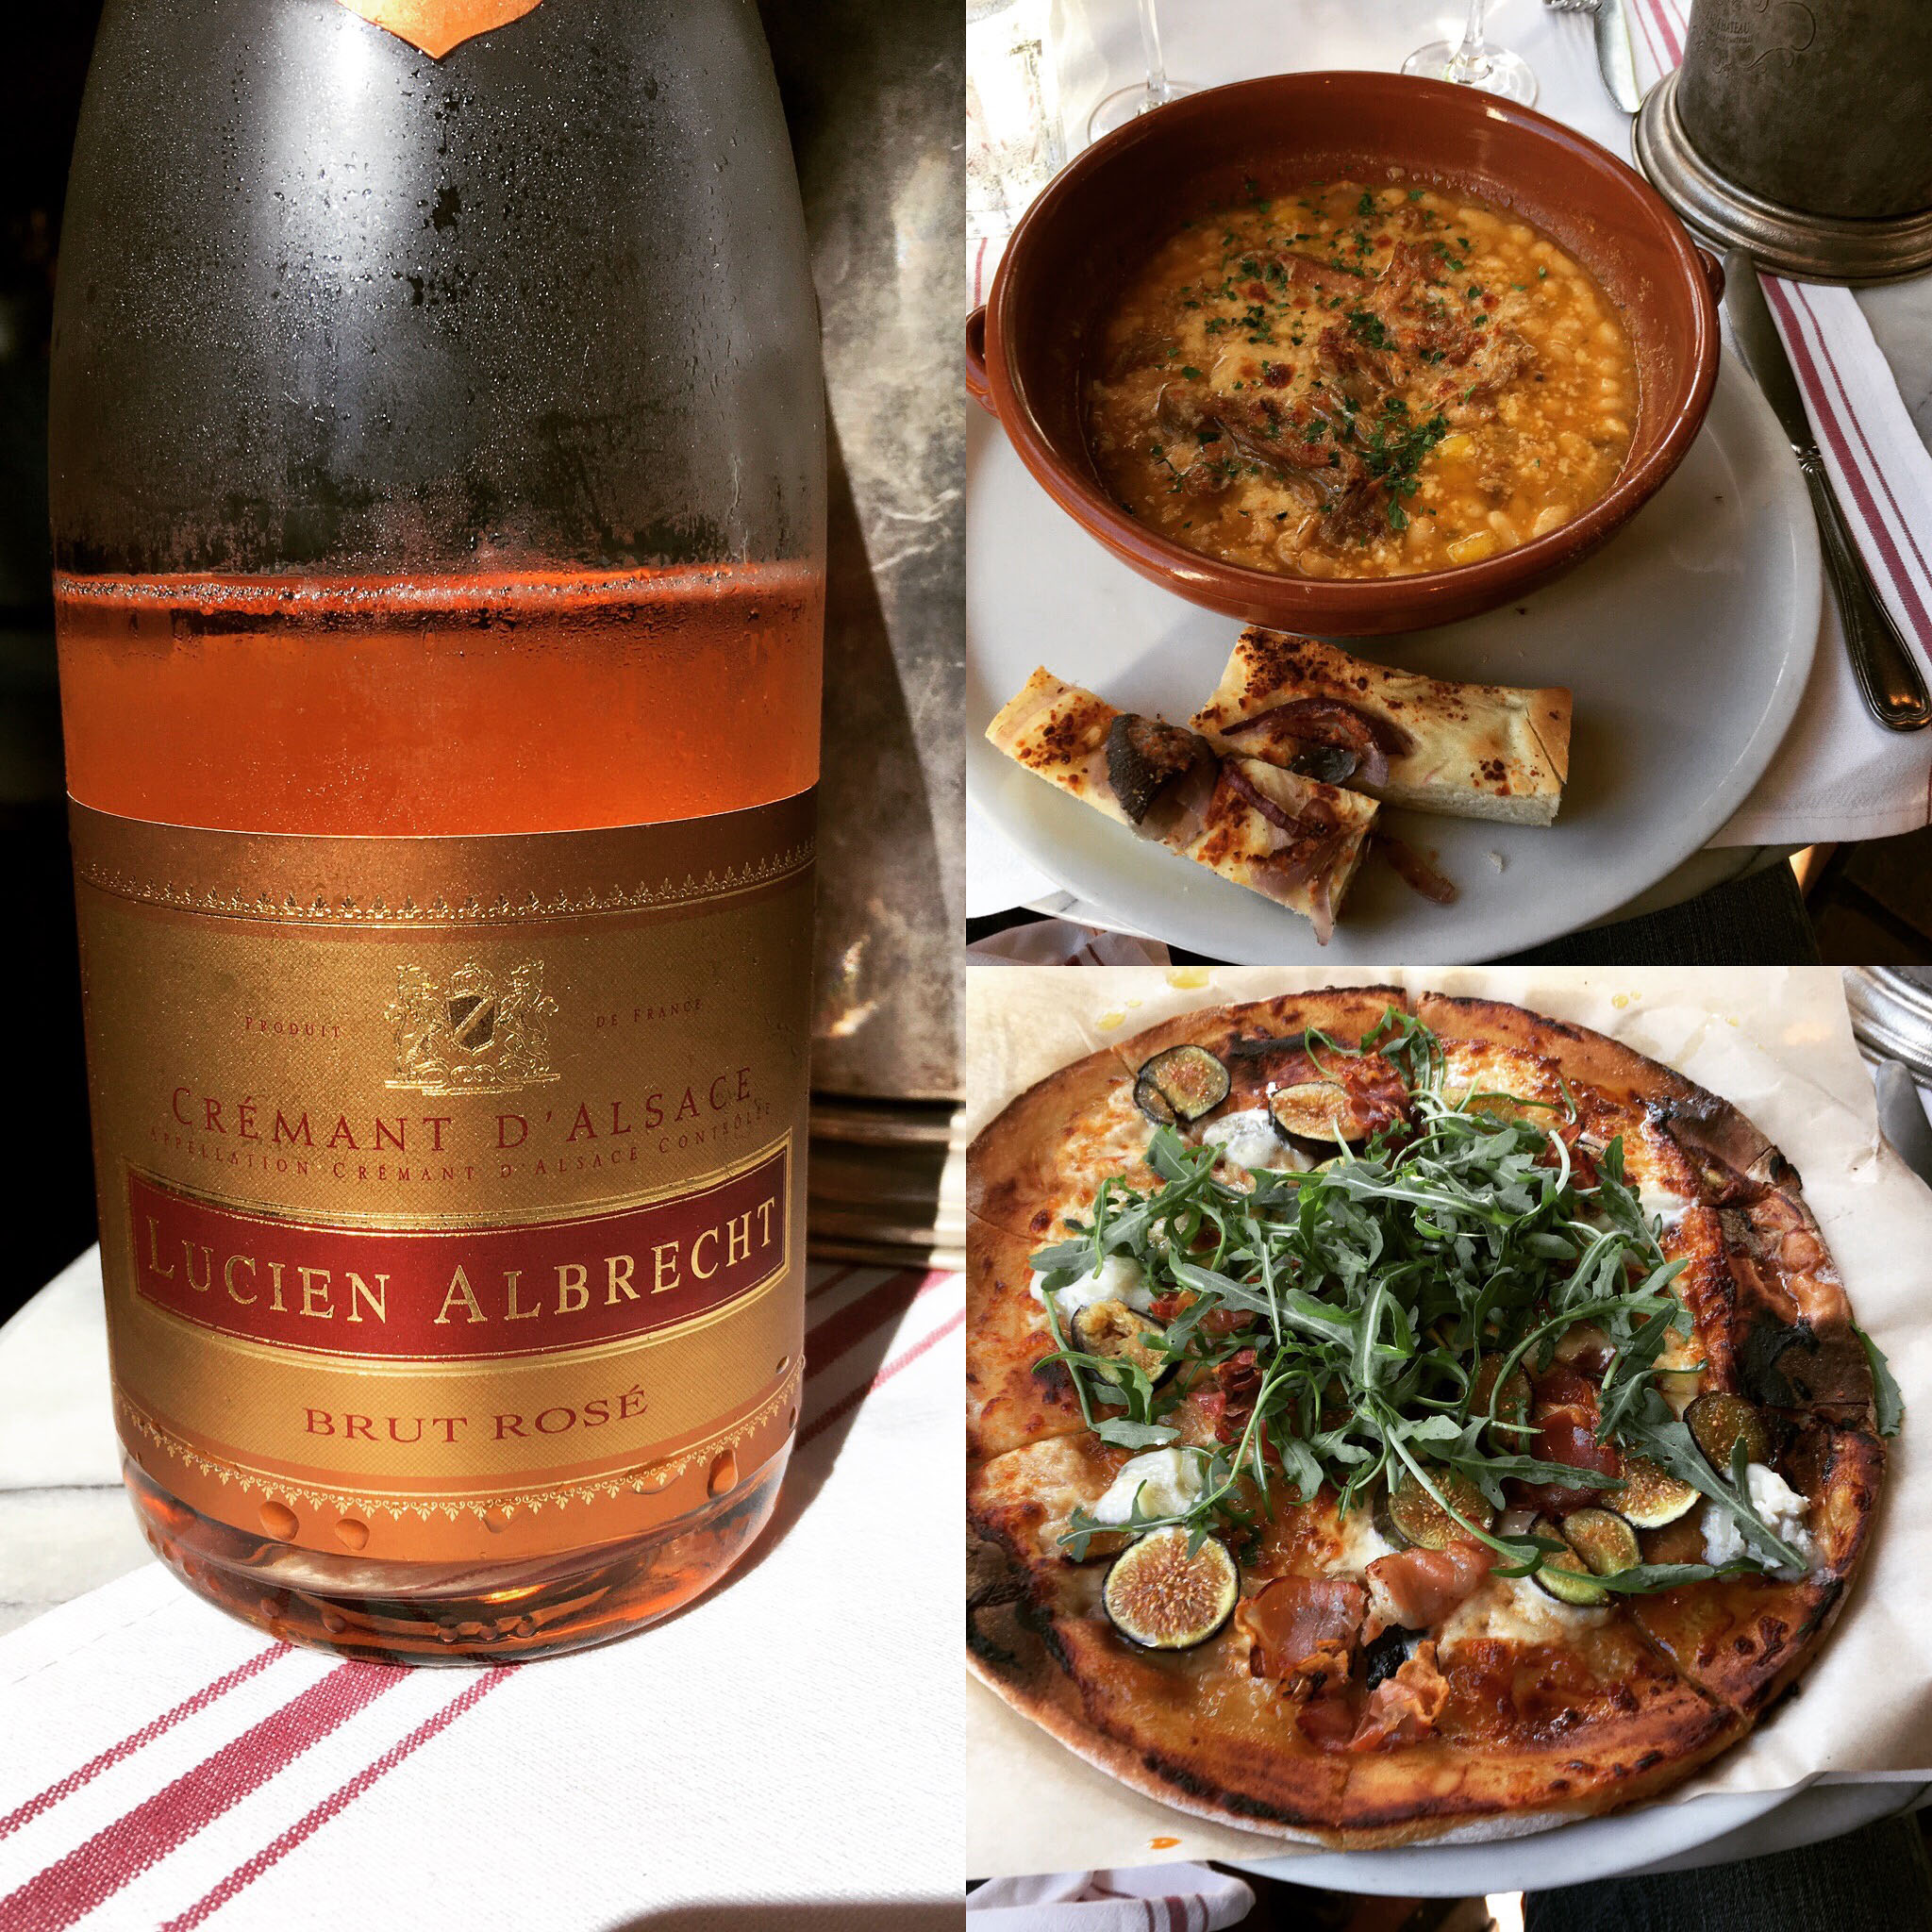
Another routine in Carmel for us is a lunch stop at La Bicyclette. It’s my annual excuse of the year to eat a high calorie lunch and love every bite. 🙂 Right now they have a cassoulet special (you must try). And they have a gluten-free dough which they can substitute for any pizza on their menu (I picked the fig, arugula & prosicutto). Pretty much heaven with the Alsatian sparkling rosé we had.
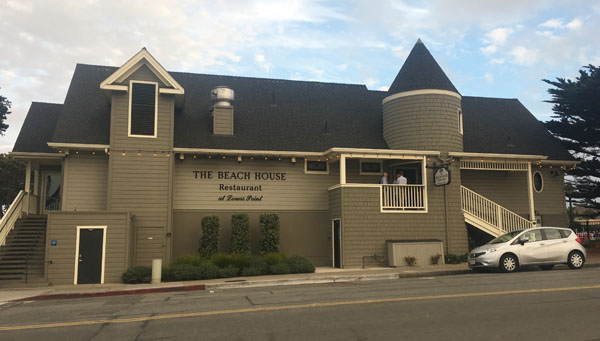
On Saturday evening, we visited Lover’s Point walked around the coastline for a while, and then and went to the Beach House at Lover’s Point for dinner. It was one of the most beautiful walks I have ever taken and the weather was still really cooperating. It wasn’t cold or rainy that evening.


The Beach House at Lover’s Point is a very popular restaurant. I highly suggest making a reservation and then arriving a little early to have a drink at the bar. The restaurant is right on the water, so the views are spectacular.

For dinner we started out with a Brussels sprouts appetizer. It was prepared with roasted garlic cloves, chorizo, butternut squash, shaved parmesan, smoked paprika oil. I am probably the biggest fan of Brussels sprouts you’ll ever meet, which is funny because I HATED them when I was a kid. Not anymore. Especially when you throw in chorizo AND cheese! This was an interesting dish and I loved the roasted garlic cloves that added a a slightly sweet flavor–balancing out the spicy sausage.

Next was a little side salad…
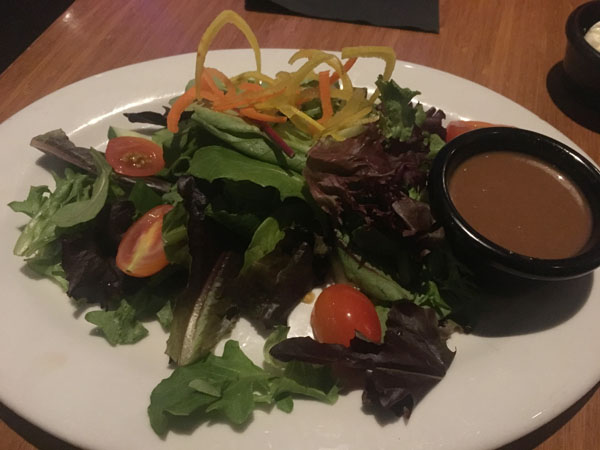
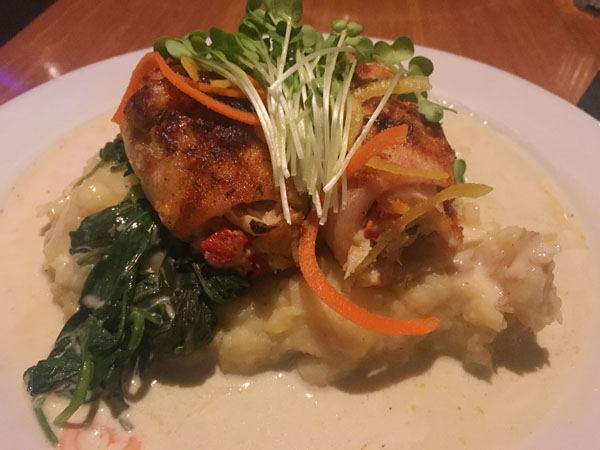
For my entrée, I ordered the Crab-stuffed Petrale Sole with sautéed spinach, smashed potatoes, saffron cream, shaved fennel, micro green salad. I am getting hungry all over again just looking at the picture and remembering the textures of the tender crab and flaky sole and the creamy sauce over the potatoes.
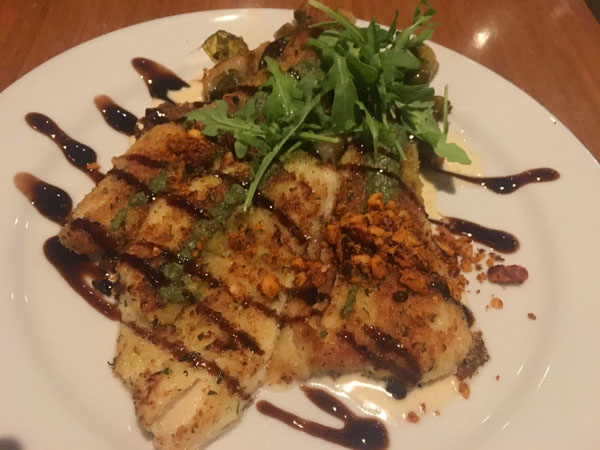
Andy had the Hazelnut Crusted Sand Dabs with charred Brussels sprouts, pumpkin gnocchi, cipollini onions, beurre blanc, arugula pesto, and balsamic glaze. We shared both entrées because they were equally fantastic. By the way, the chef could have put pesto, hazelnuts, or balsamic glaze on a shoe and I would probably eat it. #allmyfavoriteingredients!!


You can find Beach House at Lover’s Point on Facebook here.
In closing, I’d like to tell you about two upcoming events at the Hofsas House Hotel! One is the hotel’s 70th birthday celebration on Monday, November 7th, at 10:00am.
The event will begin at with coffee and light bites from Paris Bakery, then at 10:15 there will be a ribbon cutting with the Carmel Chamber and a Champagne toast with birthday cake at 10:30. There will also be a property tour and history discussion of the hotel’s 70 years.
Additionally, there will be a raffle to win an overnight stay! To RSVP (required by November 1) to marci at chatterboxpublicrelations.com
The second event is a little closer to the holidays. On Saturday, December 3rd, the 5th Annual Fundraiser for The Carmel Library Foundation will be held. The event will be a Gingerbread House Making morning/afternoon for the family. Together, families can create a gingerbread house to take home and display throughout the holidays. Children will receive one gingerbread making kit, hot cider and a cookie for a $25 donation to the Carmel Library Foundation.
Adults that want to attend will receive a glass of wine of award winning Monterey County wines from Twisted Roots Winery and can enjoy a gourmet cheese and fruit and tray for a $10 donation to the Carmel Library Foundation. Additional glasses of wine can be purchased for a $5.00 donation to the Carmel Library Foundation. (The $10 donation for adults does not include decorating a gingerbread house.)
There will be two sessions and you can sign up for 10:30 a.m. or 1:30 p.m.
Cost: $25 per child and $10 per adult (Adult does not include decorating a gingerbread house. The cost to decorate a gingerbread house is $25. All proceeds benefit The Carmel Public Library Foundation.)
Call Carrie at the Hofsas House (831) 624-2745 to make a reservation.
I’d like to extend my gratitude to the Hofsas House Hotel for hosting us during our stay in Carmel and being a direct ambassador to the 5th Avenue Deli and the Beach House at Lovers Point during our stay. Happy birthday to Hofsas House Hotel and happy 100th birthday, Carmel!!
SunBasket Offers a Healthy and Convenient Solution for Weeknight Meals

If you’re anything like me, the last thing you want to do when you get home from a busy day at the office is go to the grocery store (after sitting in traffic for almost an hour), wade through the aisles, figure out what to make, shop for the ingredients, wait in the checkout line, then actually COOK a full meal after all of that.
Now, if I didn’t work full time with a giant commute, I would be planning out multi-course menus for the week, shopping for the freshest ingredients and taking my time with all the preparations. I would be all about making every night’s dinner an event to remember.
But, for most of us, that’s just not a reality. Enter Sun Basket. The product that delivers a weekly box equipped with 3 meals for 2-4, and inside the box includes everything you’ll need to make them.
With Sun Basket there are easy and delicious recipes that YOU choose weekly for 2 to 4 people at $11.49 per meal. You can customize for a Paleo, gluten-free, or vegetarian diet. All recipes are created by top San Francisco chef Justine Kelly and approved by a nutritionist.
The Sun Basket kits are certified organic and sustainably sourced. All the ingredients are pre-measured which is less hassle and creates less waste. You can feel free to skip the grocery store and enjoy the best seasonal ingredients. You might even enjoy an ingredient that is hard to find or you have not tried on your own!
Sun Basket delivers weekly right to your door. The ingredients are shipped in an insulated box so they stay fresh and the packaging is recyclable and reusable.
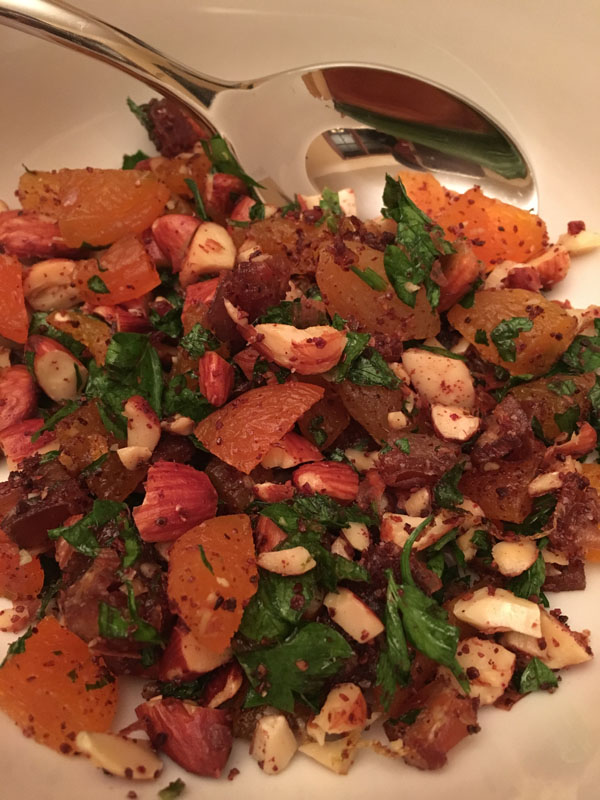
So what did we enjoy in our Sun Basket? We chose strictly Paleo options for the week and ended up with the 1. Thai Turkey Lettuce Cups, 2. Steaks with Artichoke-Red Pepper Tapenade and Sweet Potato Fries, and 3. Trout in Parchment with Warm Date and Apricot Salad.
Here’s what it all looked like!
Meal One: Thai Turkey Lettuce Cups, recipe HERE.


Of all the meals in the Sun Basket, this was the smallest in portion size, and could be eaten as an appetizer if you are both really hungry. That being said, I enjoyed it the most because of the several levels of flavors with the pickled vegetables, fish sauce, maple syrup, etc. And, there were cashews in there, too, another favorite ingredient of mine. 🙂
Meal Two: Steaks with Artichoke-Red Pepper Tapenade and Sweet Potato Fries, recipe HERE.

And meal three: Trout in Parchment with Warm Date and Apricot Salad, recipe HERE.

If you’re a big eater, then perhaps you might choose the 4 person serving to feed 2 people. I like that the calories and nutritional information is all right there on the recipe card, as well as detailed instructions on how to prepare each dish that is in the box.
One of the best things about Sun Basket is that you can order when you want and skip when you don’t. There is no commitment to order week after week, but you’ll want to order repeatedly once you discover the convenience and taste of the box contents.
You can find Sun Basket on Facebook here and follow them on Twitter here, Pinterest here and on Instagram here. To place an order, you can visit https://www.sunbasket.com/home.
New Menu Features and Gluten Free Finds at Yard House
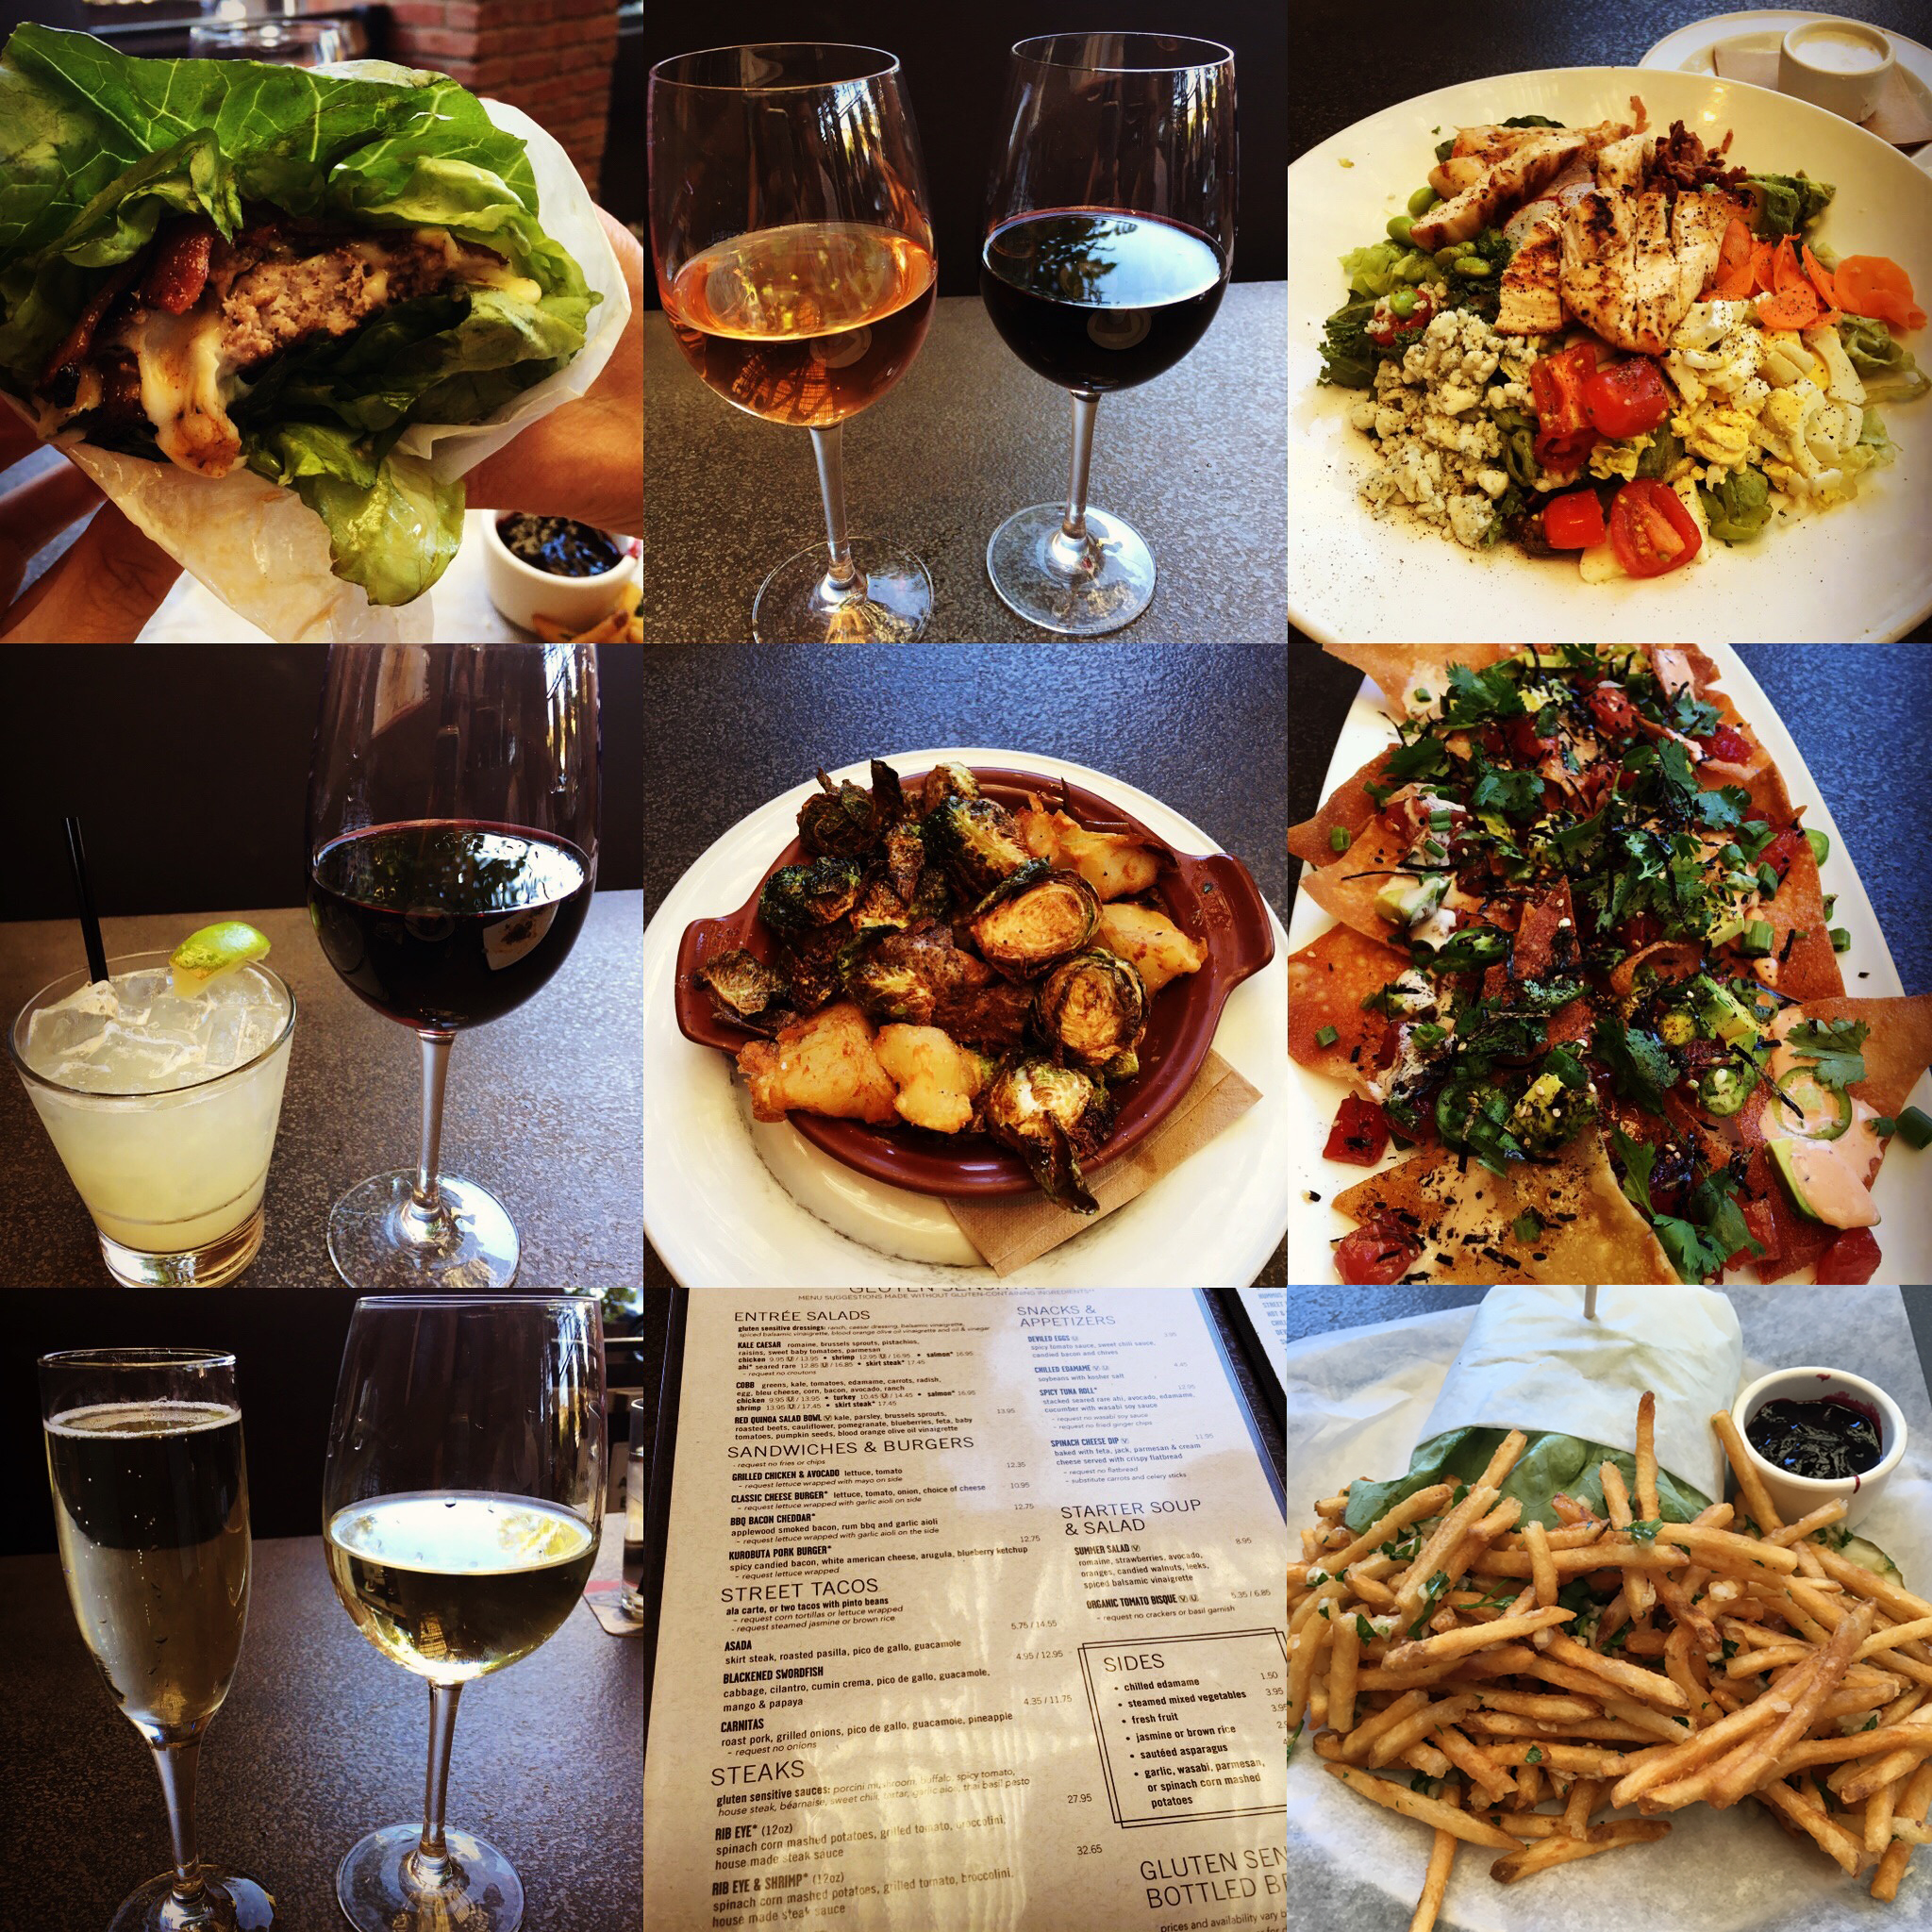

A few weeks ago Andy and I checked out some new menu items and gluten free options available at Yard House in Roseville. You might remember my visit to Yard House shortly after they opened back in 2011. We kicked off our meal with this round of drinks. On the left is a glass of Zardetto Prosecco (sparkling wine is my go-to opener) and on the right is a glass of Honig Sauvignon Blanc.

Then it was on to decide what to order. If you are reading this website, you are either eating a gluten-free diet, or you are thinking about eating gluten-free. Yard House makes it easy because there is a separate menu you can ask for when you are seated. The menu features many of items from appetizers to salads and burgers that can be served wrapped in lettuce instead of on a bun, as well as three different gluten-sensitive beers.

Our first appetizer was the Crispy Brussels Sprouts and Ripped Potatoes (served with Malt Vinegar Aioli). It’s featured on the “snack” portion of the menu, but can easily be shared if you are going to be ordering an entrée, too. The dish’s description was accurate as both items were very crispy, yet soft on the inside. The vegetables were highlighted by just the right amount of seasoning and were dressed with the Malt Vinegar Aioli.
For our second appetizer, we decided to try a new menu item (though it is not on the gluten-free menu), the Poke Nachos made with marinated raw ahi, avocado, cilantro, serranos, green onions, nori, sesame seeds, sweet soy, sriracha aioli, white truffle sauce, and crispy wontons. This plate is one of several you can get that features ahi tuna. I like this one not only because it is very shareable, but because it highlights the ahi by merging ingredients that are both used in Asian and Latin cuisine. The combination of the different textures and flavors is delightful.

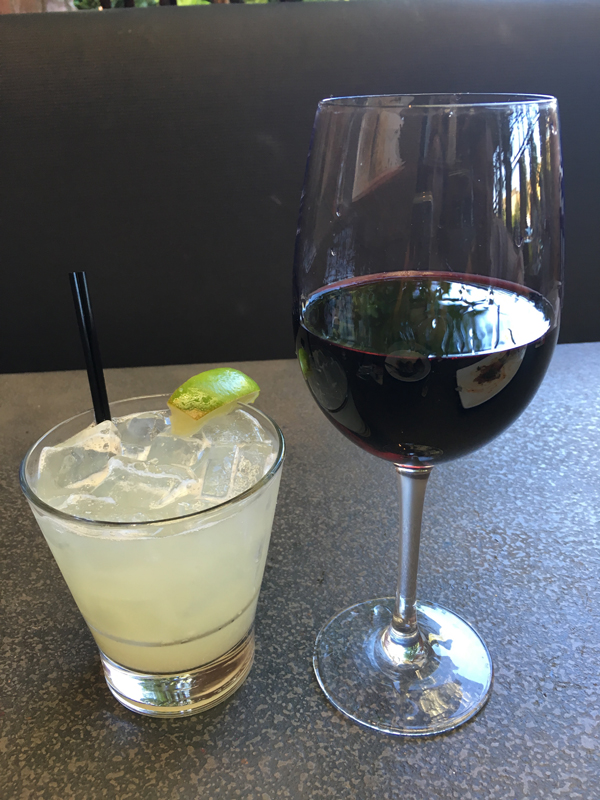
What is not delightful is an empty glass, so Andy and I revisited the drink menu and ordered another round. I was curious about the Fresh and Skinny™ Cocktail choices, so I ordered a Skinny Margarita with El Jimador silver tequila and fresh lime. Other drinks on the Fresh and Skinny™ menu are the Pure Cosmo Martini, the Lite Lemon Drop Martini, the Juniper Fusion, and the Citrus Crush. For more information on the Fresh and Skinny™ Cocktail Menu you can click here. Andy ordered another glass of wine, this time a glass of Meiomi Pinot Noir.
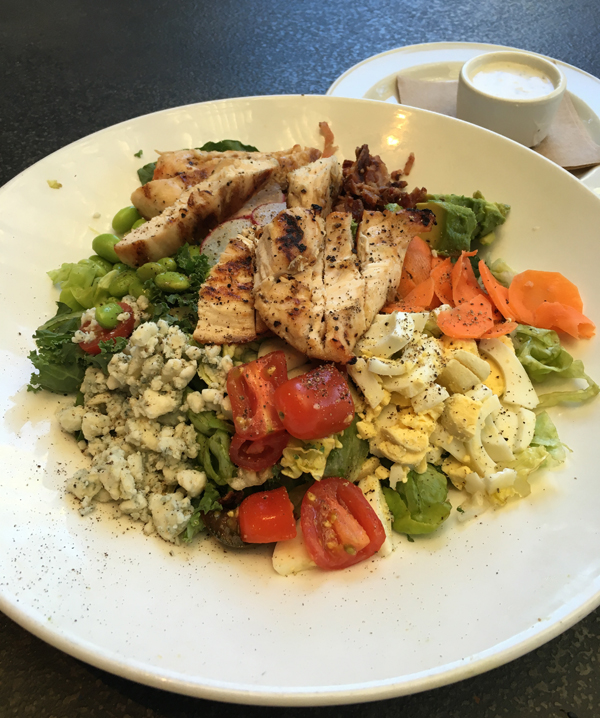
For my entree, I chose the Grilled Chicken Cobb Salad (from the Gluten-Sensitive menu) composed of greens, kale, tomatoes, edamame, carrots, radish, egg, blue cheese, corn, bacon, avocado, ranch. I usually get dressing on the side when I order a Cobb Salad because there is so much flavor (fat IS flavor!) from the blue cheese, egg, avocado and bacon, I don’t need to cover anything up with dressing. I love simple and fresh ingredients and this salad certainly fit that description.
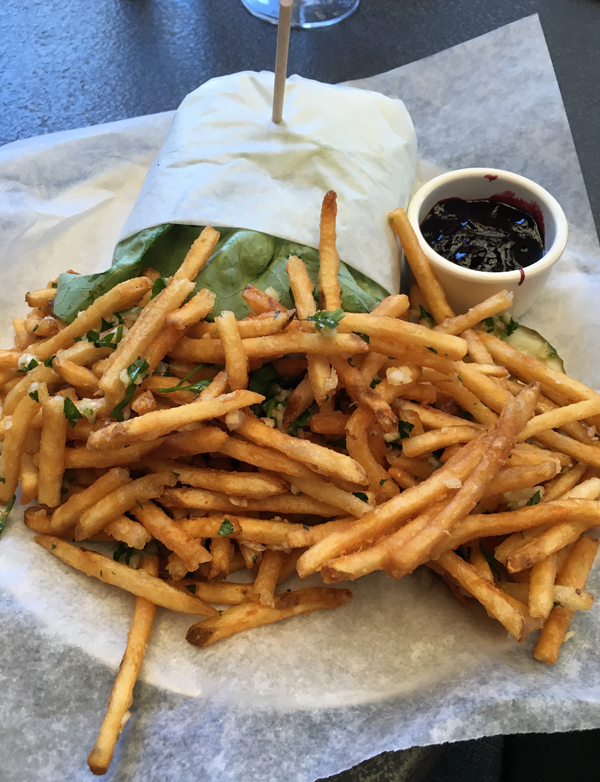
For his entrée, Andy selected a new menu item, the Kurobuta Pork Burger with spicy candied bacon, white american cheese, and arugula and served with fries and blueberry ketchup. Kurobuta or “black hog” pork comes from a heritage breed of pig, the Berkshire, a heritage breed raised specifically to produce very flavorful meats.”We feel that this is the year of the pork burger,” said Carlito Jocson, executive chef of Yard House. “We worked closely with Snake River Farms in Boise, Idaho, to procure Kurobuta pork, which is pork’s equivalent of Kobe Beef and made from 100% purebred Berkshire hogs as mandated by the Japanese Ministry of Agriculture. We balance the spice and richness with sweet blueberry ketchup to create a very flavorful burger.”If you are on a gluten-sensitive diet, you can ask for any burger on the menu to be served wrapped in lettuce, and that is how Andy ordered it (below).
For dessert, we enjoyed two more glasses of wine, mine a glass of Protocolo Rose Tierra de Castilla (a Spanish Rosé made from 50% Tempranillo and 50% Bobal. Andy ordered the Freakshow Cabernet Sauvignon produced by Michael David Winery (Lodi).

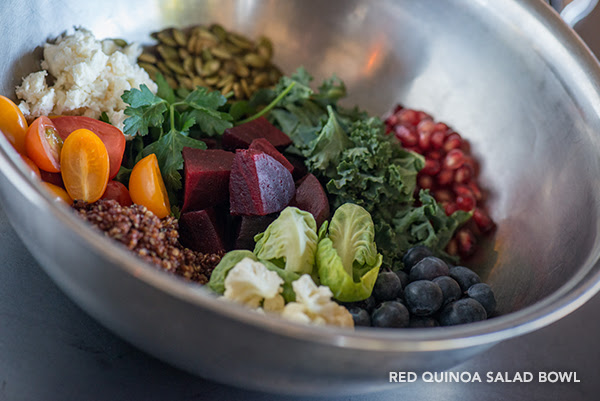
Another healthy menu and gluten-free option we did not try, but was recently added is the Red Quinoa Salad Bowl, which Chef Jocson describes as the greatest hits of all super foods. The salad is a nice shareable dish or can be an entrée for one with a garden of kale, parsley, Brussels sprouts, roasted beets, cauliflower, pomegranate seeds, blueberries, baby tomatoes, pumpkin seeds and feta cheese. Guests can request that the cheese be removed for a vegan option. Carnivores can choose to add chicken or steak for a heartier meal.
“In order to stay relevant menus have to evolve,” added Chef Jocson. “Five years ago no one would have imagined blueberry ketchup, but it’s an amazing condiment for our Kurobuta Pork Burger and ours is made in-house. These days offering vegan and vegetarian selections aren’t an option, but a necessity as more people reevaluate their diets and intake. We already have several of such items, including our new Vegan Burger, as well as gluten-sensitive options.”
If you’re reading this blog post, Yard House will have already debuted its new menu items at all 65 locations. Open daily for lunch, dinner and late-night dining, Yard House offers one of the largest selections of beers on tap plus a creative list of cocktails and wine by the bottle or glass.
For more information, visit yardhouse.com or follow on Facebook at facebook.com/yardhouse and the Roseville location of Yard House on Facebook here or follow them on Twitter @yardhouse
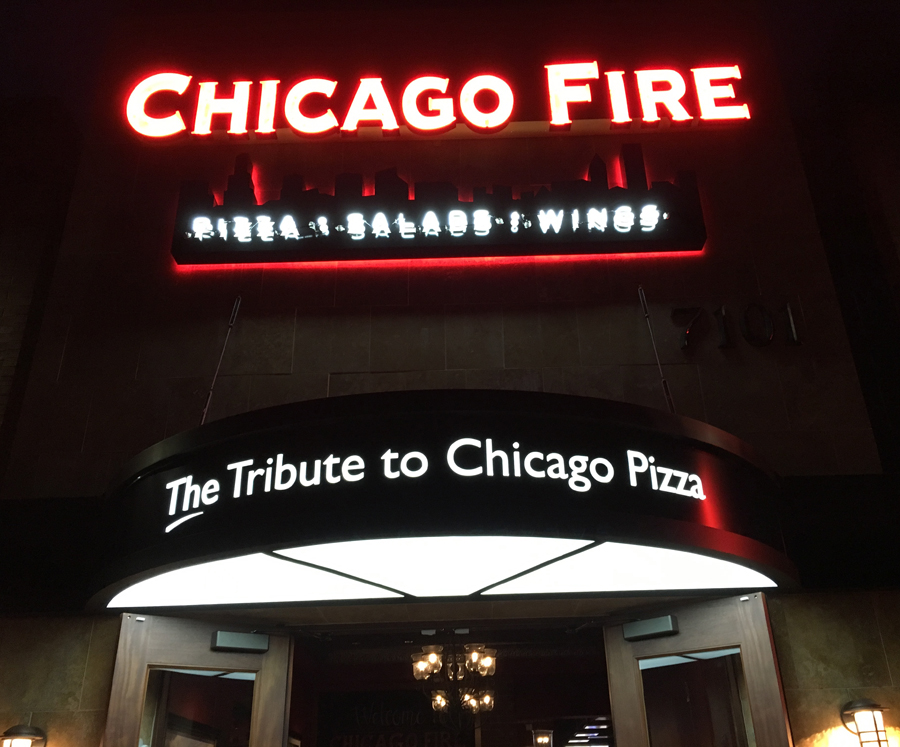
Elk Grove Welcomes New Chicago Fire Location

Last Saturday night Andy and I attended a pre-opening dinner at Chicago Fire‘s newest location: 7101 Laguna Blvd, Elk Grove. The pre-opening lunches and dinners were held both on Friday and Saturday in an effort to train the staff and to ensure consistency amongst the other four Chicago Fire locations.

The weather was terrific, so we decided to sit on the patio. The dinner was complimentary for us except for alcohol (and was also free to everyone invited). It included an appetizer, a salad, a pizza and a dessert to share between us. The limitations on food were mainly because it was a training night and an effort to control conditions in service and in the kitchen. It’s kind of like when you are a brand new runner. You don’t just start out running a marathon. You train up to that distance. Likewise, the staff in the new location were learning to run in ideal conditions, a few miles at a time.
I was very excited to be there because I have loved Chicago Fire for a long time. I think it’s a great place for celebrations or just a dinner for two. Also I work for a printer in Roseville (yes, I have a day job) and we print their business cards and takeout menus as well as a few other items. The people running the show at the restaurant are great to work with altogether.
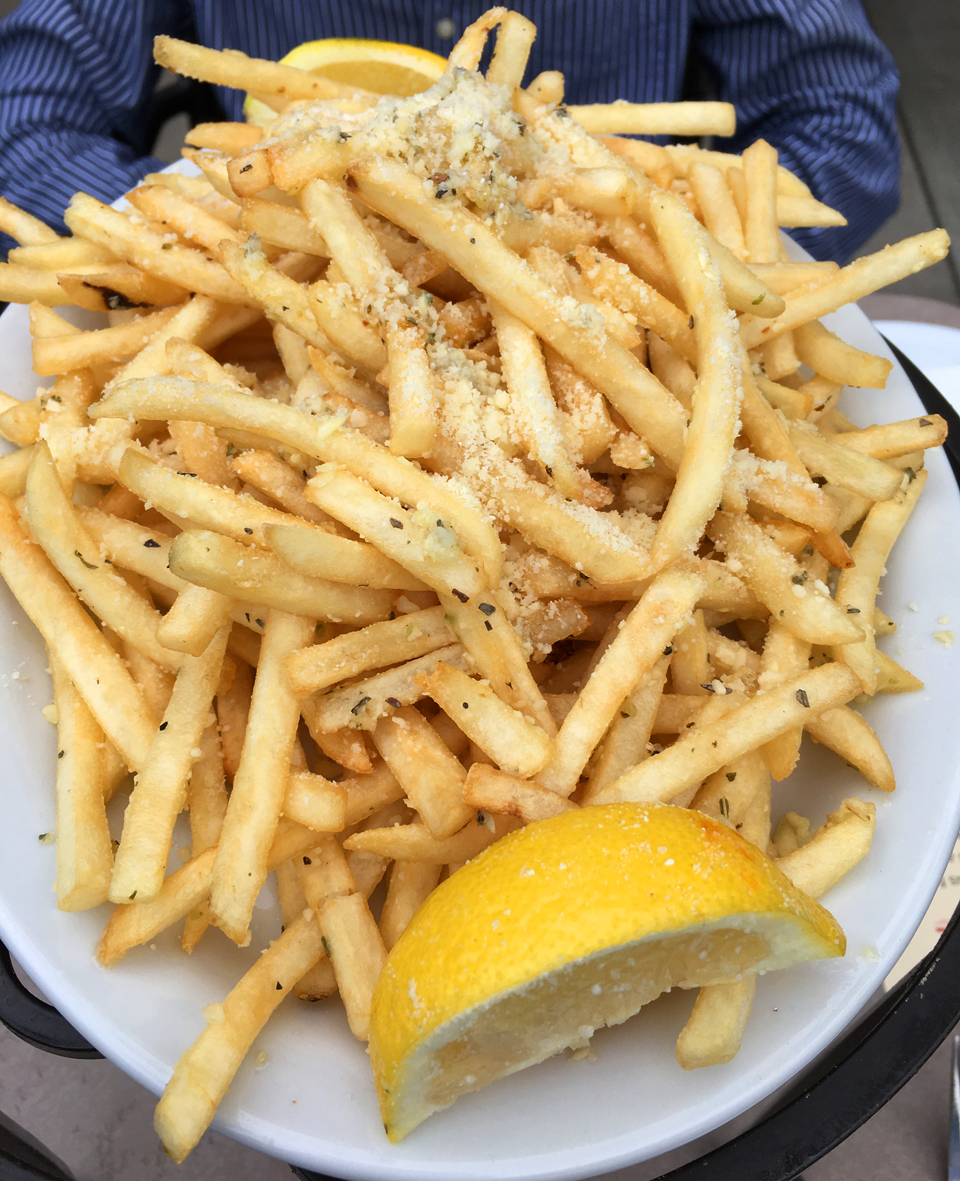
But back to the food we ordered! For our appetizer, we chose the Garlic Fries. Not really something on the diet plan, but a treat to share with Andy and always very tasty/crispy/herby/garlicky. In true Greek fashion, they are served with lemon. Super good. Diet Gods, I am so sorry. 😉
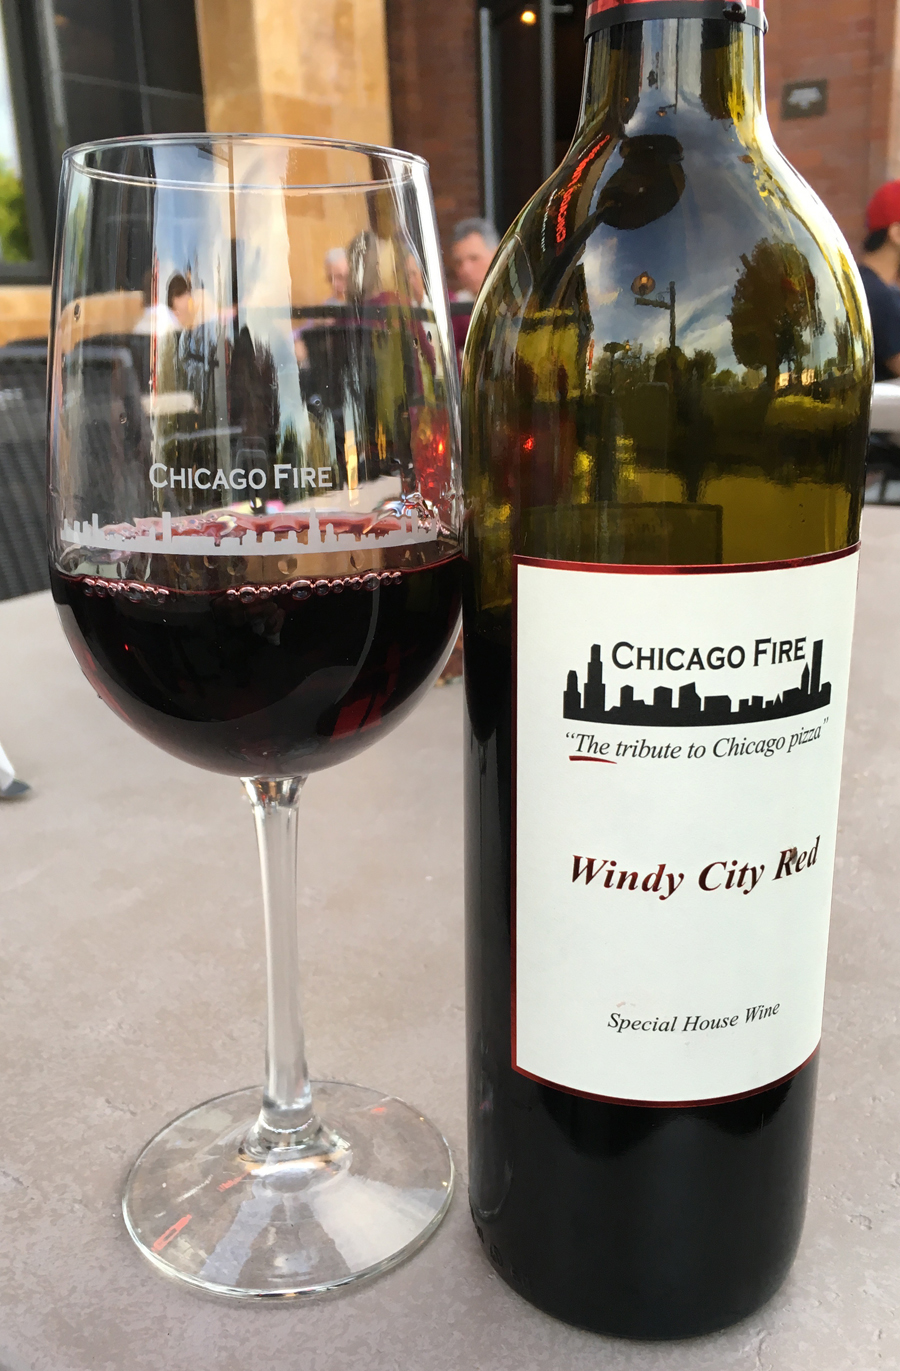
We ordered a few starter glasses of wine, but afterwards ordered this bottle of Windy City Red. It’s a wine produced solely for the Chicago Fire restaurants by Boeger Winery. It’s one of their less expensive wines and a very good value. It’s also a great pairing for anything on the menu with red sauce or any pizza that has meat on it!
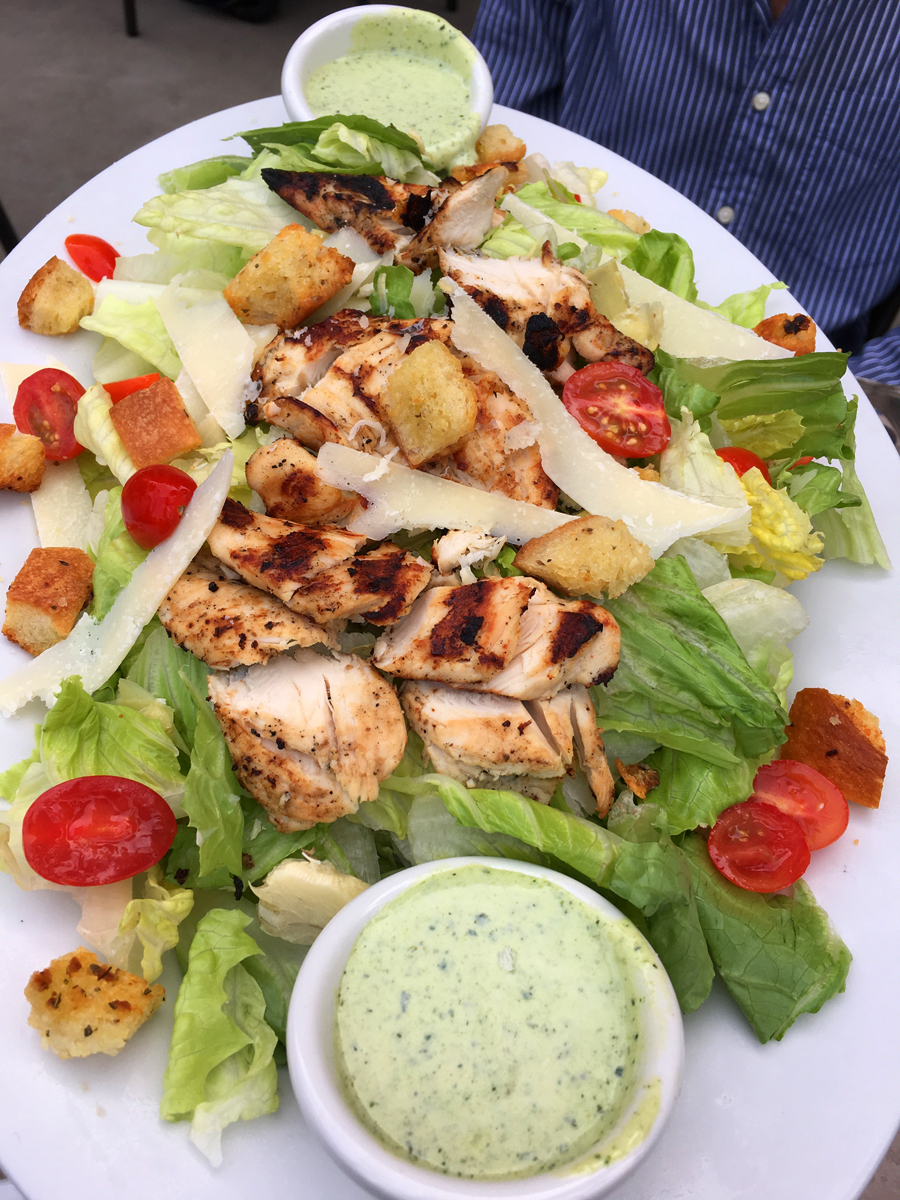
Our salad came next and we chose the Pesto Chicken Salad. It’s my favorite salad at Chicago Fire. My second favorite is the Greek Salad, but I can’t resist the pesto dressing. Plus, the chicken on the Chicken Pesto Salad is grilled to perfection, and then there’s all those big cheese shavings on top. I almost wanted to take the salad for myself and leave the pizza for Andy!
Typically, I try to load my plate with greens such as the salad above, and then maybe have 20% of the main course. That way, I have had a lot of fiber, vegetables, etc., and gotten mostly full before I move on to the next course.
Chicago Fire serves a gluten free version of most of the pizzas on their menu. This one is called the Stockyard. If you order gluten free it only comes in one size, but that is OK because with the appetizer and large salad, it was a perfectly shareable size between Andy and myself. The stockyard is a deliciously meat-loaded pizza featuring garlic sausage, pepperoni, salami and Canadian bacon. And of course we got the gluten free crust. I also always order a side of marinara, because I love to dip my pizza crusts in the sauce.

Andy enjoyed an ice cream with caramel sauce, but I decided to pass. Instead, I walked around and took a few more pictures of the interior of the restaurant.


As of all the previous visits we’ve had at Chicago Fire, I would call it consistent and very enjoyable. The difference was the great new location, the fun outdoor experience and the well-landscaped area around the restaurant.
You can find Chicago Fire on Facebook here, on Twitter here and on Instagram here. Be sure to check out the newest location in Elk Grove now open for lunch and dinner!
Grocery Outlet’s Spring Wine Sale Starts This Tuesday, March 22nd!

OK wine lovers! Grocery Outlet is holding a huge wine sale where all wines will be an additional 20% off Grocery Outlet’s everyday low prices. It’s the same high-quality wines you love at 50-70% off PLUS 20% more off, so that means you can save as much as 80% on all Grocery Outlet wines during the sale!!
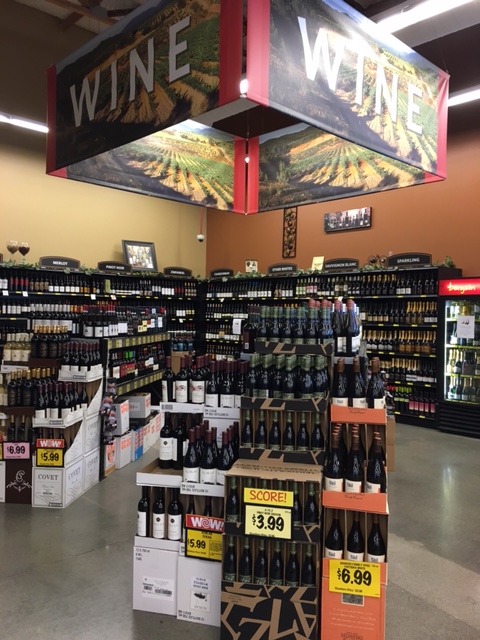
Yesterday I visited my local Grocery Outlet in Roseville, CA, and spoke to the wine buyer, Michael, about the upcoming sale. He thought my blog cavegrrl referred to wine caves! I never thought of that. That’s actually pretty brilliant. Hmmmm…maybe someday I will rebrand AGAIN as a wine blog with the same URL! Anyway, he was incredibly nice to share about an hour of his time with me. He is passionate about making sure he finds wines customers are going to love. He has a “benchmark varietal” method in which he asks the customer what their favorite varietal is, and if they aren’t sure of that, he finds out something as simple as their preference for red or white wine. Through this process, Michael figures out the customer’s preference of sweet or dry, and eventually can help them pick a wine he believes they will enjoy.
It is that kind of customer service you can get, especially at this Grocery Outlet location, where it’s almost like having your own sommelier, but in a discount grocery store (kind of awesome). And truly, since my visit today, I can tell you there are some really great wines to choose from for the sale coming on Tuesday!
Here’s the lineup I bought today and (all of them I highly recommend):
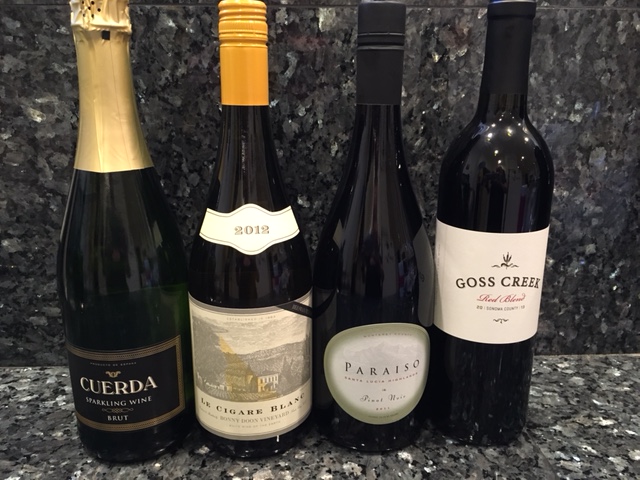
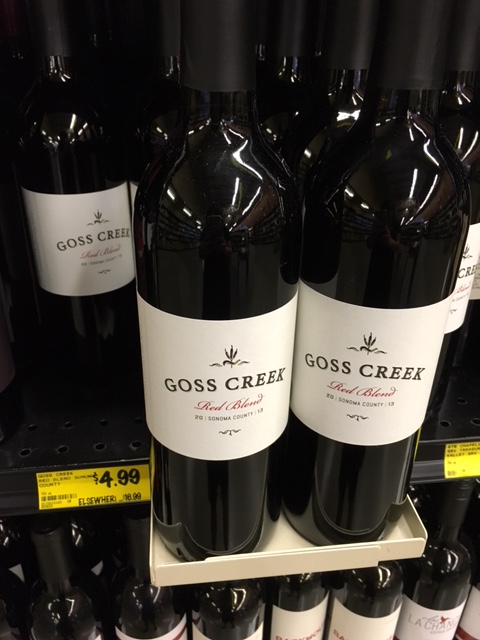
From left to right, Cuerda Sparkling Wine ($4.99)–tastes like an $8-$10 bottle and perfect for unwinding after a busy day or blending in a mimosa or bellini, Bonny Doon Le Cigare Blanc ($8.99)-I will update the description when I try this one, but Randall Graham is behind this one, so I think it will be pretty good. Also, it’s a white wine blend with Roussane, so I am sure I will be a fan. Next is the Paraiso Pinot Noir ($5.99)-a bargain and goes for $24.99 per bottle elsewhere, by the way does Santa Lucia Highlands ring a bell?? You should have seen me try to contain myself with this deal!! Finally, there’s Goss Creek Red Blend ($4.99)-I really loved, tastes like a $15-18 bottle and goes for $16.99 per bottle elsewhere.

Not only is Grocery Outlet a great place to buy wine, it’s a great place to find food to pair with your wine! Today, I bought a bag of Brussels sprouts, an onion, and some Aidell meatballs to throw together a simple and tasty dish!
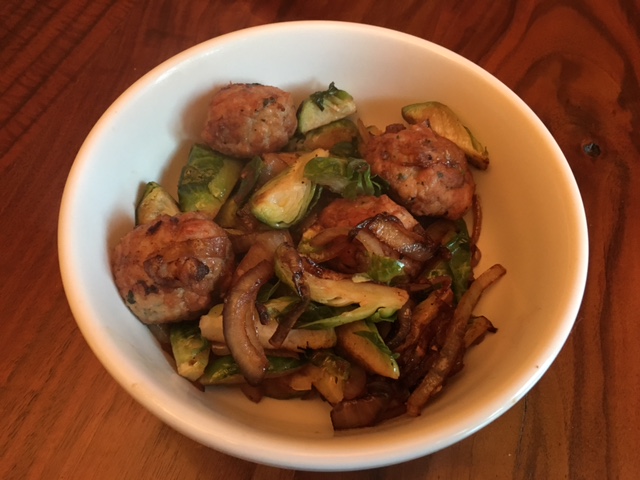
Brussel Sprout, Onion and Meatball Sauté:
1 onion
1 small package Brussels sprouts (quartered and pre-cooked in Microwave for 3-4 minutes)
Balsamic Vinegar
1 package Aidells meatballs
salt
olive oil
All you have to do is slice the onion, saute it in olive oil with some salt until translucent, then add the Brussels sprouts––I like to quarter them first and then microwave them for 3-4 minutes to get ahead of the game. Usually, I am tired at the end of the day and I just want to eat and relax, so I am looking for any shortcut possible.
After the onions get browned and are pretty well cooked, add some balsamic vinegar to your liking (2-3 Tbs for me), and then add the microwaved Brussels sprouts and sauté them until browned. Then add the Aidell’s sausages. Cook the entire thing until it’s heated through (the Aidell’s are already pre-cooked, you just have to warm them up in the pan. It literally takes less than 20 minutes to make this dish and it’s a great pairing with ANY of the wines I bought above (especially the Paraiso Pinot Noir!!)
You bet I will be back in the store at 8am on Tuesday to clear out my favorite wines and save an extra 20% off when the wine sale begins! If you love wine, do yourself a favor and visit your local GO March 22-26th!! If you have questions, don’t hesitate to ask the wine buyer (if that person is present) or the store manager. In my personal experience (I was a customer before I was compensated for this blog post) and the following held true: the management team at Grocery Outlet just wants you to find the right wine for you and for you to be happy with your purchase.
You can find Grocery Outlet on Facebook here, on Twitter here and on Instagram here.
Join the fun on social media by tagging your posts with #GOWineSale!! Cheers and happy shopping!!
One Last Cookie You Should Make Before the Holidays are Over…

So, there are only a few days left in the year and there might be one more cookie exchange or party to attend. Or you might want to make one more treat before beginning a new diet on January 1st. If so, this is the cookie to make. It’s called a Santa’s Whisker.
I first heard of these delicious cookies when I worked for a bakery in Cincinnati that made them. Since then, I created my own recipe to fit into the Primal lifestyle. It is gluten free and used a product called Swerve (a sweetener made from a unique combination of ingredients derived from fruits and vegetables). I also added a touch of orange to the traditional cherry and coconut ingredients, to elevate the cookie’s overall flavor. Finally, instead of pecans (used in traditional recipe), this time I used pumpkin seeds and pine nuts. This recipe is addictive and makes 2 dozen cookies!
Ingredients:
1 cup butter (softened)
1 cup sugar or sugar substitute (I used Swerve)
2 tablespoons almond or coconut milk
1 teaspoon vanilla
1 Tbs orange liqueur (I used triple sec)
1 tbs orange rind
2 eggs
2 1/2 cups Gluten Free Flour
1/2 cup coconut flour
1/2 tsp baking powder
1/2 tsp baking soda
1/2 tsp salt
3/4 cup finely chopped dried cherries
1/2 cup pumpkin seeds
1/2 pine nuts (or nuts of your choice, omit altogether if allergic to nuts)
3/4 cup flaked coconut (I used unsweetened)
1 cup coconut (for rolling the dough)
For “Snow” Topping:
1 bag white chocolate chips
1 Tbs coconut oil
2 Tbs almond or coconut milk
Directions:
In a medium sized bowl, combine the dry ingredients and whisk together: the gluten free flour, coconut flour, baking powder, baking soda and salt. In a mixer, cream the butter and your sugar substitute of choice. On a lower speed, add eggs one by one until well combined. Then add the vanilla, milk, orange liqueur and orange rind. Mix in the dry ingredients a little bit at a time until completely incorporated. Remove bowl from mixer stand, and fold in the cherries, seeds, nuts and coconut.

Line a work surface with parchment paper. Then place some shredded coconut on the parchment.
Divide the dough into two and roll each division of the dough into a log shape 8-10″ long. Then, roll each log over the coconut until the edges are coated thoroughly. Wrap the two logs in plastic and chill in the refrigerator for at least one hour.

Preheat oven to 325°F. Line 2 cookie sheets with parchment paper. Remove the dough logs from the refrigerator, and remove the plastic wrap. Slice the dough into coin shapes and place on the cookie sheets. There should be enough for 12 cookies in each dough log.
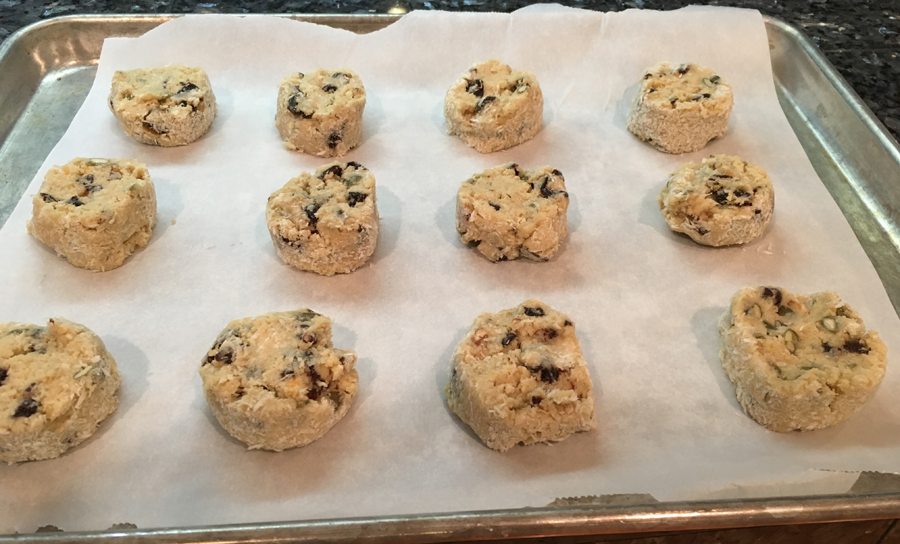
Place the cookie sheets in the oven and bake until edges are golden, about 10 minutes.

Allow cookies to cool thoroughly, and make the snow topping. Place the milk and the coconut oil in a microwaveable bowl and microwave for one minute. Then slowly add the white chocolate chips and stir as they melt. You probably won’t use the whole bag, but will most likely need most of it to get to a consistency that will coat the cookies. Not too thick, not too thin.
Dip the cookies halfway into the melted white chocolate and place them back on the lined parchment paper until the chocolate sets up. If you are in a hurry, you can place the cookies in the refrigerator or even the freezer to quicken the hardening of the chocolate.
Thanks to my loyal readers for following me in 2015! I hope you had a wonderful Christmas and I hope to write another post before the New Year, but if I don’t have a happy and safe new year. xoxo -kd
Hungry Root: You Won’t Push These Vegetables Aside!
A few months ago, I was introduced to a company called Hungry Root. Hungry Root’s mission, via their website is to: Unleash the flavor of vegetables, bring them to the center of your plate, and make them craveable.
OK picky people. I know what you are thinking… Vegetables and craveable are oxymorons! Not anymore. 🙂
Since going Paleo in 2011, I have been a proponent of obtaining most of my carbohydrates from fruits and especially vegetables. 🙂 🙂 🙂
Yes, I am the person who will roast root vegetables like carrots and parsnips until they are caramelized, and eat them for dessert! Maybe that sounds a little nutty, but when you start a true Paleo diet, you omit all processed sugars and so even vegetables when roasted can actually taste sweet!
I was really interested in Hungry Root, because they are making similar things with vegetables that we do on a daily basis, and yet, Hungry Root can ship meals pretty much really to cook with no prep involved other than heating oil in a pan, which is the perfect thing for busy people who need a quick and healthy meal! 🙂
So, the folks at Hungry Root sent me a 3-pack sampler of some of their most popular items to try them out:

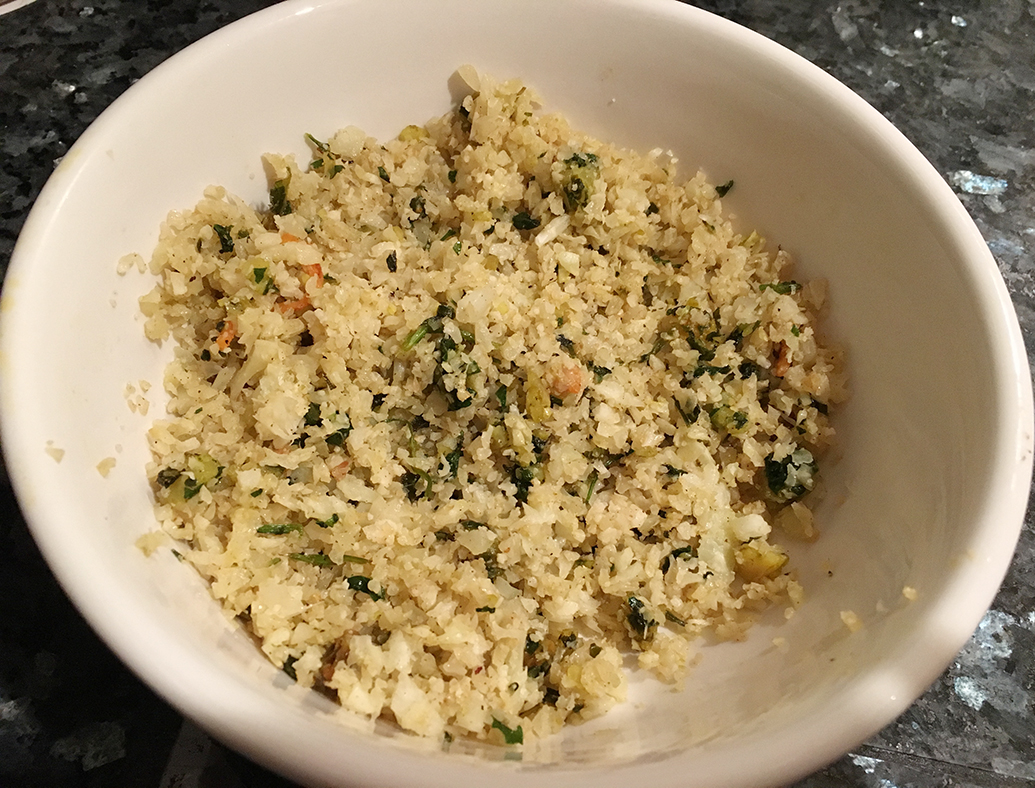
This is the Cauliflower Coucous with Moroccan Almond Curry ($6). This VEGAN side is finely chopped raw cauliflower with a container of Moroccan almond curry made from fresh cilantro, parsley, mint, almonds, raisins and madras curry in the package. It’s super easy to prepare and you can eat the WHOLE container for only 121 calories. I don’t know about you, but I am a whole container kind of gal. 😉
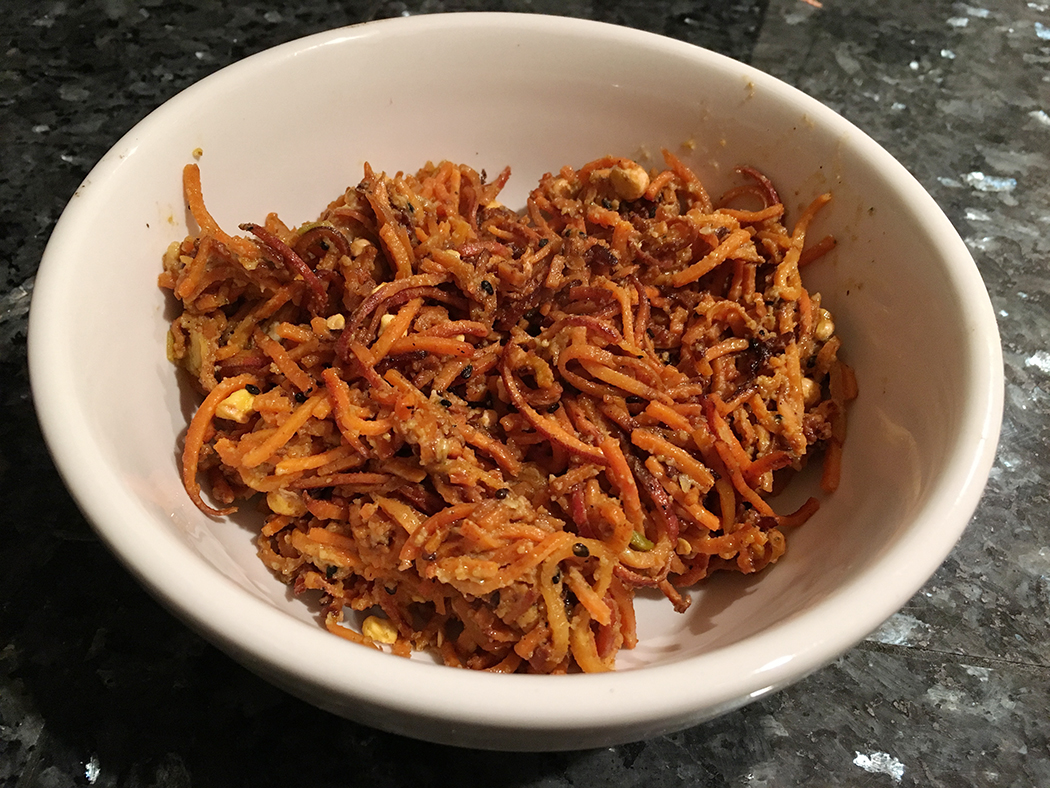
And THIS is the Sweet Potato Noodles with Creamy Cashew Alfredo which contains Fresh-cut sweet potato noodles with creamy cashew alfredo (cashews, sesame tahini, garlic, Dijon mustard, Kosher salt, lemon juice, black pepper), tossed with curried carrots and chopped, roasted chickpeas. The cashew alfredo is absolutely ADDICTIVE. And BOOM, another vegan dish. P.S. There’s so much Vitamin A in the house in this dish, your eyes and skin will thank you just as much as your tastebuds!
The third item we tried was the Almond Chickpea Cookie Dough. Ingredients: Chickpeas, sweet potato, almond butter, sesame tahini, maple syrup, organic cane sugar, vanilla extract, baking powder, baking soda, sea salt, vegan chocolate chips. And we loved it so much, we ate it raw. Because it was so HARD CORE yummy that way—and only 60 calories per serving!! 🙂 YAY. Cookies for everyone!!

Want to try out Hungry Root? Well, you’re in luck! The marketing team at Hungry Root sent me a special code to pass along to you so that you can save 20% OFF your order. Just type in KRISTY20 in the promo code field at check out. Also, they are currently running a promotion of FREE shipping for orders over $40. Click here to start shopping!
You can find more information on Hungry Root here, find them on Facebook here, and follow them on Twitter here. 🙂
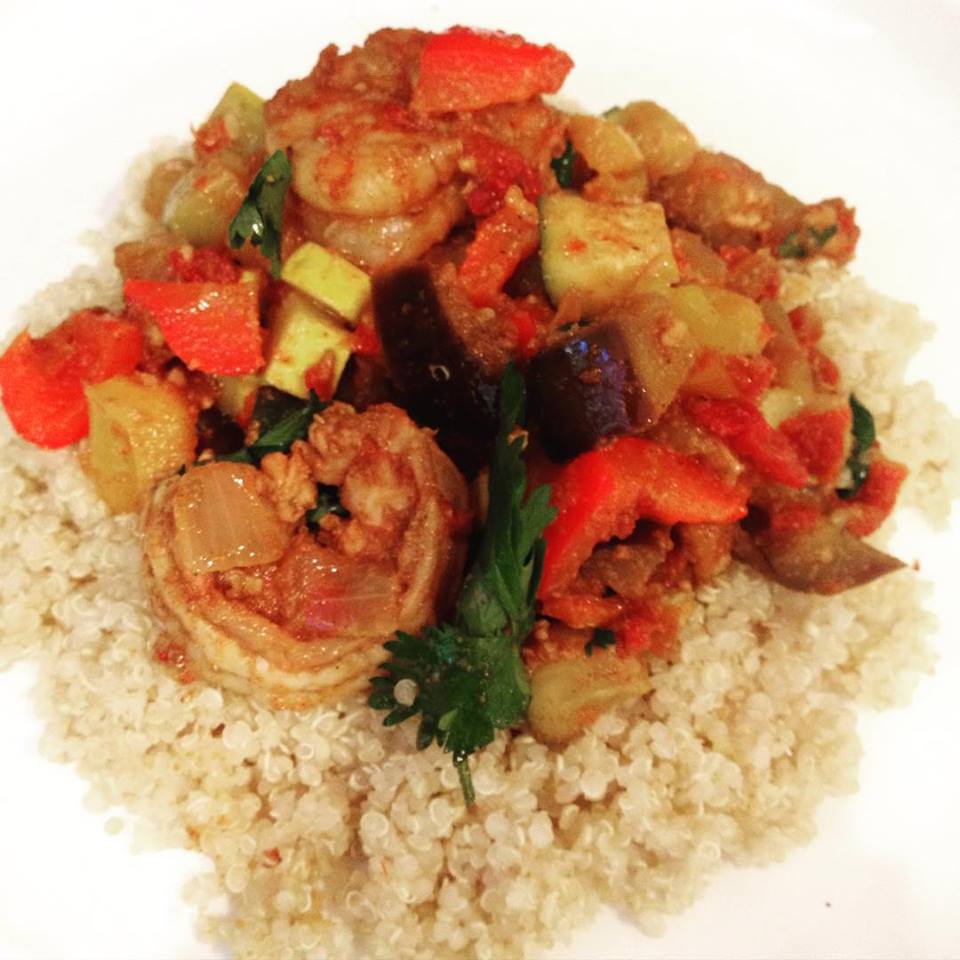
Recipe: Chili Lime Shrimp with Vegetables and Quinoa
Last Monday, Andy and I attended a hospitality professionals meeting and I won a bag of groceries from Whole Foods Arden (Sacramento). They are also members of the group and brought the bag to give away at the meeting through a raffle of business cards of all the attendees.
We rarely buy quinoa, because it is a grain and not technically Paleo, but since it is a gluten free grain that is high in protein and the box was in the bag of groceries, I decided to make good use of it and post the recipe here as my thanks to Whole Foods! 🙂
Chili Lime Shrimp with Vegetables and Quinoa
Inspired by a Kaiser Permanente recipe
(serves 4)
Shrimp Marinade:
2 tsp chili powder
2 tablespoons olive oil
1 Tbs teaspoon cumin
1 tsp red pepper flakes (this will make the recipe moderately spicy, omit if you don’t prefer heat)
1 clove garlic, crushed
Juice of one lime
Salt and pepper
20-24 uncooked, peeled and deveined medium-sized shrimp (roughly one pound)
Note: If you can’t find peeled and deveined shrimp, it’s pretty easy to do at home, it just takes about 15 more minutes to do it. After you peel back the shell, use a small knife to make an incision right on top of the vein and down to the tail. The vein will come practically on its own under running water. I also removed the tails for this recipe.
Mix marinade ingredients in a bowl and add the shrimp, tossing them in the bowl until they are coated. Set aside and work on your vegetables.
Vegetable Sauté:
2 Tbs olive oil or coconut oil
1/2 of a large red bell pepper
1/2 of a large yellow bell pepper
1/2 of a large yellow squash
1/2 of a large zucchini squash
1/2 of a large eggplant
1/2 of a large onion
1 1/2 cups of your favorite tomato (I used some cherry tomatoes left over from a veggie tray and one large heirloom tomato)
2 tsp garlic powder
2 tsp salt
1/2 of one bundle of cilantro
After you wash and chop up the vegetables (cube or cut each into bite sized pieces), set them aside and prepare the quinoa.
Quinoa Base:
1 1/2 cup 365 Organic Quinoa
 First, for a nuttier flavor, toast the quinoa in a skillet until it turns a little brown in color. Then prepare according to package directions. For even more flavor, cook the quinoa in a vegetable or chicken broth (substituting the water and using the same amount of broth in the directions on the package).
Prepare Vegetable Sauté:
While the quinoa is cooking, begin your vegetable sauté by heating the olive (or coconut oil) in a skillet and cooking the onion until it is translucent and then adding both the red and yellow bell peppers. Cook for 5 minutes on medium heat, then add the squashes, and then the eggplant. At this point the pan will be getting dry, so add a little water or white wine (1/2 cup), add the tomatoes and the garlic powder, and cook until vegetables are tender and the alcohol has cooked out of the mixture. Lastly, remove the pan from heat and add the cilantro leaves allowing them to wilt into the vegetables.
By this time the quinoa will be done or nearly done. Drain any excess water (or broth) out of the quinoa and set aside.
Cook the Shrimp:
Heat a pan big enough to accommodate the 24 shrimp and get the pan really hot. Place your shrimp in the pan, along with all the marinade and cook the shrimp 3-4 minutes (until they sear and turn color). Then add the shrimp to the vegetable pan, and place the vegetable pan back onto low heat. Fold all the ingredients together until everything is well combined and heated through.
To Serve:
Begin with the quinoa, and place the amount of your liking in a circle shape on a large plate. Make a nice big crater in the center of the plate, and fill it with the shrimp and vegetable sauté. Then garnish with a little more cilantro if you’d like.
You can also make this recipe with chicken if you don’t like seafood. I would marinate and cook it in the exact same fashion. 🙂
You can find Whole Foods Arden (Sacramento) on Facebook here and follow them on twitter here.
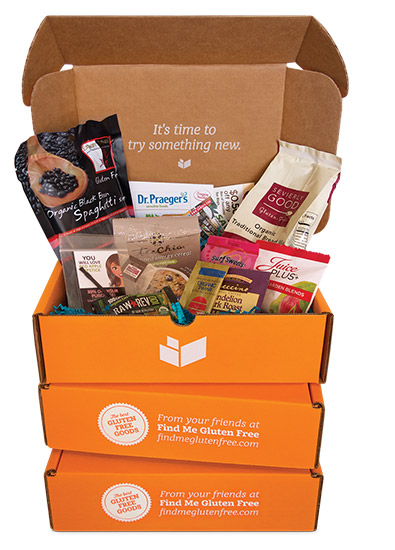
Giveaway!! Get Gluten Free Delivered Right to Your Door with Send Me Gluten FREE!

I am a fan of trying new things and I love getting surprises in the mail, so when I heard about Send Me Gluten Free, I immediately checked them out!
Send Me Gluten Free is a monthly subscription service that introduces you to new gluten free products. The company was kind enough to send me a sample box (just like I would get if I had a subscription to their service).
I didn’t want to describe/review the individual products I was sent, because they vary so much in individual boxes each month, but I will tell you that I enjoyed everything in the box, and there were even coupons/offers in the box along with the products. I want to thank the people at Send Me Gluten Free, as they must be mind readers!
But, to be honest, they sent me some REALLY addictive (yet organic, non GMO!! stuff), and I’m sure that’s pretty much the norm every month!! Some of these items included: Sunbutter (sunflower seed butter that can substitute peanut butter), Skinnypop popcorn (hello popcorn, I missed you!), some amazing chocolate coated pumpkin seeds called SuperSeedz (probably my fave in the box), and some Alter Eco chocolate. YESSSS!! Box already scarfed down. 😉
Along with the assortment of products, I also received an envelope in the box containing coupons good for gluten free products. I’ll definitely be using the one for SunButter spread.
Soooo, the Send Me Gluten Free subscriptions range from month-to-month, 3 months, 6 months and 12 months (the 3, 6, and 12 months are prepaid in advance, and offer discounted rates that increase the discount the longer you commit to the service).
Each month, your box will contain 8-10 new gluten free products. You’ll get both full-size and sample size food, personal care items, supplements and household products that support your gluten free lifestyle. Your chosen subscription will automatically renew, but you can cancel at any time. You box will ship on the first Monday of each month.
Send Me Gluten Free requires all of their brand partners to be certified gluten-free or tested to the FDA standard of less than 20 parts per million.
You can find Send Me Gluten FREE on Facebook here and follow them on Twitter here.
Would you like to try a sample box from Send Me Gluten Free? You can enter to WIN one by commenting below AND sharing this post on Facebook with your friends. In your comment, please answer these questions: Why did you go gluten free & what is your favorite gluten free snack? Also, let me know in the comments that your shared with your friends and please tag cavegrrl.com when you do. Contest lasts until the end of April, and I will pick a winner at random.
Below is an example of the type of products found in a box, not the actual contents of what the winner will receive. It changes every month, that’s the fun of it!

PS!!: If you decide to subscribe, Cavegrrl.com readers can get a 20% off an subscription length by using discount code BLOG20 at checkout.
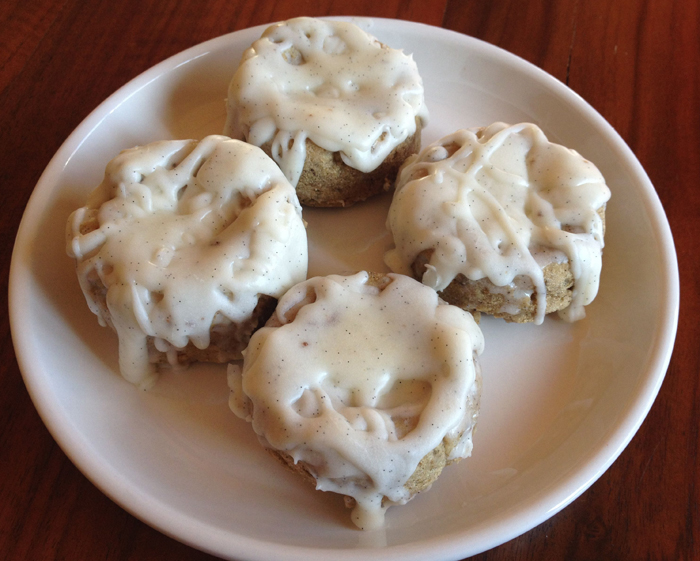
FREE Gluten FREE Donuts! Today We Reveal the Winner of the Dr. Bob’s Giveaway…
It’s time to make the donuts and time to choose a winner for the giveaway of the Dr. Bob’s Donuts and Doyos Complete Starter Kit that includes all three of Dr. Bob’s gluten free and vegan donut mixes, as well as a pan to make them in, a cooling rack and a vented lid.
I entered all of you for the number of times you commented, liked, shared, etc. this blog post and used random.org to generate a numbered list of all of you, and Andy picked a number at random (number 17). Number 17 is going to have a blast with this kit! I know I have with mine. 🙂
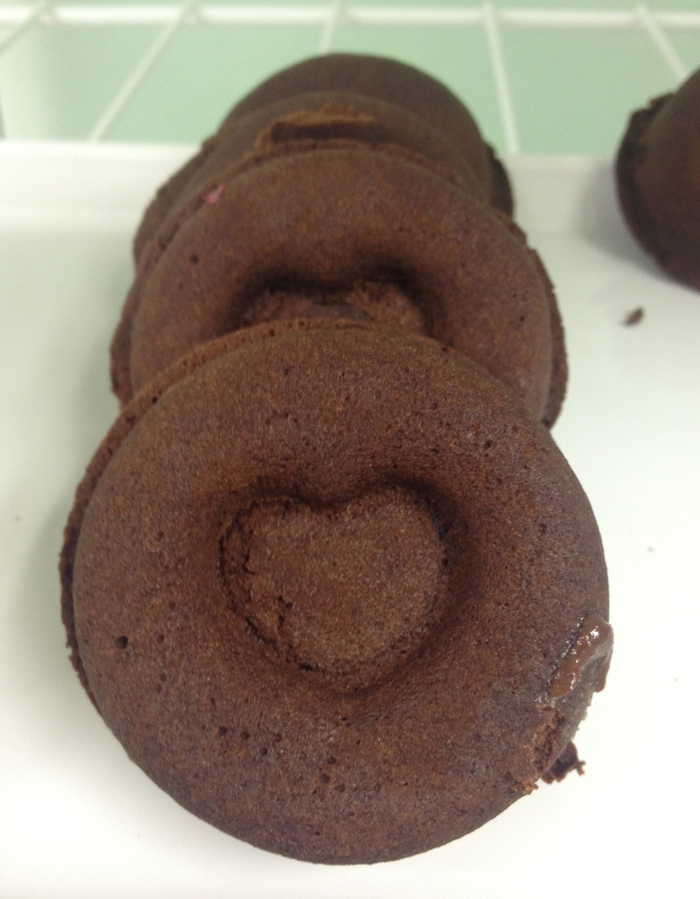
Before I reveal the winner, I would like to share the donuts I made today. I used the very last of my blonde mix (my favorite, by the way) to create a honey vanilla donut with honey vanilla glaze.
I used the blonde mix in the standard way, except I added 1 tsp of vanilla and 2 Tbs of honey in the 1 cup of liquid mixture. (The standard recipe is one cup mix and one cup water). I also added 1/2 of the beans from one vanilla bean pod to the batter.
To make the glaze, I used 1/2 cup coconut oil, 1 Tbs butter, 2 Tbs honey, 1 packet of stevia, a pinch of salt, and the contents of the other half of the vanilla bean pod.
After you steam the donuts in the microwave, brush them with a mix of 2 Tbsp honey & 1 Tbs hot water. This makes them super moist inside and gives them a little more sweetness. Then glaze the donuts with your glaze and place them in the refrigerator to set. It’s that easy! 🙂

Now, let’s cut open the donut to find out the winner of the starter kit!

Congratulations to Mindie! You have won the starter kit and Dr. Bob’s will ship it directly to you. I will contact you privately to get your mailing address. Thanks again for your entry. I hope you’ll share some of the fun things you make on Dr. Bob’s Facebook page or the cavegrrl.com Facebook page. 🙂
If you didn’t win the contest, I have some buy one, get one FREE coupons (good for Dr. Bob’s Donuts and Doyos Roseville Store location only). Just email me with your address and will send one your way (one per family, until I run out of them).
And to those interested in buying Dr. Bob’s products online, I have a discount code for you! Just enter CAVEGRRL15 for 15% off of your online purchase! (Apply Your Coupon or Discount Code on Final Payment Screen)
Enter to Win a Dr. Bob’s Donuts and Doyos Complete Starter Kit!


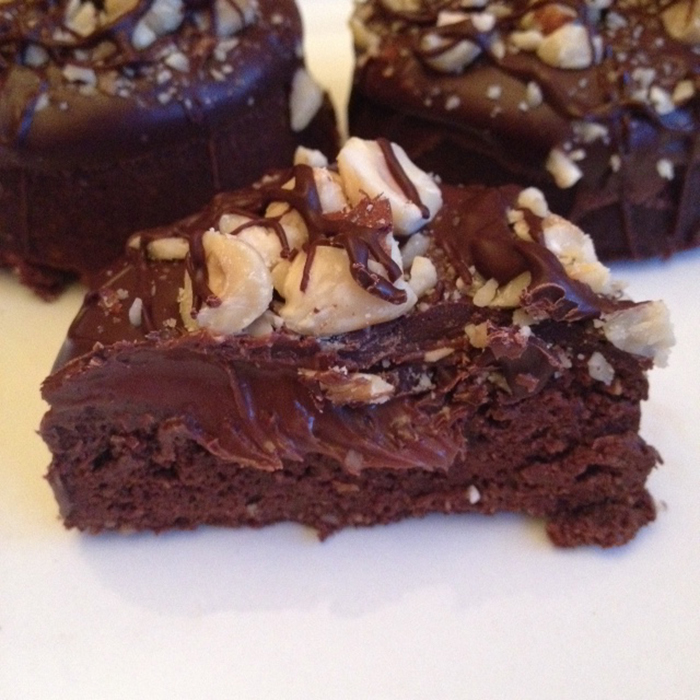
You might recall a few blog posts back a certain donut I made for Andy: Gluten Free and Vegan Banana Maple Walnut Donuts with Banana Date Filling using Dr. Bob’s Blonde Mix. That was fine, but what about me? 😉 This time I decided to make a donut with a few of my favorite flavor combinations: Hazelnut and Chocolate!
First, I made the donut base with Dr. Bob’s Chocolate Mix and a few other ingredients:
Donut Base:
Dry Ingredients:
3/4 cup Chocolate Mix
2 Tbs Unsweetened Cocoa Powder
2 Tbs Hazelnut Flour
2 Packets Stevia or Zylitol
Liquid Ingredients:
3/4 cup of Hazelnut Coffee (or regular coffee if you do not have hazelnut)
3 Tbs Nut Milk of Your Choice
1 Tbs Frangelico or Sugar Free Hazelnut Syrup
Mix all the dry ingredients in a medium-sized bowl, and mix all of the liquid ingredients in a smaller-sized bowl. Add the liquid ingredients to the dry ingredients and mix until thoroughly combined.
I like to spray/grease my silicone pan with Coconut Oil Spray (which can be found at Trader Joe’s) before adding the donut batter to the it.
Then I microwaved for 2 minutes (yep, that’s all it takes) and the donuts were done!

Allow the donuts to cool, and for an extra flavor boost, poke holes in them with a fork, and using a pastry brush, dab them with more Frangelico or hazelnut syrup.
For the filling, I used a hazelnut spread called Nocciolata is Italy’s health-conscious answer for a chocolatey treat. Crafted using carefully selected ingredients, including dark chocolate from the Antillean Islands, Italian hazelnuts (with low-fat content), raw cane sugar, skimmed milk and Bourbon vanilla extract, this high-quality certified organic spread is also free from trans fats, artificial flavors, colors or preservatives.
You can find Nocciolata on Facebook here, follow them on Twitter here and follow them on Pinterest here. You can find Nocciolata at Nugget Market!

Icing and Topping:
6 oz. semisweet chocolate or chips
1 Tbs butter
1/2 cup toasted and chopped hazelnuts
For the topping, I just melted a little semisweet chocolate, 1 Tbsp of butter and a tiny bit more of the Frangelico. To ice the donuts, I carefully dipped them into the melted chocolate and set them on parchment paper. I then topped each one with toasted, chopped hazelnuts, then returned to each donut with a final drizzle of chocolate on their tops, so that the hazelnuts would stay in place.
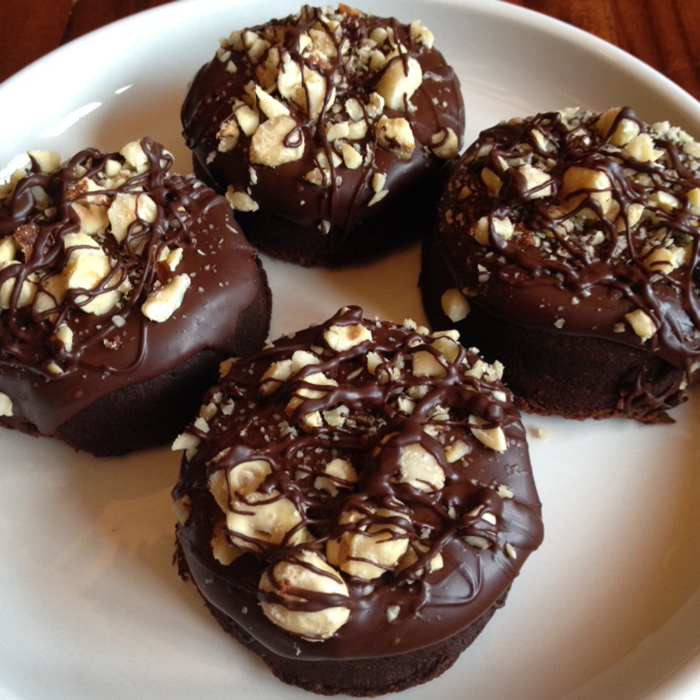
And here’s the delectable cross-section. OMG. 😛
The bad news? All of the Chocolate Hazelnut donuts have already been scarfed down and I don’t have any for you to sample.
The good news? You can try making your very own with the Dr. Bob’s Complete Starter kit that Dr. Bob’s Donuts and Doyos and I are giving away!!
YES! Dr. Bob’s and I are giving away a Dr. Bob’s Complete Starter kit! This giveaway is only for those who live in the Continental USA.
The Complete Starter Kit includes a 100% food grade silicone heart shaped Vitamold, a bamboo drying rack, and a vented lid. The complete kit includes a regular size bag Chocolate unsweetened, Chocolate Sweetened and the Blonde Mix. This kit has a retail value of $89.97.

To be entered in the giveaway, comment below and tell me what kind of donuts you would create with your kit. Then for extra entries and an increased chance of winning the kit:
Like the Dr. Bob’s Donuts Facebook page and leave me a comment that you did.
Like the CAVEGRRL.COM Facebook page and leave me a comment that you did.
Follow CAVEGRRL on Instagram and leave me a comment that you did.
Follow Dr. Bob’s Donuts on Instagram and leave me a comment that you did.
Share this post on Facebook!!
You have until Friday, February 27th to enter! I will pick a winner at random on Saturday, February 28th and announce it on my Facebook page. Again, you must live in the Continental US to win and you must LOVE donuts!
GOOD LUCK!! 🙂
Dr. Bob’s Donuts and DoYos is located at 336 Lincoln Street in old town Roseville. They are open 7 am to 5 pm Tuesday thru Sunday. For more information, you can call them at 916-742-5241. You can find Dr. Bob’s Donuts and DoYos and tons of photos/ideas for donut creations on their Facebook page here and you can follow them on Twitter here. You can also follow them on Instagram here! 🙂
A Look Inside Dr. Bob’s Donuts and DoYos in Roseville
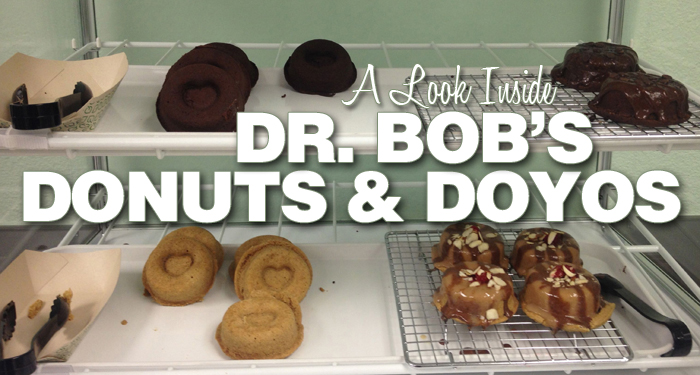
Last Friday, I stopped by a new place in Roseville called Dr. Bob’s Donuts and DoYos. They’ve been open about 3 weeks now and are the first to serve steamed gluten free and vegan donuts in the area. At Dr. Bob’s, customers are able to fully customize their donuts with different glazes, syrups, puddings, and dozens of toppings. Taking their creations a step further, they can add up to two different kinds of dairy free frozen yogurt to make a DoYo. Donuts AND frozen yogurt? And it’s healthy? Where do I sign up? 🙂
During my visit, I spoke with Tasha Richard, owner and co-founder of Dr. Bob’s Donuts and DoYos. She was neatly dressed in her chef’s attire, and though in the middle of a busy afternoon rush, she made time to answer some of my questions and chat with me about the her culinary background, food philosophies, and the shop itself.
Immediately, Tasha made a strong impression on me as a person who doesn’t want to change the world, but rather wants to help the world change. She and I have that in common as I have tried to help people who want to change their diet with this website and access to my Paleo and Primal recipes.
It’s been a long time coming, but I believe people are finally realizing that “food is medicine and medicine is your food”. There’s a direct correlation between sugar intake and disease. There’s also a connection between foods with highly processed ingredients (enriched flour, high fructose corn syrup) and obesity. It was exciting to interview Tasha because as she spoke to me about the donuts and her products at the shop, she transformed from a soft spoken business owner into a passionate health food advocate!
It wasn’t always like that for the Chef-Owner of Dr. Bob’s. After 25 years in the food industry and a typical American diet, Tasha had fallen into ill health with a myriad of digestive issues. Eventually she went to Hawaii and met Dr. Bob. Instead of prescription medicine, Dr. Bob placed her on an elimination diet. The elimination diet usually involves cutting out foods/ingredients to which people are commonly allergic such as milk, eggs, nuts, wheat, and soy. It took 2 years, but finally Tasha’s health improved and the gastrointestinal problems vanished. Her waistline did a vanishing act, too–she lost 80 pounds!
One of the keys to Tasha’s success and managing an elimination diet was developing a gluten and dairy free treat that reminded her of one of the things she loved and gave up: donuts! (To be honest, I miss those, too!) With her chef background, she worked on the mix for the donuts with Dr. Bob and came up with a blend of: Sprouted Brown Rice Flour, Criollo Cacao Powder, Yellow Pea Protein Powder, Peruvian Maca Powder, Golden Milled Flaxseed, Hemp Protein Powder, Cinnamon Powder, Sprouted Brown Rice Protein Powder, Moringa Leaf Powder, Tumeric Powder, Green Tea Powder, Ginger Powder, Probiotics, and Minerals.
The donut mix is vegan and common allergen free (no gluten, wheat, dairy, corn, eggs, or nuts) and now available for sale on their website and in the Roseville storefront.

So how does it work inside Dr. Bob’s Donuts and DoYos? Well, here’s a look inside the shop:
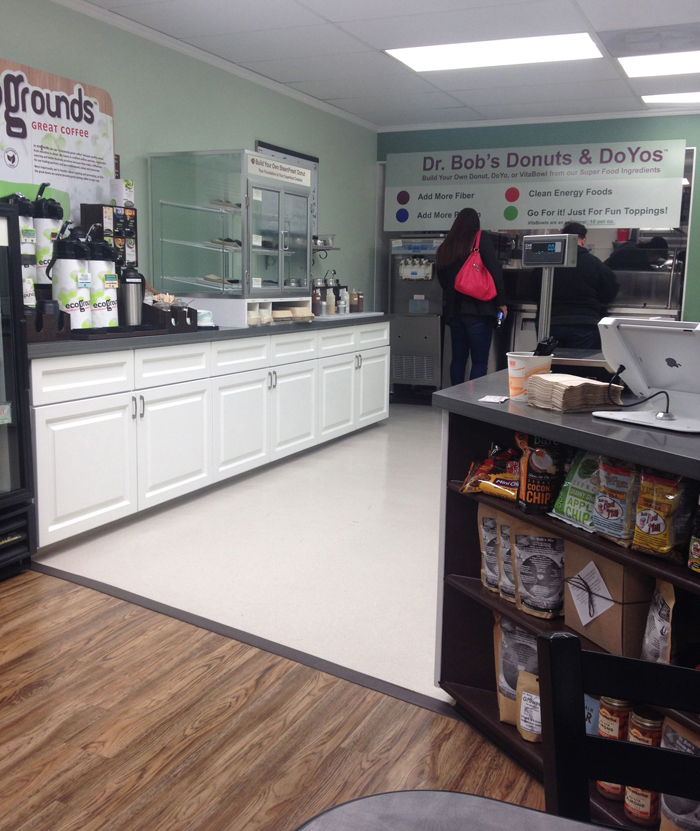
First, you select a donut. You can choose from vanilla, chocolate, or even unsweetened chocolate. For the uninspired, there are also several premade donuts with glazes and fruit already on them. All of the donuts are kept warm in a glass cabinet.


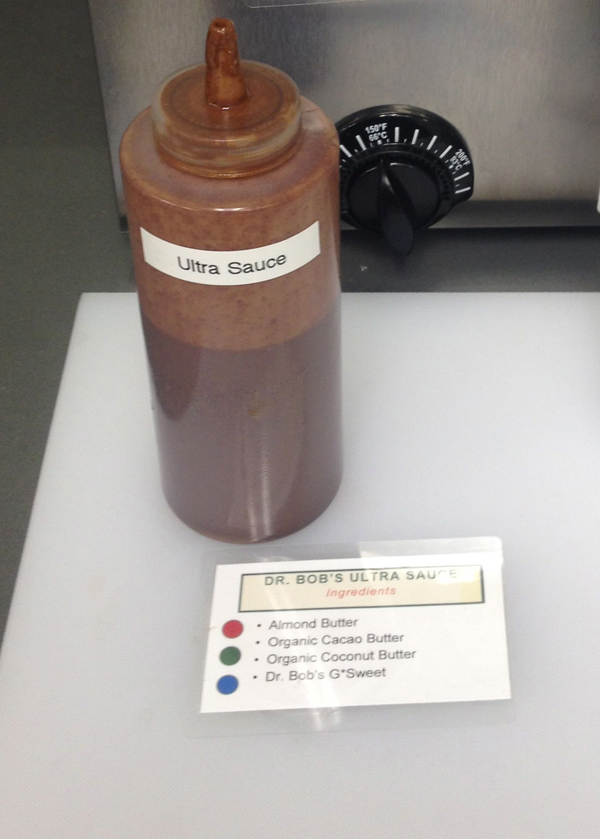
After you select a donut, you can top it with any of the house made glazes and sauces. This one is the “Ultra Sauce” made with almond butter, organic cacao butter, organic coconut butter, and Dr. Bob’s G* Sweet (a sweetener made with a blend of cane sugar, coconut palm sugar, lo han guo, coconut water powder, and stevia) that is 6 times sweeter than table sugar–meaning you can use less of it and it still tastes very sweet. 🙂

After the sauce and glazing station, you can visit the frozen yogurt machine:

Or not. Since I was going to be driving back to Sacramento, I arranged to keep my donuts and frozen yogurt in separate containers so the frozen yogurt would not melt as quickly.
Then, more toppings are available on the fresh bar next to the yogurt machine. There is fresh fruit like strawberries and kiwi as well as a few different dairy free mousses and chia pudding. Tasha explained to me that some people skip the donuts altogether and just enjoy the puddings and fresh fruit together. It’s really a choose your own adventure at Dr. Bob’s.

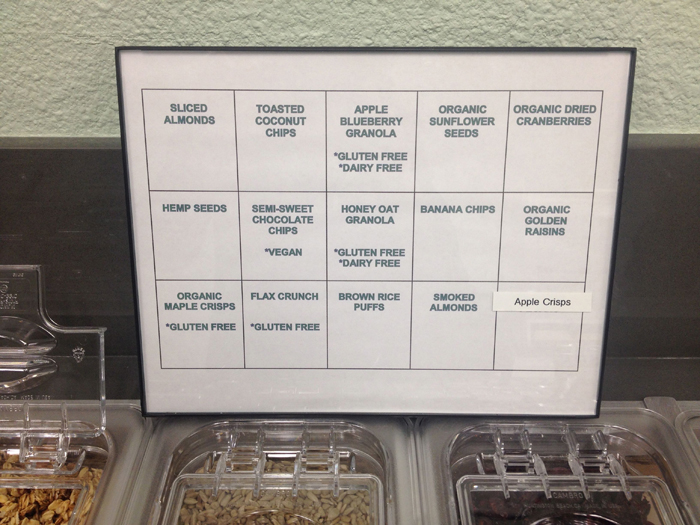
Next and finally there is the dry bar of toppings. This station gives a little bit of crunch and texture to your creation. There are also a few different agave nectars and honey if you need a little more sweetness.


Looks pretty good! After you’re all done making your custom donut or DoYo, it’s time to pay. What to drink? There is a small coffee bar across from the cash register and there are also two fresh juices available daily. If you feeling generous and want to take some donuts into the office, they are available in packs of 4, 8, and 12. For pricing and menu, you can click here.

Dr. Bob’s Donuts and DoYos is located at 336 Lincoln Street in old town Roseville. They are open 7 am to 8 pm Tuesday thru Sunday. For more information, you can call them at 916-742-5241. You can find Dr. Bob’s Donuts and DoYos and tons of photos/ideas for donut creations on their Facebook page here and you can follow them on Twitter here. You can also follow them on Instagram here! 🙂

Recipe: Gluten Free, No Sugar Added Büche de Noel
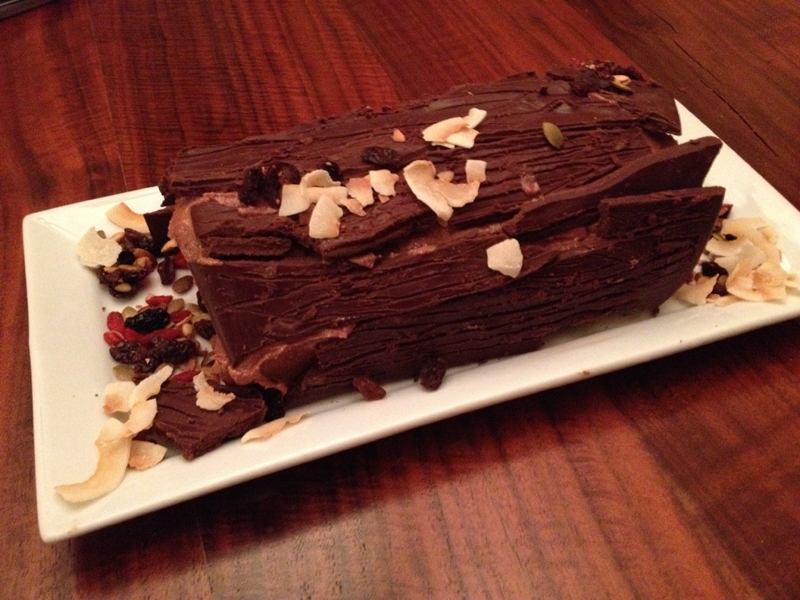
I used to work at The Bonbonerie in Cincinnati, Ohio and the most amazing thing they make (other than their masterpiece wedding cakes—many of them creations by the incomparable Richard Prince) is their Büche de Noel (pictured below).

I never attempted to make one myself until this year, and just to raise the stakes, I made it Primal friendly! 🙂 I used coconut flour and eggs and made a simple sponge cake that would roll without falling apart. I am posting the recipe and hope you will try it yourself because it really is not that hard, but it takes a little effort and patience. And great ingredients.
I’d like to thank Challenge Butter, Bob’s Red Mill, and Pyure Organic Stevia for helping make my Büche de Noel taste amazing. They all sent me products that were used in cookies for my annual Ladies Gluten Free Cookie Exchange, (I’ll be writing about that very soon) and I am continuing to use their ingredients in other recipes that will be featured here on my website throughout the year.
First, prepare your filling and frosting.
For the Filling
Ingredients:
20 Medjool dates soaked in hot water and drained
2 Tbs Challenge Butter
sea salt to taste
2 tsp vanilla extract
Procedure:
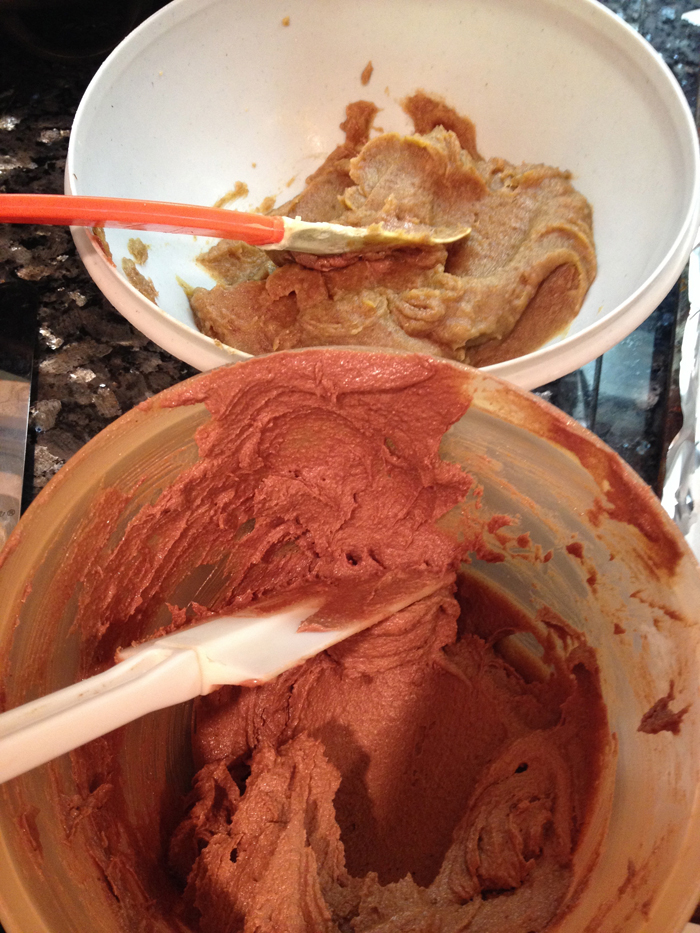
Pulse all ingredients in a food processor until the filling becomes a caramel texture.
For the Buttercream:
Ingredients
1 stick Challenge Butter
1 cup Pyure Organic Stevia
1/2 cup coconut oil (solid, not melted)
1/4 melted semisweet chocolate
1 Tbs unsweetened cocoa
1 tsp vanilla extract
Procedure
This is another food processor item. Start with the Pyure Organic Stevia. Pulse the product in the food processor until it becomes a fine powder. Then add the Challenge Butter and coconut oil and blend together until you have a buttercream-like substance. Add the cocoa and vanilla extract. When ingredients are combined completely, add in the melted chocolate. The chocolate will heat up the butter and coconut oil and mixture will look rather runny. Pour the mixture into a bowl and place into your refrigerator while you make the chocolate bark and the cake. Next, prepare your chocolate “bark”.
Chocolate Bark
Ingredients
2 cups dark or semisweet chocolate (broken into pieces)
1/2-3/4 cup coconut oil
Procedure
Melt your chocolate pieces and the coconut oil in the microwave 20 seconds at a time, stirring after each 20 seconds. Do not overheat. Stir until the mixture is completely smooth and spread on a parchment paper lined baking sheet. Place baking sheet in the refrigerator until semi-solid. Then take out the sheet and with the twines of a fork, drag lines across the chocolate to create a “bark” texture. Then return the pan to the refrigerator to solidify completely.
 Now it’s cake time.
Sponge Cake
Ingredients
8 large eggs (room temperature)
1 tsp lemon juice
½ tsp cream of tartar
2 tbsp Bob’s Red Mill coconut flour
(plus 1-2 Tbsp more for dusting your baking pan)
1 Tbsp unsweetened cocoa
4 tbsp Pyure Organic Stevia
2 tsp vanilla
1 tsp salt
Juice of 1 large orange
Rind of 1 large orange
Procedure:
Pre-heat oven to 350°F. Line a jelly roll pan with parchment paper and grease the sides of it with coconut oil or butter. Then lightly dust with Bob’s Red Mill coconut flour and tap off the excess.
Separate the eggs into 8 yolks and 8 whites. Whip the egg whites with the lemon juice and cream of tartar, until firm peaks can be formed. You can do this with a stand mixer, a hand mixer or you can do it like I did by hand. If you do it by hand it’s quite a workout!
In a separate bowl, whisk together the Pyure Organic Stevia, The Bob’s Red Mill coconut flour, the orange juice, orange zest, salt, vanilla and egg yolks. Once you have combined those ingredients completely fold in 1/4 of the egg white mixture. Once the first 1/4 has been folded in, fold in another 1/4 of the egg white mixture. Continue adding portions of the egg whites, while folding until you have a complete incorporation of the two mixtures.
Pour your batter into your prepared pan and bake for 20 minutes, or until golden brown.
Remove from the oven and place a sheet of parchment paper directly over the top. Then roll the hot cake into a “jellyroll” and then let it cool while it’s still rolled tight. Remove your date paste and the buttercream from the refrigerator. The date paste will be a perfect spreading consistency, but the buttercream will be pretty solid. To get it to the right texture, simply stir it around and it will loosen up pretty well the closer it gets to room temperature.
Now it’s time to unroll and fill your Büche de Noel. At this point, the cake should look like this (below):
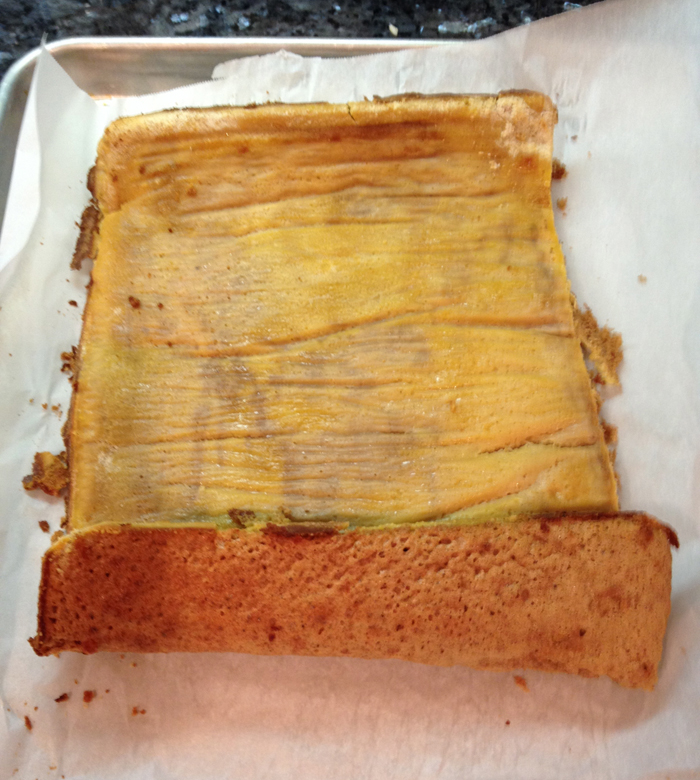
Fill your cake with the date paste and then spread a thin layer of chocolate buttercream over that. It should look like this (below):
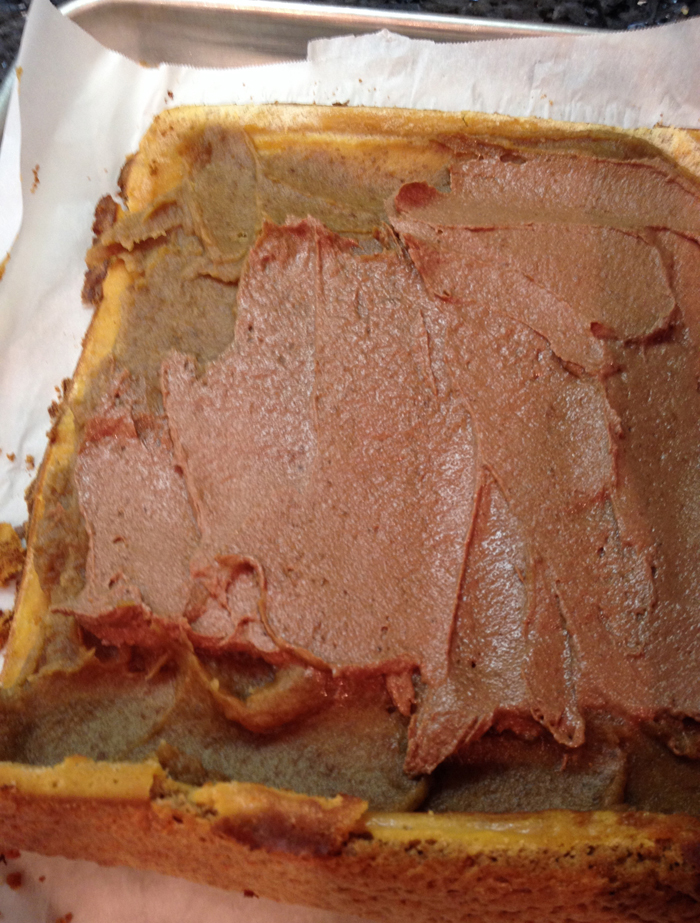
Then roll up cake and frost with the remaining buttercream. Now it should look like this (below):

Next, break up the chocolate bark you made and place it on the cake so that the cake looks like a fallen log. I added some toasted coconut to resemble lichen and some seeds and dried fruit so it really looks like a little forest bed. When you slice the Büche de Noel it will look like this in the middle (pictured below).

I plan on making this cake every year (perhaps with different frostings and fillings, but keeping it free of gluten and added sugar). I hope you will attempt this recipe as it is not too tricky with practice and patience.
I hope all of you had a safe New Year’s and I wish you all the best for 2015! Cheers 🙂
Gluten Free Menu Shines at Siino’s Pizza, Pasta and Grill in Lincoln

A few weeks ago, Andy and I visited a restaurant in Lincoln called Siino’s Pizza, Pasta & Grill. We were originally going to sample the gluten free pizzas as a part of National Pizza Month in October, but instead we decided to go with other items on the gluten free menu.
Siino’s story began in February 2011, when Annalisa Siino opened the doors of her first restaurant as a franchisee. When Annalisa took over, the restaurant was an Original Pete’s, and in just three years Annalisa turned it into her own community establishment and gave it her own name: Siino’s Pizza, Pasta & Grill. The rebranding took place in May of 2014.
Siino’s concept is to partner with local growers and feature their produce/products within the new menu. The menu also includes baked goods from Divine Desserts in Loomis, and hand-crafted brews from Loomis Basin Brewing Company & Roseville Brewing Company.
But back to that great gluten free menu. I am not sure of the inspiration for that, but I was pleased to see a restaurant with a whole section of their menu devoted to gluten free items. Patrons can order pizza, burgers and pasta sans gluten.
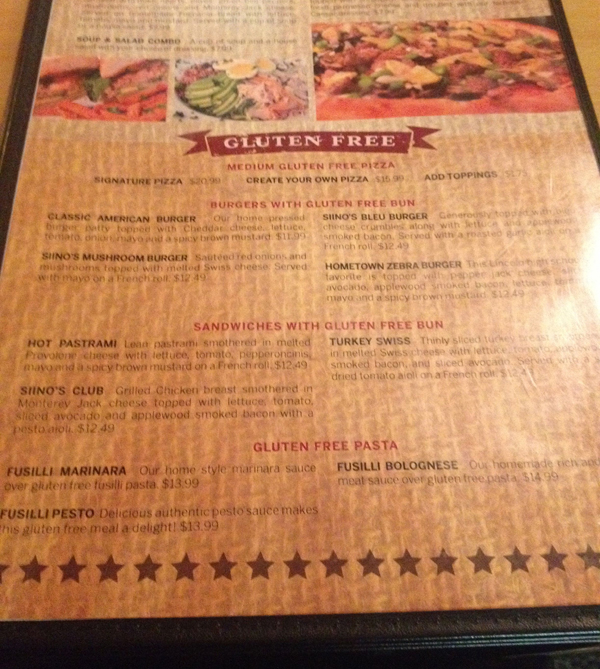
Siino’s also has a succinct and approachable wine list and an even more impressive beer selection. They offer a happy hour from 2-5pm, and an all day happy hour on Mondays, with a $1 off pints and $2 off wine by the glass. Then there is Wine Wednesday, that involves half off bottles and $2 off glasses of wine. Sign me up for that! 🙂
We chose a bottle of 2011 Chateau St. Jean Merlot, because of its versatility. We decided within a few minutes of looking at the food menu, we were going to both order a burger, so this wine was appropriate.

Our “appetizer” was a salad— the Balsamic Chicken salad. The salad was composed of mixed lettuce with grilled chicken, julienned salami and mozzarella cheese, red onions, roasted bell peppers and pepperoncinis. It was served with balsamic vinaigrette (easily ordered on the side). Another note: the picture below depicts half of the serving. The kitchen staff kindly split the salad between the two of us.
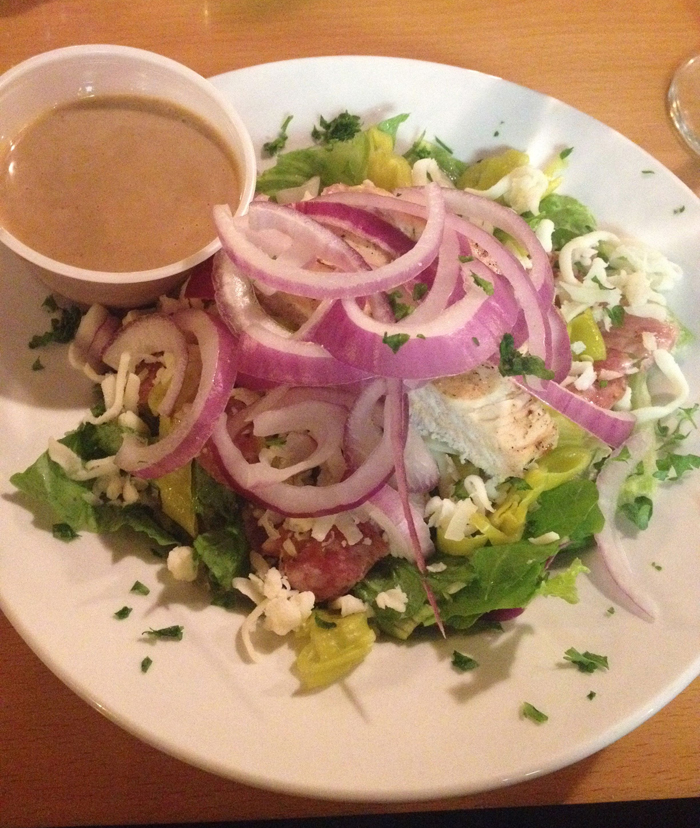
I loved the local touch on the menu of the Zebra Burger (lovingly named after the Lincoln High School mascot), so I ordered it. It came topped with pepper jack cheese, sliced avocado, applewood smoked bacon, lettuce, tomato, mayo and a spicy brown mustard.

Andy ordered Siino’s Mushroom Burger with sautéed red onions and mushrooms topped with melted Swiss cheese. I actually liked this burger more than the Zebra burger. The mushrooms and the Swiss cheese were an incredible combination. We both enjoyed sweet potato fries with our burgers. Sweet potato fries were a nice touch and an interesting alternative to regular fries.
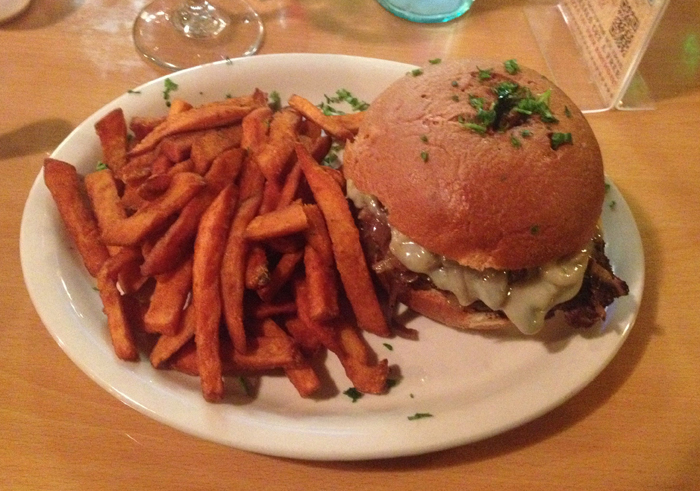
Siino’s has many great characteristics as a restaurant: a very local gem, family friendly, great beer selection, fun wine list, lots of gluten free options, and I did not mention this previously, but the service at the restaurant was also very good. My only suggestion is for Siino’s to incorporate some local wineries into their wine list, since they are already using local purveyors for their produce.
Thanks to the servers and management team at Siino’s for a fun Friday evening. You can find Siino’s Pizza, Pasta & Grill on Facebook here and on twitter here.
National Pizza Month Concludes with Chicago Fire’s Gluten Free Pizza
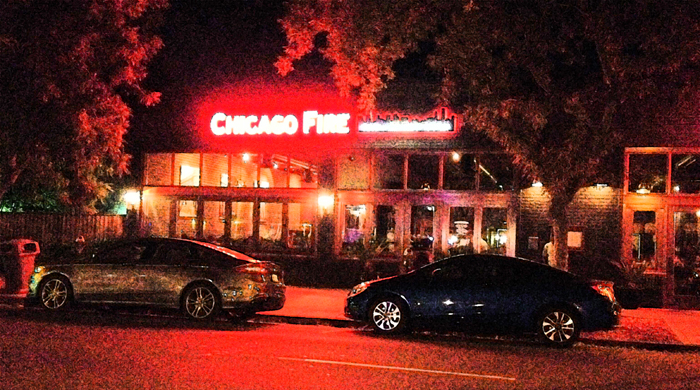
Our last yummy stop for National Pizza Month was Chicago Fire in Midtown Sacramento.
Andy and I were excited to work with Chicago Fire because it’s so close to home and we had actually been there before a few times (thanks to a $100 gift card that I won at a Christmas party my boss threw last year). Don’t ever try to win Christmas Carol Word Jumble against me. You will lose! 😉
We were able to actually use the gift card twice, so we had already tasted their fabulous version of gluten free pizza and already had a favorite wine we like to drink with our dinner (the Windy City Red blend that Boeger Winery creates just for Chicago Fire). 🙂 We already knew the service was great and were lucky enough once to have a server who had adopted a gluten free diet as well. I am seeing that more often in restaurants and it is very comforting.
It’s been a head-spinning 3 weeks since our visit (my apologies to the team at Chicago Fire for not being a little more timely on this piece–life has been absolutely crazy lately with multiple visits to San Francisco, training for a 20 mile race, working 45 hours a week, and being in the process of moving happening all at once). Still, I remember what a great time Andy and I had that night, and we always enjoy the food at the restaurant. So, here’s a recap of what we ordered:
Starter drinkys!! It was Friday night and I was ready for one of the cocktails I had seen earlier in the day on Chicago Fire’s inventive drink menu! I was interested because I saw a few descriptions that were not going to be sweet (like a lot of other drink menus unfortunately are). I picked the Basil Lemonade with Tito’s vodka muddled with fresh basil & lemon juice over ice. It hit the spot, just as I had imagined it would. Basil and lemon together in my drink, yes please! 🙂 Andy had a glass of Bolla Chianti. OK, now we’re all set…

In an effort to make the entire meal gluten-free, we chose the Baked Artichoke for an appetizer. It’s a whole artichoke, doused with lemony caesar sauce and topped with fresh parmesan cheese. Chicago Fire has quite a Greek influence in their menu and many things are flavored with lemon and garlic. That’s a plus in my book and in Andy’s, too because he is half Greek. 🙂 My favorite part of the artichoke was the cheese on top that had slightly browned and gotten crispy, and the way it tasted with fresh lemon juice on it. It was a great lead in to the salad we ordered.

Next up we tried the Chicken Pesto Salad, which is a favorite of mine. It is made of Romaine lettuce, grilled chicken, pesto-marinated artichoke hearts and red onion. We ordered the house made pesto ranch dressing on the side. Pesto is one of my favorite sauces and the dressing that comes with the salad is addictive. 😉 The chicken on the salad was grilled perfectly. I recommend ordering a large size salad because it is perfect for sharing if you are a party of two and plan on ordering a pizza as well.

I wanted to mention the wine pairing we had. This time, we did not order the Windy City Red that we usually drink, but instead went with a Greg Norman 2012 (Santa Barbara) Pinot Noir (because of the lighter nature of ingredients in our salad and our pizza). We chose the Greg Norman Pinot Noir (Santa Barbara) because it was a better value than the other Pinot Noir on the wine list (La Crema).

By now it was pizza time! We decided on the gluten free Greek pizza. The Greek is topped with Gyro meat, white Sauce, Artichoke Hearts, Kalamata Olives, Red Onion, Fresh Tomato, Feta Cheese & Pepperoncini and served with what else? Tzatziki on the side. Love it. My favorite part of the pizza (other than the super crispy edges on the crust were the little slices of Gyro meat that had also gotten super crispy/crunchy in the pizza oven. We squeezed the lemon juice over the slices for an extra burst of flavor and the tzatziki lemon combo was just paradise. It’s a real treat for Andy and I to eat pizza/things with crust/bread at all even if it is gluten free, so it was fun to try the Greek flavor combination on a crust. Bonus points for the presentation, one slice of pizza was slightly propped up with the ramekin that held the tzatziki sauce. Beautiful!

Thanks Chicago Fire, we’ll definitely be back for more very soon! We’ll continue to work our way around the menu of gluten free pizzas. We’ve already tried and given thumbs up to the Stockyard and Chicken Pesto on previous visits. 🙂
Chicago Fire has a loyalty program called Square Points. You can points as soon as you get a Square Points card from your server. By registering online, you’ll be able to redeem your points. Then you can earn more points when you buy food, drinks & merchandise. Some of the rewards from the Square Points membership include a free Deep Dish Delight on your birthday, a free specialty pizza for every 500 points, and free corkage. Of course the term FREE CORKAGE was music to our ears, so we decided to enroll in Square Points, too!
Are you hungry for a visit yet?!?! Good news for you if you aren’t near downtown but live closer to Folsom or Roseville, because in addition to the Midtown location on 2416 J Street, there are 3 other locations: Historic Folsom (Chicago Fire made its debut on Sutter Street in Folsom in March 2003), Folsom at Palladio, and in Roseville at Sunrise/Eureka.
Thanks for the wonderful hospitality and service all the way from the marketing team to the staff at Chicago Fire Midtown. We’ll see you again soon. 🙂
You can find Chicago Fire Pizza on Facebook here and follow them on twitter here.
National Pizza Month: ZPizza’s Gluten Free Takeout–Hasty and Tasty!

So picture this: I work in Roseville (as a graphic designer/life saver) from 8:30am-5pm, and last Wednesday Andy and I have to be at a Kings Pre-season game by 7:00pm. Factor in a 30 minute commute time, and 10-15 minutes to get to the game from my house, and there’s pretty much NO TIME to cook and have a meal before we go.
Enter National Pizza Month and zpizza! They have a gluten free menu and salads suitable for a busy person like me.
All I had to do was call them ahead of time and let them know I wanted to pick up my order just a little after 5:00pm. I browsed their website, and chose what looked interesting to me. I thought their website was fantastic at showing what and was not available in gluten free. All you have to do is check a little box in the upper right hand corner, and the gluten free items remain listed, while the gluten items are grayed out. See?

So two items on the menu immediately caught my eye, beginning with the Arugula Salad! The salad has cucumbers, caramelized onions, parmesan cheese, candied walnuts and guess what? Arugula! Sold! I added on some avocado and chicken breast for an extra charge.
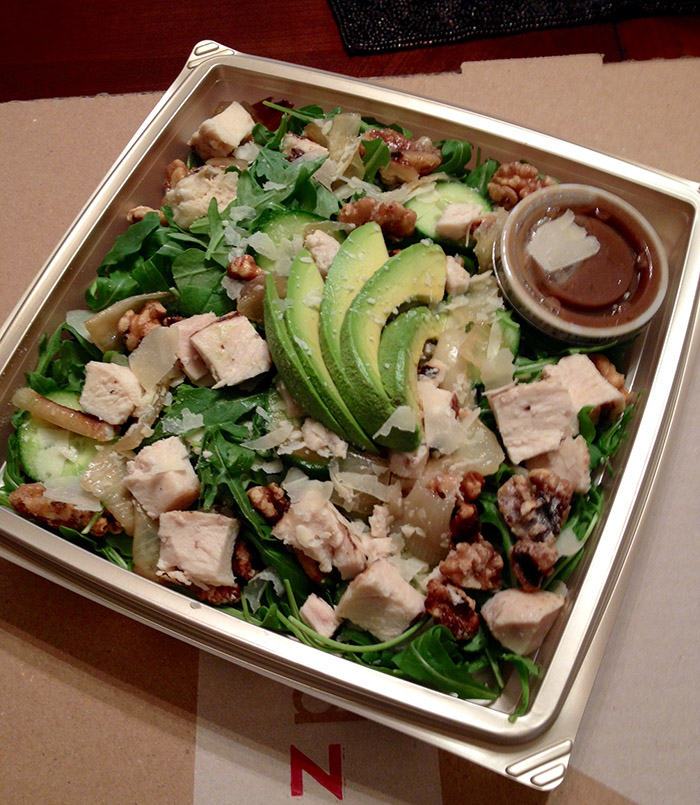
The other menu item that grabbed my attention was the gluten free Italian pizza with artichoke hearts, tomatoes, ham, basil, pesto (yes!!) mozzarella cheese, and black olives. At first I was worried I didn’t order enough food, but as we ate, we both got really full. I guess we’re not used to having a treat as nice as pizza––even the gluten free variety––and any kind of dough is really filling. I had 3 pieces and it was so gooood. The crust was great and really crispy on the edges. The pesto was terrific and I only wish I had ordered extra on the side to dip the crust in! The crust had a nice buttery flavor and even a sort of flakey texture. I am glad I have Andy to eat the other 5 pieces, because I would have demolished them for sure! 😉

Now, onto the wine we had with dinner! 🙂

Andy brought over 2 different wines to have with dinner. The white wine he brought was a 2012 Chardonnay from Mercy Vineyards. The second wine he brought (yep, I am pretty lucky to have such premium wines with a take out dinner!!) was a Cinsaut from Miner’s Leap which is produced from 127 year-old vines in Clarksburg!
Andy said he chose the wine pairing to resist the traditional “pizza wines” like sangiovese or chianti, because this pizza had pesto on it and really lent itself to a lighter style of wine. Enter the Chardonnay from Mercy––a less oakey more fruit forward wine, but still a Chardonnay lover’s wine, and the Pinot Noir mimicky Cinsaut from Miner’s Leap. Try either of these two and you’ll just think wow.
Kind of too fancy for pizza, but hey, gluten free zpizza is pretty fancy–especially before a Sacramento Kings game, so OK I’ll take it. 🙂
You can find Miner’s Leap on Facebook here and Mercy Vineyards on Facebook here.
If you find yourself short on time, order your pizza from zpizza online by CLICKING HERE!!
You can find zpizza on Pinterest here, on twitter here and on Facebook here.
PS: The Kings won the game against the Toronto Raptors, 113-106! 🙂
Seasons 52 Wows Us with Service and their Gluten Free Menu

I try to avoid the Arden Fair Mall at all costs. I have been shopping there maybe about 10 times in the 10 years since I have lived here and it’s always been a pain. Probably because of frustrating trips to the Apple Store and the always promising long wait therein. Even with an appointment. For those of you that have been there you know what I mean. Then there’s the abundant parking at Arden Fair. 😉 And the youngsters these days…hmmm. Nothing good can ever come from a trip to the mall. But wait!
But last Friday we did NOT go to the mall! We went to Seasons 52, a restaurant that happens to be tucked into the aforementioned mall. They have been there since January 2013, and I have been eager to come back since the media opening I attended at that time.
Eager to come back because of the concept of the restaurant and it’s direct fit with this website! 🙂
Every entree at Seasons 52 is designed to be less than 475 calories. Here’s a link to their menu. There are no freezers in the kitchen/pantry, so no meats or fish or vegetables are ever frozen. No butter or margarine is used in food preparation. Instead, extra flavor comes from natural caramelization on their wood-fired grill and brick oven. Seasons 52 also has a chef’s table for chef-hosted events and wine pairings, and features a piano bar with live music currently on Thursdays, Fridays, and Saturdays.
A few months ago I was pitched to come back to Seasons 52 to try some of their new desserts for the upcoming fall season. I emailed back to say thank you and that the dessert angle was not really an editorial fit, but I would be happy to feature the gluten free menu. I knew the restaurant was popular for their flatbreads, but I was sure they could show me more. And they really did…
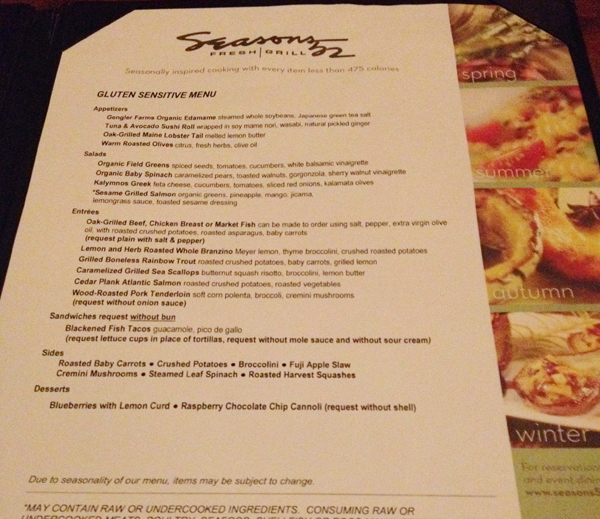
First, a gander at their gluten free menu. It’s got a lot of choices. So many that Andy and I ordered a starter glass of wine while we decided on appetizers and entrees. 🙂 A Borsao Rosé for me and a Selbach Oster Pinot Blanc for my man. By the way, once we were seated, it was like there was no mall. Just a romantically lit environment with several other couples and small parties dining around us. 🙂


Our server for the evening was Tanya, and she was more than delightful. Once we told her about my website and we asked to see the menu, she mentioned that she is also Paleo. I was pleasantly surprised and automatically won over. We were in the right hands!
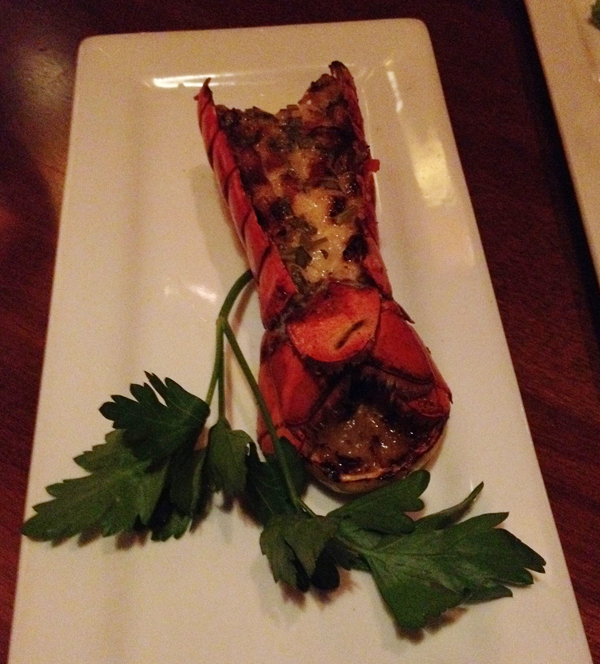
For appetizers we ordered the Oak-Grilled Maine Lobster Tail served with melted lemon butter (above).
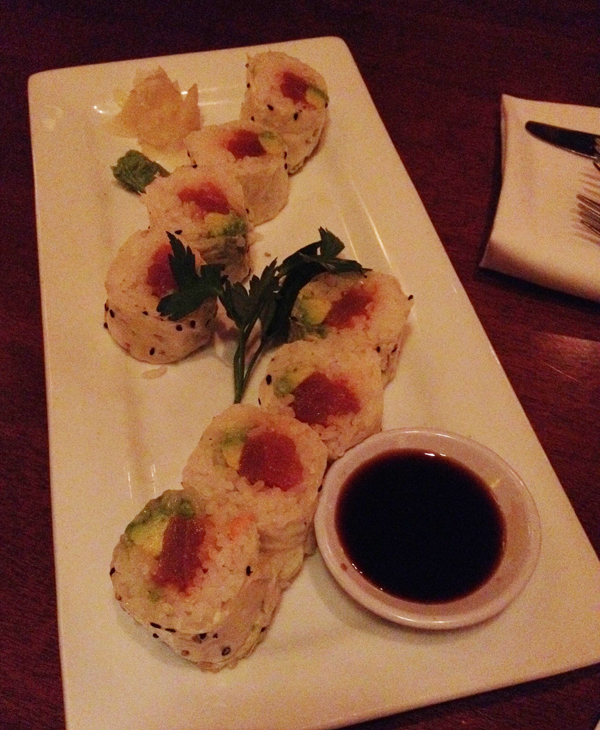
And the Tuna & Avocado Sushi Roll wrapped in soy mame nori, wasabi, natural pickled ginger (above). Our wines both complimented the appetizers, both seafood items. The lobster had a very pleasing texture and taste, but was tricky to navigate with just a butter knife. 😉 We survived however, and also enjoyed the sushi roll. The rice was a welcome treat. I don’t have it that often, but really enjoy it when I do.
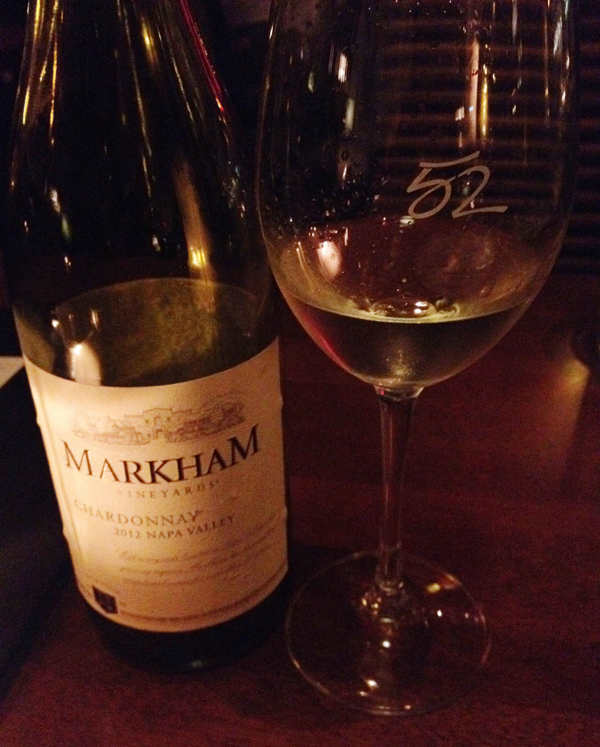
We ordered settled on a bottle of 2012 Markham Chardonnay to drink with our main courses. And the wine selection is the only thing even slightly negative that I have to say about Seasons 52. Sadly, there was not a single bottle of local wine on the menu. That’s a shame because there are so many stellar local wines coming out of Amador, Lodi, and even Placer County. I realize that a Master Sommelier put together the list for the entire chain, but to appeal to more customers (especially real wine drinkers) in a city like Sacramento, there really needs to be an addendum to the wine list featuring local juice. I will now step down from my soapbox and tell you about what we had for dinner! 😛

I ordered the Lemon and Herb Roasted Whole Branzino (a European seabass) with Meyer lemon, thyme broccolini, and crushed roasted potatoes. The presentation on this particular dish is pretty neat. A waitstaff member presents the plate with the Branzino closed and the lemon and thyme resting inside. Then, they open the top filet and remove the lemon and thyme, resting it on the side of your plate. The entree also comes with a little olive oil on the side.

We also ordered a side of Brussels sprouts with bacon to supplement our meal–I had a race and long run planned for the next day. The cast iron container is a nice touch––it kept the sprouts very warm so we could spoon a few onto our plate at a time.

Andy ordered the Caramelized Grilled Sea Scallops accompanied by butternut squash risotto, broccolini, lemon butter. I didn’t ask him to try the scallops, but he always cuts a little piece for me to try. We love ordering different entrées and eating family style. I was never a big fan of risotto and not eating a lot of rice on the Paleo diet, but really liked the risotto served with this dish. Once again, a buttery flavor is imparted without using butter.
We did clean our plates, but honestly it was the right amount of food. I wasn’t interested in dessert, but if you are there are some great options for you at Seasons 52. There are even two gluten free, but not sugar free desserts you can try from the gluten free menu. The desserts are served in little shot glasses to keep the portion/calorie count down. Each one is a smaller take on a classic dessert (carrot cake, s’mores, for example) Below is a picture of how you might end a meal at Seasons 52, just don’t eat all of what you see on the platter. 🙂

After dinner, we went into the Piano Bar for a little music, and here’s what we heard:
Thanks to the staff at Seasons 52 for their immaculate service. We’ll definitely be back. You can find Seasons 52 on Facebook here and on Twitter here. Make a reservation on Open Table by clicking here.
Farm to Fork Wine Dinner Series: Sienna Restaurant Featuring Cakebread Wines

Just look at that line up! Those bottles of Cakebread Cellars were the wines featured at Sienna Restaurant’s latest wine dinner last Thursday.
Andy and I were excited to attend this dinner because we are big fans of Cakebread, especially their Reserve Chardonnay.
Pictured below is the menu for the evening, kudos to chef Moses Hernandez at Sienna for making our dinner gluten free!!

We started with the 2013 Cakebread Sauvignon Blanc paired with a Scallop and Tiger Prawn Ceviche over cabbage and a mixed vegetable slaw with red chile and blue corn chips. This dish was the best pairing for a Sauvignon Blanc, as it was citrusy, light and refreshing, just as the wine was. And I was a hungry lady after a semi-stressful day at work. Andy remarked that he was transported to Mexico by this dish. Good thing we’re going in November! 🙂

The second course was a Seared Chilean Sea Bass with Forbidden Rice, Soy Poached Bok Choy, Lemongrass Broth & Thai gremolata. It was paired with a 2012 Napa Valley Cakebread Cellars Chardonnay.

I was so happy to have had this as the second course, as I love Thai food and this was certainly a Thai inspired dish. Again, really refreshing and just amazingly good. The broth was so flavorful, and the rice was cooked perfectly. We had some wine left from the previous course and it went with the Sauvignon Blanc just as well.
The third course was a Roasted New York Steak with Sauteéd Fingerling Potatoes, Citrus Swiss Chard, Pomegranate Molasses, and Roquefort Blue Cheese butter. It was paired with a 2011 Cakebread Cellars Napa Valley Cabernet Sauvignon.

This was the course that made Sienna as a restaurant really shine. Not only was the steak cooked perfectly along with the accoutrements. I want to comment for a moment on the service and attention to detail I witnessed at Sienna. First, one of the servers halted service of this course for Andy and me. They were not sure if we had been served the gluten-free plates or not. Now, that was highly appreciated, because although we do not have a gluten allergy, maybe someone who requested a gluten free meal might have. The staff at Sienna made sure we were delivered the correct entreés.
Another comment is that special attention to detail was given in handling the wine, as it was going to be pretty tight tannin-wise. The bar staff at Sienna took the time to both aerate the wine and then decant it long before dinner guests arrived, so that it would give its best showing.
And the wine was pretty phenomenal to both of us, and pretty much put a spell on Andy. He loved the Cabernet so much, that he ordered a case. I am pretty excited about that, because I benefit. I get to taste the 2011 Cabernet Sauvignon as it matures and develops. Softens and becomes even more magnificent. I think he said we are going to open a bottle every 6 months. Don’t be jealous, maybe you’ll get an invite for dinner to share. 😉
Then, it was on to the last course. The dessert course. Sienna made sure to adjust ours so that it was gluten free as well. It was a Peanut Butter Mousse, topped with Whipped Cream and chopped Peanut Butter Cups. It was paired with a 2012 Red Hills Lake County Cakebread Cellars Zinfandel that to be quite honest, longed to be paired with the prior course. No matter. I gave Andy all but two tastes of my dessert and I enjoyed the Zinfandel pretty much as my dessert. It was spectacular. 🙂
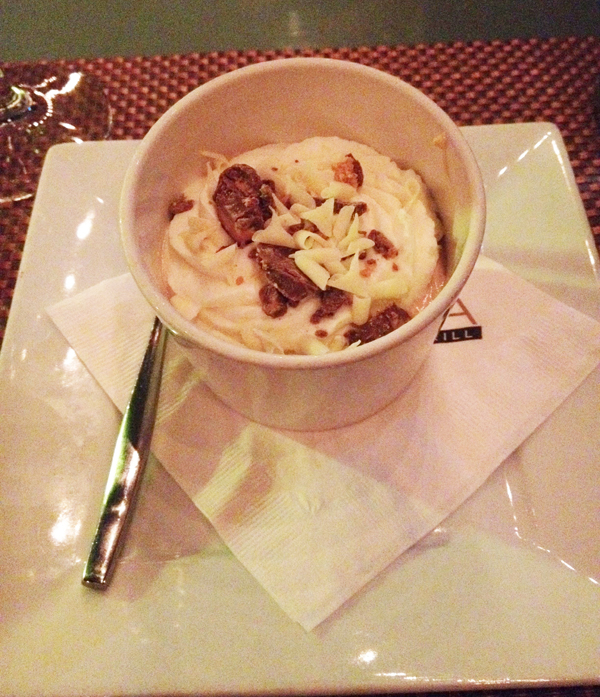
I could pretty much sum this dinner up as pure bliss. It was a beautiful evening under the stars with like minded people. All food and wine lovers like Andy and myself. I want to thank the team at Sienna for making this an incredible evening for all of the guests. No detail was spared and I am pretty sure no one left hungry or the slightest bit unhappy. We’ll certainly be back to enjoy dinner when we come to retrieve the case of Cakebread Cabernet, but we’ll also save the date for your upcoming dinner on October 2nd with Jordan Cellars.
PS: Sienna also does a Monday night Wine and Dine, it’s 3 courses paired with wine for $35 per person. Hook yourselves up by clicking here! Guess what… it’s Monday, you should totally go NOWWWW!!!
OK, that’s the yummy wrap for tonight. I’ll have more Farm to Fork Wine Dinner coverage later this week! Cheers!! 🙂
You can find Sienna Restaurant on Facebook here and on twitter here.


