
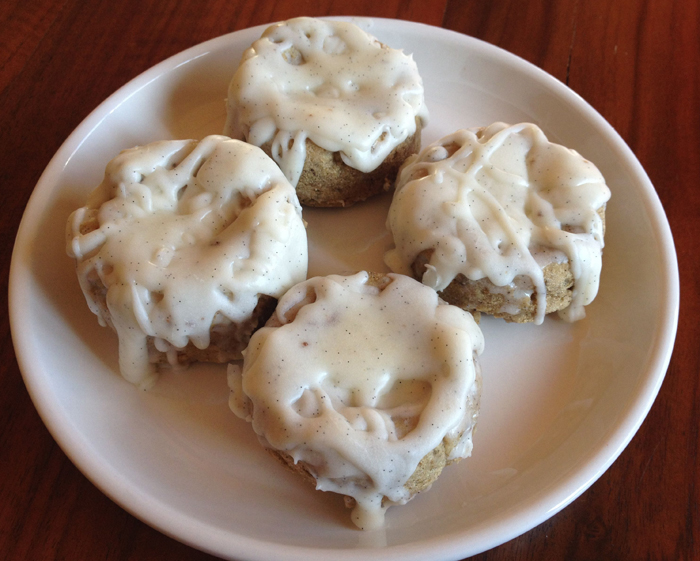
Fancy Pants Shrimp Dip with Tsar Nicoulai Salmon Roe & Schär Gluten Free Bread

Are you looking for a Memorial Day recipe to bring to a party and show off how fancy you are, but don’t want to put a lot of effort into it? I’ve got you covered with a recipe I put together last night in collaboration with Tsar Nicoulai Caviar and Schär Gluten Free Bread!
Fancy Pants Shrimp Dip with Tsar Nicoulai Salmon Roe
Recipe by Kristy Harris
6 wedges Laughing Cow Light Wedges
3 Tbs Kraft Mayo with Avocado Oil Reduced Fat Mayonnaise
1-2 Tbs 0% Chobani Greek Yogurt (drained)
3 Tbs lemon juice
Zest of 1/2 lemon
3/4 pound cooked shrimp of your choice
(weight with shells and tails removed… you can even use salad shrimp if you like)
1/4 cup scallions
2 Tbs parsley
2 tsp garlic powder
Method: Pulse all ingredients in a food processor (I start with the laughing cow, the mayo, and yogurt and then add the rest of the items) until the mixture comes together and can be spooned out (or piped out of pastry bag if you want to get even MORE fancy pants–you’ll pulse the shrimp dip further, however, I like to see little chunks of shrimp in mine).
Spread onto Bread/Toast/Crackers/Cucumber
*Eat with a Spoon out of the Food Processor Vessel standing up in your kitchen = whatever is your “conveyor belt” to your mouth of choice. 😛
I used a duo of “breads” on this plate. A slice of Schär Gluten free sourdough I toasted in the air fryer, as well as some Protein Sparing Bread (I make for myself) that contains 0 carbs.
Topping: Top each bread and spread with a 2-3 tsp of Tsar Nicoulai Salmon Roe.
I had a 2 ounce jar, so you could get a 1 ounce jar and use the whole thing, but I snacked on some while I was preparing the dip. 😉
Tip: (If you want the ULTIMATE fancy, you can use one of their caviar products!) Serve with a bottle of Domaine Carneros Brut Rosé, or be the fanciest with a bottle of Le Rêve Rosé! Cheers and Happy Cooking!
Entire recipe (serves 6-8) Approximate Macros: 641 calories: 30g carbs 25g fat, 74g protein
Per serving: 107 calories: 5 carbs, 4g fat 12g protein
Crackling Eggplant Slices with Cheesy Aubergine “Butter”

Today I competed in the Loomis Eggplant Festival Cooking Contest and won 1st place with my (original recipe) eggplant dish: Crackling Eggplant Slices with Cheesy Aubergine “Butter”. The name is derived from the incredible texture of the breading, and I also used “eggplant” in the name twice without actually doing it. Aubergine is the word for eggplant typically used in old world Europe. I also used eggplant twice in the recipe. First, with the fried slices, second, with the eggplant “butter”/spread on the top.
The thing is though, I was the only participant in this year’s contest. So, while I was happy to take home the 1st place certificate, participant ribbon, and the $100 cash for winning, it did not feel all that special to win by default. I was surprised that absolutely no one else entered!
What felt great was walking in downtown Loomis, and seeing a few hundred people out having a good time. The weather here at the end of September/beginning of October is next to perfect, and there were lots of families taking advantage of that and having good old-fashioned fun at the festival. I wish my mom had been there with me today to see it, but she lives in Ohio and absolutely does not like eggplant!
The cooking contest organizer (Mary Jane Perkins) encouraged me to come back next year, and I certainly hope to do so, even though I am not sure I could top my creativity this year or back in 2008 when I made a CAKE with eggplant and won 2nd place.
Here’s my “winning” recipe from today. I hope you’ll try it for yourself. If you do, please let me know what you think.
Crackling Eggplant Slices with Cheesy Aubergine “Butter”
Appetizer Category (Serves 6-8)
Eggplant Spread:
1/4 Cup Mascarpone Cheese
1/4 Cup Cream Cheese
2 Tbs Butter
1 Roasted Eggplant with Skin Removed
Lemon Juice
Sea Salt
You can prepare eggplant spread a day ahead of time. Slice an eggplant. lengthwise and drizzle it with olive oil. Roast in the oven at 425 for 45 mins and discard the skin. Scoop out the roasted flesh and place in a food processor with the mascarpone cheese, cream cheese, butter, lemon juice, and sea salt. Pulse until completely blended. Set aside.
Fried Eggplant Slices:
1 Eggplant Sliced into Rounds
1 Cup Crushed Pork Rinds
1 Cup Parmesan Cheese
1/2 Cup Almond Flour
2 Eggs
Cracked Pepper
Combine pork rinds, cheese, and almond flour to create the “breading”. You’ll want to place the “breading” in a shallow container that will allow the slices to be dipped in. Slice the eggplant into rounds and salt, laying on paper towels to allow the excess moisture in the eggplant to seep out for 10 mins.
Beat the eggs in a bowl and when the eggplant has drained, dip the slices into the egg, and then into the breading.
Place on a parchment lined baking sheet to bake, or prepare the slices in the air fryer. 350° in the oven until browned, or 370° in the air fryer for about 10 minutes.
Garnish:
Fresh Dill
1/4 Cup Pine Nuts
1/4 Cup Capers
Meanwhile, fry the capers in olive oil until they become crispy and drain. Toast the pine nuts in a shallow pan until they become nice and toasty.
Top each fried/baked eggplant slice with some of the spread, and garnish with the crispy capers and toasted pine nuts. Top with fresh dill. Serve.


Primal Sweet Potato Salad Recipe and Pinot Noir Wine Pairing
Learn how to make my killer (and healthy) sweet potato salad recipe (that happens to also be PRIMAL!) and pair it with a 2018 Owl Box Pinot Noir from Grocery Outlet.
Recipe Ingredients:
3 to 4 medium-sized white sweet potatoes, peeled cut into 3/4-inch chunks
1 cup Greek yogurt
2 Tbsp. apple cider vinegar
1 tsp yellow mustard
Dash of paprika
1-1/2 tsp. salt
1/4 tsp. ground black pepper
1 tsp Garlic Powder
1/2 cup thinly sliced fennel bulb
1/2 cup chopped red onion
2 hard-boiled eggs, chopped (optional)
4 slices thick-cut cherrywood or applewood bacon
Recipe Preparation:
Cook the bacon in the microwave and drain on a paper towel.
Cover potatoes with water and bring to a boil. Reduce heat to low and cook until potatoes are tender, about 10 minutes. Drain and cool slightly. Combine the yogurt, vinegar, salt and pepper in large bowl. Add potatoes, fennel slices, onion, eggs, then the bacon.
If you like a little chill on your potato salad, you can refrigerate for about a half hour. However, I like mine room temperature so I pretty much eat the salad right after I put it together.
Air Fryer Recipe: Hot Honey Bacon Wrapped Chicken
AIR FRYER RECIPE Hot Honey Bacon Wrapped Chicken with WINE PAIRING: Clerget Grande Cuvée Sparkling Wine
Recipe:
Serves 8-10 people
(depending if you are eating as an appetizer or main course)
Ingredients:
3 Pounds Chicken Breast Tenders
24 ozs. (about 2 packages) Applewood Bacon
2 Teaspoons Paprika
2 Foil Lined Pans
Air Fryer or Oven Set to 350°F
Hot Honey Sauce
1 Cup Honey
2 Teaspoons Yellow Mustard
1 Teaspoon Garlic Powder
1 Teaspoon Onion Powder
1 Tbs Red Pepper Flake
Steps:
Pat the chicken dry with paper towels. Coat the chicken breast tenders with the paprika, then wrap each piece with one slice of bacon. Put each wrapped piece on a tray you have lined with aluminum foil (prep tray). Continue until you have wrapped all the pieces.
Place bacon wrapped chicken in the air fryer at 350-360°F or bake in the oven. It will take about 10 mins in the air fryer and about 20 in the oven.
While the chicken is cooking, prepare the hot honey sauce by combining honey, mustard, garlic powder, onion powder, and the red pepper flakes. Stir until well combined.
Remove all the chicken from your air fryer and place on to the other foil-lined tray. Then brush the hot honey sauce generously over each piece.
I like to serve the chicken on a nice platter over a bed of arugula.
Wine Pairing:
For the wine pairing, any dry to off dry sparkling wine will do. I found the Clerget Grande Cuvée (a French bubbly made in the Charmat method) at Grocery Outlet for $5.99. A Spanish Cava or an Italian Prosecco would also be an excellent pairing. Cheers!
TICKETS FOR PEACEMAKING HAPPY HOUR WITH ZAMIR GOTTA on July 16th:
https://www.eventbrite.com/e/peacemaking-happy-hour-with-zamir-gotta-tickets-156145412131
Putting the “Pazazz” in Your Holiday Feast
Every holiday table needs a little pizzazz. And so does every potluck. I present to you today a recipe that even the laziest person can whip together in less than 20 minutes (depending on how fast you can slice), but it will seem like the most gourmet salad you’ve ever made. More importantly, it’s gluten free, nutritious, and just happens to even be vegan. The star of the salad is Pazazz itself. Pazazz apples, that is!
Pazazz is a descendent of the Honeycrisp with a sweet, yet tart flavor. You may or may not have seen them in your grocery store, because they are quite new to the market. Pazazz apples are grown sustainably by second and third generation family orchards, who make sure the natural orchard habitat and the land is protected.
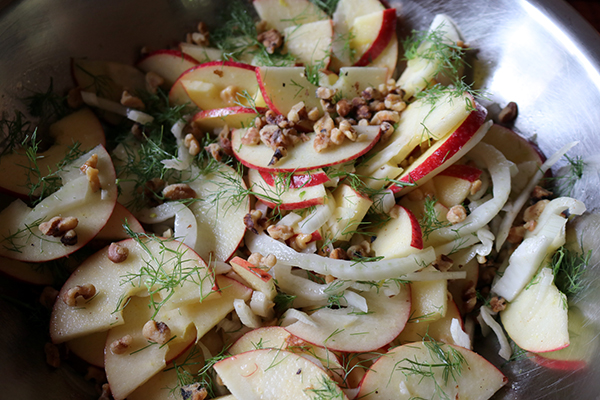
I was sent a box of Pazazz apples by Honeybear Brands to develop a recipe and feature it here. Since one of the main characteristics of the Pazazz apple is its crunch, I decided to use the apples raw. I also didn’t want to add any heat that would change their skin’s beautiful color. With those parameters, I chose to make a simple Fennel and Apple Salad with Lemon and Toasted Walnuts. I wanted a lighter counterpart to all the heavy food we tend to eat at holiday parties and family dinners.
If you go to the Pazazz apple website, you can click on “Find Pizazz” to locate where to find them in your area.
You can find Honeybear Brands on Facebook here and on Instagram here.


Fennel and Apple Salad with Lemon and Toasted Walnuts
4 Pizzazz Apples
1 Whole Fennel Bulb
Fennel Fronds for Garnish
Juice from 3-4 Lemons
1/4 Cup Olive Oil
1 Tbs Lemon Zest
1 tsp sea salt (to taste)
Cracked Black Pepper (to taste)
3/4 cup toasted, chopped walnuts.
7. Sprinkle the fennel fronds over the salad for extra flavor and garnish. Salt and pepper to taste.
Serves 6.
Besides leaving you this recipe, I also want to say thank you for reading for another year. I haven’t written as often as I would have liked, but I hope next year it will be more often. This blog has been cavegrrl.com for nearly 8 years now, and I am headed into my 15th year as a blogger. I can’t believe time has gone by so quickly!
I wish you and your family a happy and healthy holiday season. I am off to travel for the rest of the year, but I will be back with more in January! Follow me on Instagram here to see what I am up to until then. Cheers!
Gluten Free Breakfast Pizza with Sweet Potato Crust
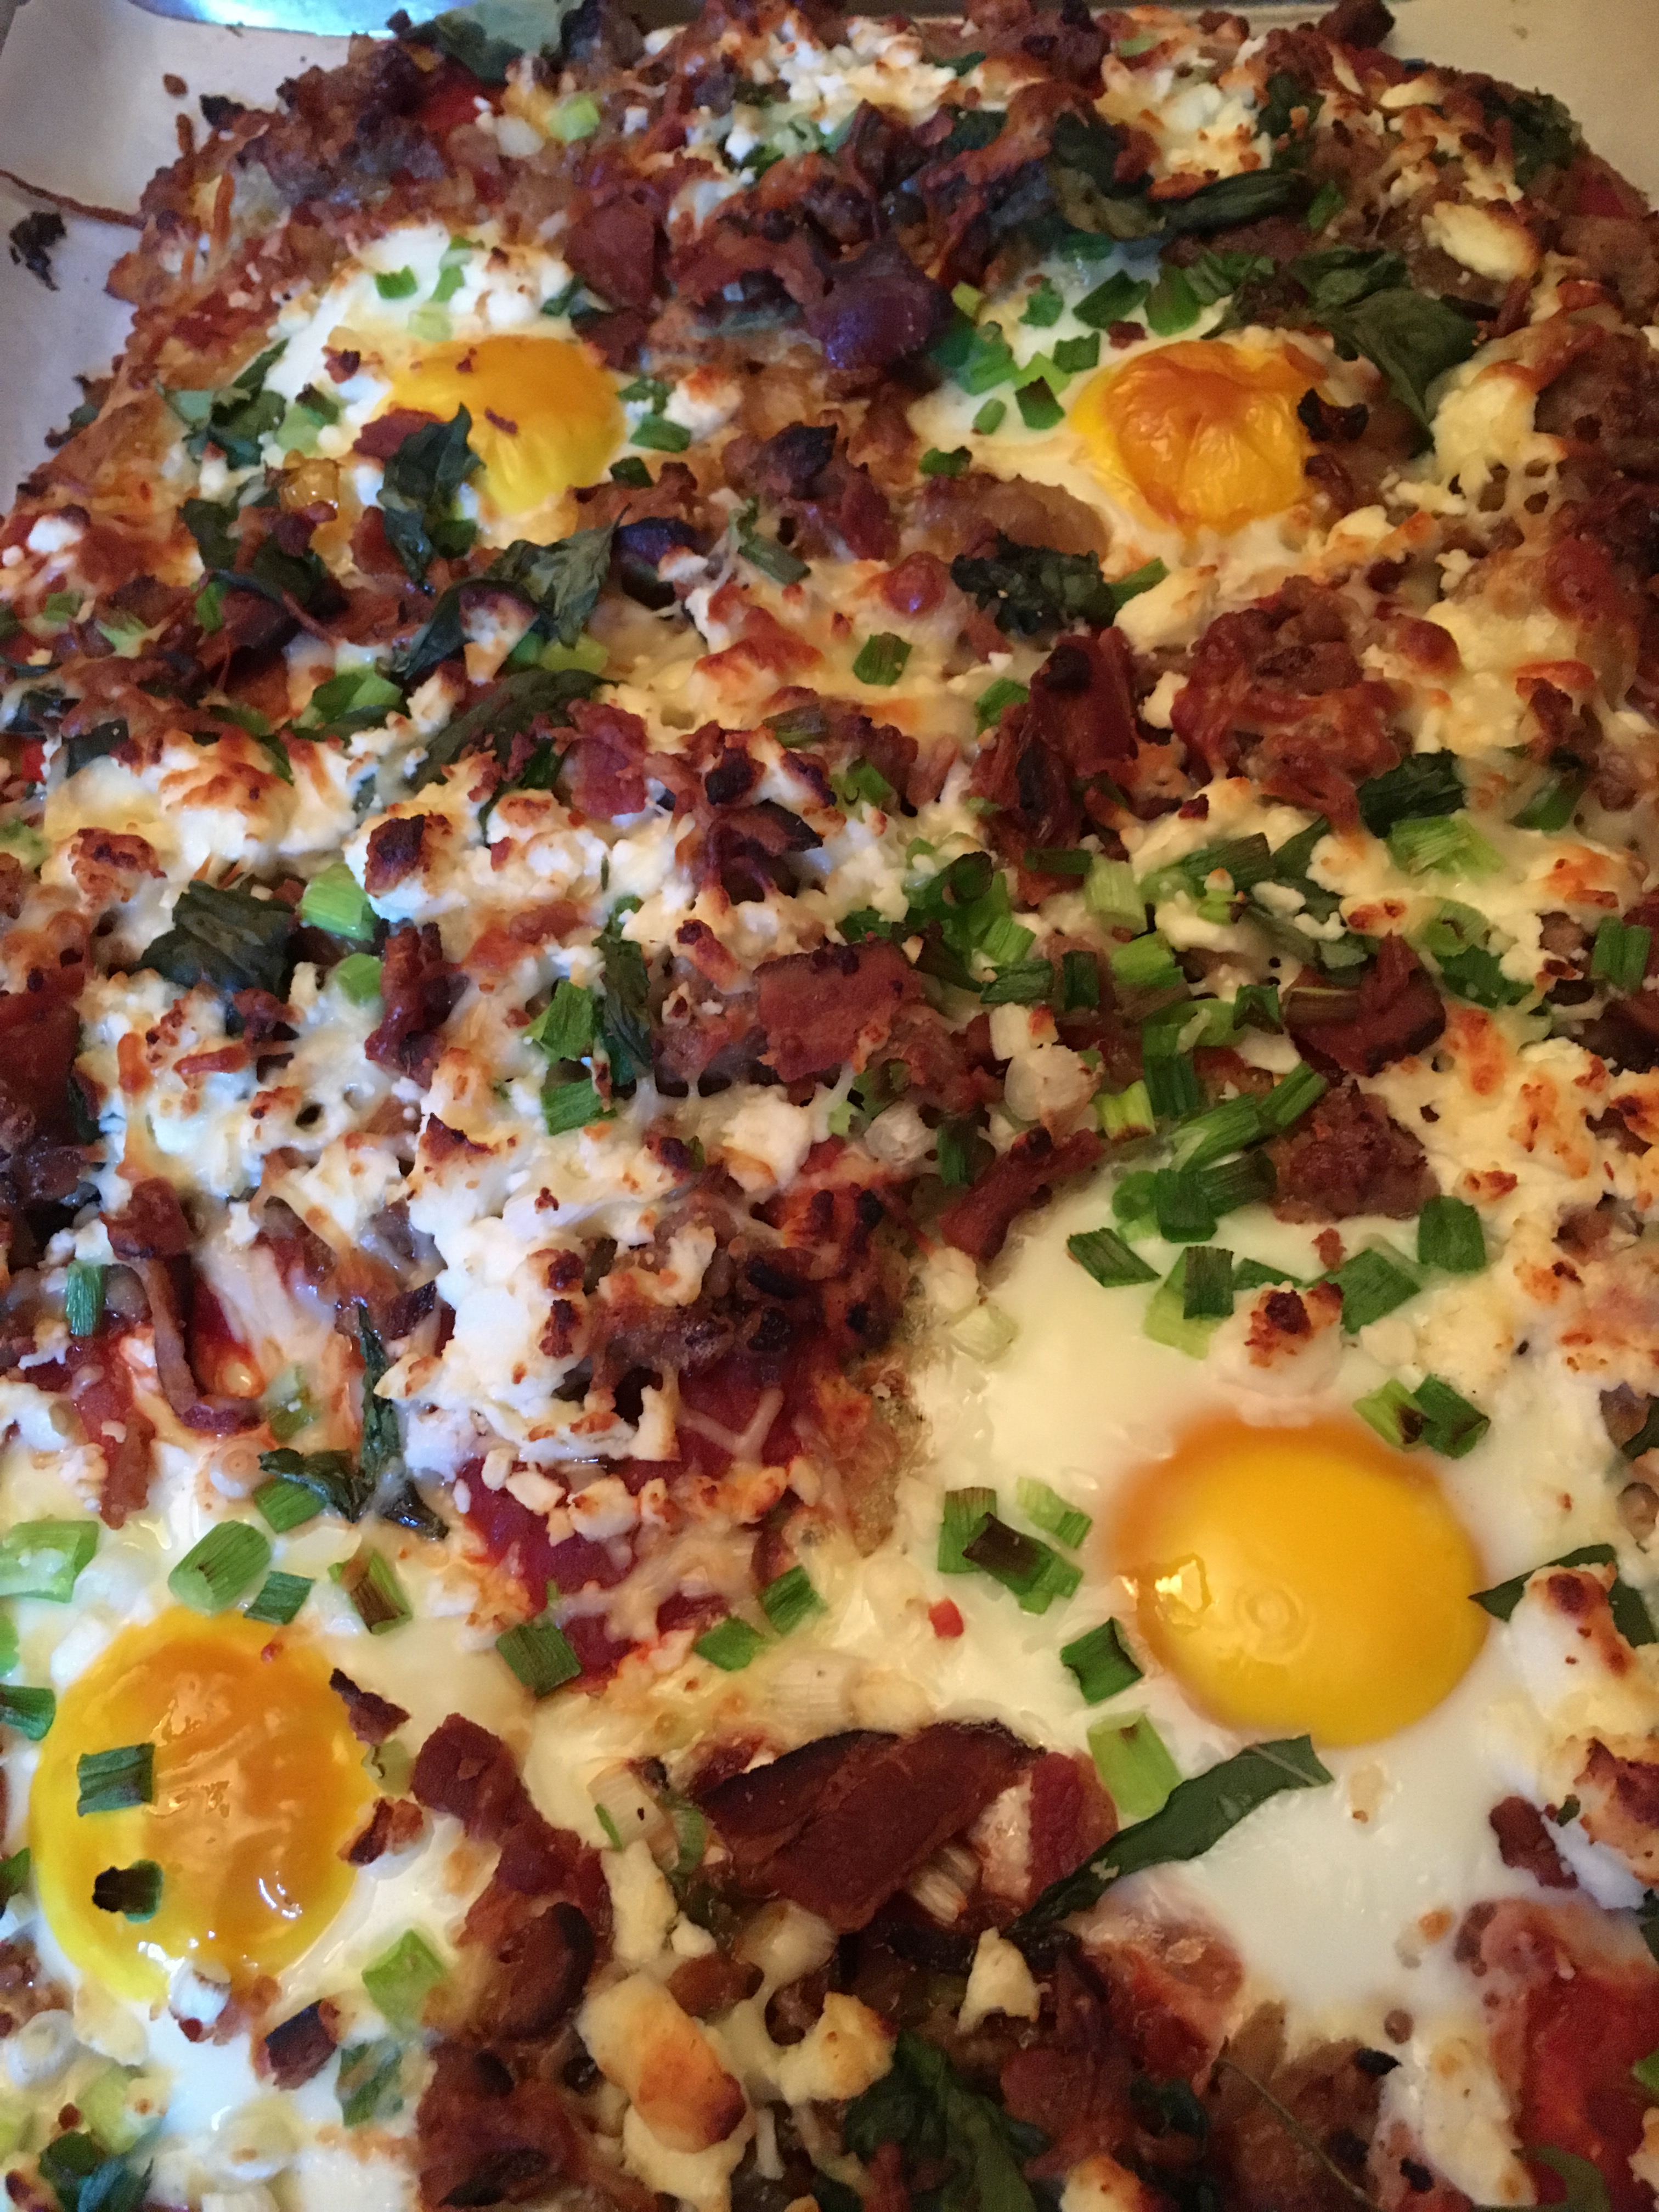
One of the things I miss the most being on a Paleo/Primal diet is BREAD. In that category would also be a nice, not too thin pizza crust that I have never been able to replicate with cauliflower. I also wanted to be able to PICK UP the slice of pizza and not have to use a utensil. A lot of gluten free pizza recipes require and knife and fork and leave me feeling like I am eating some sort of soggy polenta dish with tomato and cheese on top.
I finally came up with a ratio/blend of ingredients that make a great gluten free crust, and I will probably never make a cauliflower crust again. I felt confident enough about the crust recipe’s texture and flavor that I made it at the 2017 California State Fair Cooking Demo on the last morning of the fair. Try for yourself, and use the following crust recipe as a base for any kind of pizza you want to make. I am posting the exact recipe below that I made at the California State Fair. 🙂
PS: You’ll need a food processor, 3 sheet pans (at least 9 by 13) a cook top of some kind, and an oven to make this! (Just throwing that out there!) For the oven, place one rack in the middle and one nearer to the top.
Crust Ingredients:
2 large sweet potatoes (you can use orange or white, whatever you prefer)
1 1/4 cup nut flour of your choice (I used a ground pistachio/almond blend)
3 eggs
3/4 cup grated parmesan cheese
1/4 water
1/4 cup olive oil
1/2 Tbs garlic powder
1/2 Tbs dried oregano
1/2 tsp sea salt

Step One
Peel and cut your sweet potatoes into roughly 1-2 inch squares and pre-cook them. You can do this any way you want, but I would stay away from boiling them because this will leave them waterlogged and soggy. My shortcut is the microwave. Cook them until they will mush between your fingers with almost no effort. You can also bake them if you want. Tip: Cook potatoes the night before, or even a few days before to shave a little bit off your pizza prep time.
Step Two
If you are making the breakfast pizza, this is the part where I go ahead and PREHEAT the oven and cook my bacon for the topping at the same time. Even if you’re not making the breakfast version, SURELY you’ll want bacon on your pizza anyway! 🙂 This is an easy way to get the bacon super crispy without burning it. I use a sheet pan lined with parchment paper to cook the bacon. While you’re at, go ahead and line THREE sheet pans with parchment paper. Two you will need for the pizza crust, so parchment paper line them and set them aside for now. The remaining pan will get a layer of parchment and then your 6-10 slices of bacon. Don’t crowd the pan too much, or the bacon won’t cook evenly and it won’t render (get crispy). Once you’ve put the bacon on the sheet pan, place it in the oven and THEN turn the oven on. Heat it to 400°F. You’ll want to cook the bacon slow, so a cold oven is OK to begin with. By the time you’re ready to put your crust in the oven, your bacon will be almost ready and your oven will be the temp you need it. Now on to the crust!
Step Three
Grind the nuts of your choice (I used a mixture of pistachios and almonds–1 cup ground pistachios, 1/4 cup ground almonds) until they look like coarse sand/start sticking to the sides of the food processor bowl (we don’t want nut butter, just finely ground). Pulse in your parmesan cheese. Add the salt, garlic powder and the dried oregano. Then begin adding your sweet potatoes in stages. You will need to add the water, olive oil, and 3 eggs in between adding the potato pieces so that the mixture continues to blend well. Depending on the size of the potatoes, you might not need to add all of them. Consistency-wise you are looking for a thin cookie dough, but thick cake batter. It won’t be the consistency of pizza dough from a pizza parlor, it will be more loose than that.
Step Four
Spread the dough mixture onto the other parchment-lined pan. Spread evenly across the pan, no thinner than a 1/2 inch thick. At this time, you can check your bacon. It may or may not be done depending on the thickness of the bacon slices. If it is not done, you can leave it in on the top rack and set the timer to remind you to check it (I go in 5 minute increments). Also, make sure to pour any excess grease off of the pan. Pour the grease into a coffee cup or something you can retrieve it from for later use (I will get to that later!) Place the dough pan on the middle rack and bake for 10-12 minutes.
Sauce Ingredients:
15 oz can crushed tomatoes
3 Tbs tomato paste
1 Tbs chopped garlic
2 Tbs chopped fresh oregano
1/3 cup chopped fresh basil
1/2 tsp salt
Step Five
If you want, you can buy a jar of pizza sauce and skip this step all together. I do this when I am pressed for time. If not, add your crushed tomatoes, paste, and herbs and salt to a saucepan and cook together while the pizza crust does it’s first bake for the 10-12 minutes. You will be simmering the sauce until you need to use it. Also, the bacon should be getting done by now, so check it again and take it out if necessary.
Sausage and Shallots Preparation Ingredients:
2 shallots
Reserved bacon grease
1 lb ground turkey
Step Six
While the sauce is cooking and crust is baking, dice up the shallots. Then, in another saucepan separate from the one you used for the tomato sauce, pour some of the bacon grease you reserved from earlier, heat it up, and sauté the shallots until they are translucent. Add the ground sausage (turkey or pork, whatever your preference) and cook with the shallots, allowing the meat to cook through and brown. When the meat is browned, turn off the heat and set aside. At this point, the first bake of the crust is probably done, so go ahead and take out the crust and place the pan on a heat safe surface.
Step Seven
At this point, fetch the third parchment lined pan, and invert it, making sure the parchment paper stays put. Place it on the top of the crust and flip it over. This is so the pizza crust will cook through/dry out, and you will be able to pick up the pizza/not eat with a fork! Your oven should still be at 400°F. If you are making the breakfast pizza, this is the part where you will peel the parchment off the top of the crust, use the back of a spoon and make little “wells” on the pizza. I make 4 wells for 4 eggs. The wells I am describing are little indentations so that when you crack the egg on the pizza crust, it will not run all over the top. Instead, it will be captured in the little bowl you made for it. Once you have made the wells and cracked the eggs into them, carefully place the crust into the oven for another 10 minutes. This time, use the rack that is higher in the oven, so the eggs will set.
Toppings:
1 bunch green onions
½ cup sun dried tomatoes
6-10 slices bacon
2 cups grated mozzarella cheese
Step Eight
OK, we’re almost done! For final prep, chop the green onions and set aside. Also, chop the bacon you prepped earlier and set aside. I also like to measure out the sun dried tomatoes and the cheese and put everything in a row (so I don’t leave anything out). It’s like a little pizza assembly line. 🙂
Step Nine
Take the crust out (the eggs on top should be almost set). Turn the oven temp up to broil (low), you will need to use the oven one last time after you top the pizza (so that the cheese will melt). Begin with the tomato sauce and spread around the crust, being careful to avoid the eggs on top. Then add the sausage, bacon, sun dried tomatoes, green onions, and top with the mozzarella cheese. You should still be able to see the eggs through the toppings.
Step Ten
Place the pizza back in the oven until the cheese on top melts and browns. I like to keep an eye on the pizza through the window on the door of the oven to prevent over-browning. Once the cheese on top is melted, take the pizza out, allow to cool 5-10 minutes before cutting. This is the part where I set the table. By the time I am finished setting the table, the pizza is ready to cut and serve!
Did I leave out anything? Do you have questions? Contact me here!
For other adventures in gluten free pizza, you can click here and here. There’s even here.
If you don’t already, please follow me on Facebook here, on Twitter here, and on Instagram here. Thank you, and please enjoy the recipe! 🙂
SunBasket Makes Cooking Paleo Meals Easy! Part One

Today’s post will be several in a series I am doing with a company called SunBasket. They are one of several home-cooked meal kit delivery services that have popped up as of late. I am particularly fond of SunBasket because you can order strictly Paleo meals that are organic and non-GMO. I also love the story behind the company.
Additionally, all meals are developed by top San Francisco chef Justine Kelly (formerly of The Slanted Door) in partnership with Sun Basket’s in-house nutritionist Kaley Todd, ensuring that each dish is balanced, nutritious and delicious.
Also, I am excited to bring this company to your attention because the Paleo diet is something that is only truly sustainable if you 1.) Can cook at least a little or 2.) Can carve out the time to cook at least a little. Andy and I are a little spoiled because we alternate shopping and cooking to churn out Paleo/Primal meals everyday. But, we don’t have kids and have pretty flexible schedules to allow the time to do so.
I am thrilled to help introduce SunBasket because they can take the thinking/guess work out of dinner for three nights a week and even do the shopping for you. The meals come complete with everything you need to make three full meals for two people. The only thing you will have to do is the dishes!

For my first box, I was sent 3 meals, one of which was Winter Albondigas with Shredded Cabbage. I was pretty impressed with the way everything was labeled and the pre-printed recipe cards that came in the package.


As you can see above, everything is clearly labeled and pre-measured. In most cases, the only prep that has to be done with the meals is to chop up some of the produce.

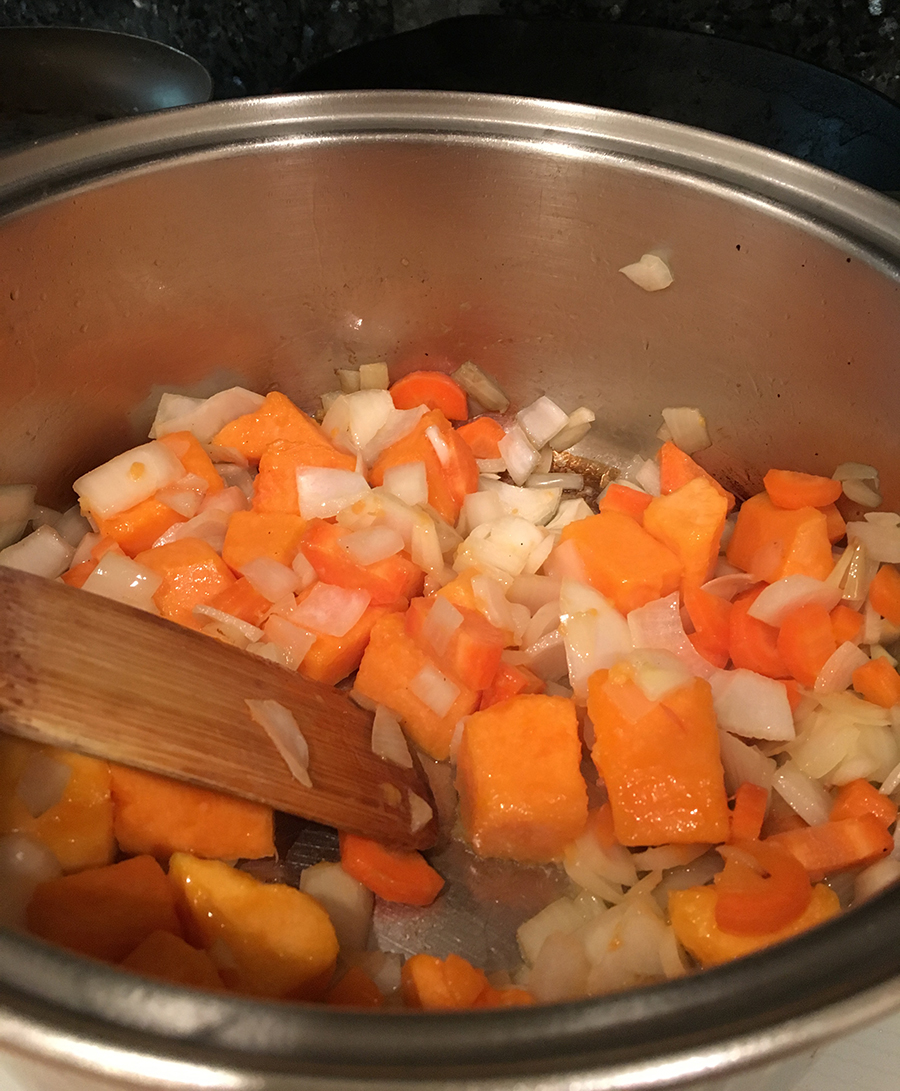
And chop away I did, as I chopped the onion, carrot, cilantro, cabbage and segmented the lime. The butternut squash used in the meal was already peeled and chopped for me. OK, now that’s easy, because if you have ever cooked a butternut squash, you know what a pain it can be to peel and remove the seeds.
Following the recipe, I sauteéd the vegetables (as you can see below). Meanwhile, I prepared the meatballs that were to go in the soup:
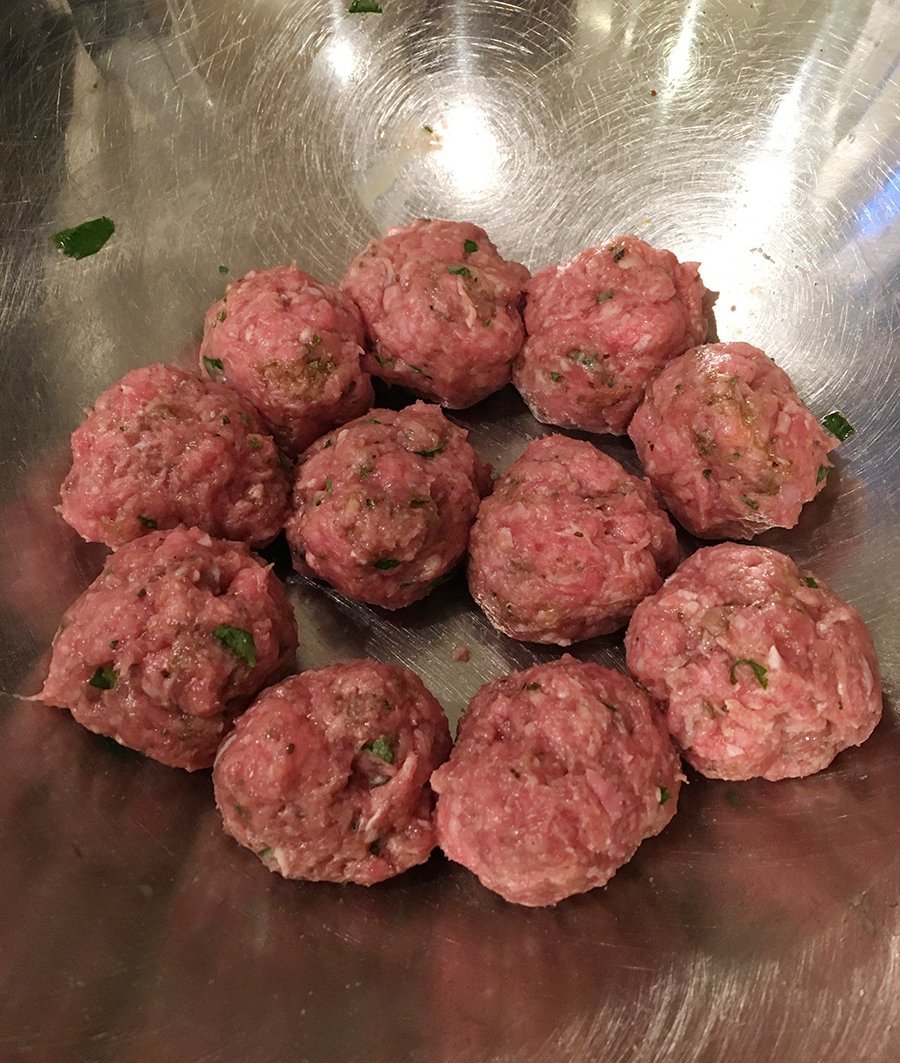
The meatballs were a blend of ground pork and beef (antibiotic and hormone free) with chopped cilantro, egg, and a provided spice packet. I was able to make 11 pretty decent-sized meatballs from the meat and ingredients given.

After simmering and reducing for about 30 minutes, you end up with a delicious meal for two. The soup preparation was so simple, yet the flavor was as if I had spent hours in the kitchen!
Recipe:
Winter albondigas with shredded cabbage
Ingredients:
- 1 onion
- 1 carrot
- 1 bunch cilantro
- 4 ounces cabbage
- 1 lime
- ¾ pound butternut squash cubes
- 1 tablespoon tomato paste
- 1 cup diced tomatoes
- 1 cup chicken stock
- 6 ounces ground beef
- 6 ounces ground pork
- 1 egg
- Meatball spice blend (oregano-cumin-coriander-garlic)
1. Prep the vegetables
Peel the onion and cut into ½-inch-thick pieces.
Scrub the carrot and cut into ¼-inch-thick half moon slices.
Finely chop the cilantro.
Cut the cabbage into thin strips.
2. Cook the soup
In a sauce pot over medium-high heat, warm 2 tablespoons oil until hot but not smoking. Add the onions, carrots, and squash. Season with salt and pepper and cover, stirring occasionally until the vegetables start to soften, 6 to 8 minutes. Add the tomato paste, stirring to coat the vegetables. Add the diced tomatoes, chicken stock and 2 cups of water. Bring to a boil and reduce to a simmer. Cook until the soup slightly thickens, 2 to 3 minutes.
3. Make the meatballs
In a mixing bowl, combine the ground beef and pork. Add the egg, spice blend and half of the cilantro. Season with salt and pepper, and mix well until combined.
Add the meatballs to the soup. Bring the soup back to a boil, reduce to a simmer, and cook until the meatballs are just slightly pink in the center, 5 to 7 minutes.
4. Serve
Cut the lime into wedges. Divide the soup between two bowls and top with the remaining cilantro and cabbage. Serve with lime wedges.
Nutrition per serving: Calories 710, Protein: 37 g, Total Fat: 44 g, Monounsaturated Fat: 21 g, Polyunsaturated Fat: 6.5 g, Saturated Fat: 12 g, Cholesterol: 185 mg, Carbohydrates: 43 g, Fiber: 12 g, Added Sugar: 0 g, Sodium: 490 mg
Stay tuned for the next recipe from SunBasket! The best part is that I can keep the recipe cards and buy my own ingredients if I want to make the same recipe again. 🙂
For more information on ordering SunBasket meals, you can click here. Sign up for SunBasket now and get 30% OFF your first delivery.
You can find SunBasket on Facebook here and follow them on Twitter here, Pinterest here and on Instagram here.
FREE Gluten FREE Donuts! Today We Reveal the Winner of the Dr. Bob’s Giveaway…
It’s time to make the donuts and time to choose a winner for the giveaway of the Dr. Bob’s Donuts and Doyos Complete Starter Kit that includes all three of Dr. Bob’s gluten free and vegan donut mixes, as well as a pan to make them in, a cooling rack and a vented lid.
I entered all of you for the number of times you commented, liked, shared, etc. this blog post and used random.org to generate a numbered list of all of you, and Andy picked a number at random (number 17). Number 17 is going to have a blast with this kit! I know I have with mine. 🙂
Before I reveal the winner, I would like to share the donuts I made today. I used the very last of my blonde mix (my favorite, by the way) to create a honey vanilla donut with honey vanilla glaze.
I used the blonde mix in the standard way, except I added 1 tsp of vanilla and 2 Tbs of honey in the 1 cup of liquid mixture. (The standard recipe is one cup mix and one cup water). I also added 1/2 of the beans from one vanilla bean pod to the batter.
To make the glaze, I used 1/2 cup coconut oil, 1 Tbs butter, 2 Tbs honey, 1 packet of stevia, a pinch of salt, and the contents of the other half of the vanilla bean pod.
After you steam the donuts in the microwave, brush them with a mix of 2 Tbsp honey & 1 Tbs hot water. This makes them super moist inside and gives them a little more sweetness. Then glaze the donuts with your glaze and place them in the refrigerator to set. It’s that easy! 🙂

Now, let’s cut open the donut to find out the winner of the starter kit!

Congratulations to Mindie! You have won the starter kit and Dr. Bob’s will ship it directly to you. I will contact you privately to get your mailing address. Thanks again for your entry. I hope you’ll share some of the fun things you make on Dr. Bob’s Facebook page or the cavegrrl.com Facebook page. 🙂
If you didn’t win the contest, I have some buy one, get one FREE coupons (good for Dr. Bob’s Donuts and Doyos Roseville Store location only). Just email me with your address and will send one your way (one per family, until I run out of them).
And to those interested in buying Dr. Bob’s products online, I have a discount code for you! Just enter CAVEGRRL15 for 15% off of your online purchase! (Apply Your Coupon or Discount Code on Final Payment Screen)
Valentine’s Day Our Way


We had a wonderful Valentine’s Day this past weekend. Andy and I decided to stay in and cook for each other instead of battling the landmine of multi-course (no substitution) wheat, sugar and dairy heavy pre-fixe menus arranged by local restaurants.
And deciding to avoid the crowd and the high cost of dining out (both to the wallet and to our waistlines) it turned out to be a great decision, because I had one of the most fun Valentine’s in years. 🙂
We decided we would each make one dish (paired with a wine) for the other person, and then eat them together family style.

I made this Chicken Korma for Andy, with a 4-ingredient gluten and dairy free naan to eat with it.
Andy made me one of my favorite things that he makes a few other times a year: Eggplant Moussaka. He uses the Primal recipe that can be found here at Mark’s Daily Apple.

I bought the ingredients for the Chicken Korma dish at Nugget Markets, and the rest of the ingredients needed to complete our dessert, a Black Bean Brownie mix I was sent by Breads from Anna.
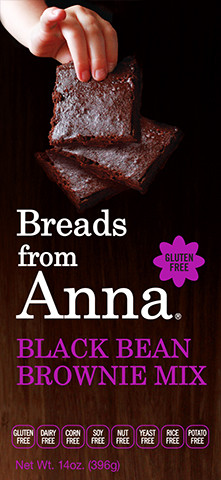
The gluten free mix contains powdered honey, cocoa powder, tapioca starch, arrowroot, millet flour, chia flour, chickpea flour, navy bean flour, pinto bean flour, cream of tartar, baking soda, sea salt, xanthan gum, so I was pretty happy to make it. All I did was add some coconut oil, a cup of coffee, and a can of organic black beans (following the package intructions).
I baked them in a cupcake pan (because portion control, baby!) and when they came out, I poked holes in the top and drenched each one with Kahlua. Kahlua makes everything taste better. 🙂
Then I frosted them with melted semisweet chocolate, and decorated them with coconut manna that I had melted a bit and sweetened with stevia (and colored with a few drops of food coloring to make it pink).

I made this candle holder for the table to sit out on every anniversary or Valentine’s Day. It’s made from 36 corks from bottles of red wines we have enjoyed together over the past three and a half years.

I made it with a glass plate, glue gun and ribbon for less than $10, including the candle. 🙂
This blog entry would be incomplete if I didn’t mention the wines we drank with dinner!
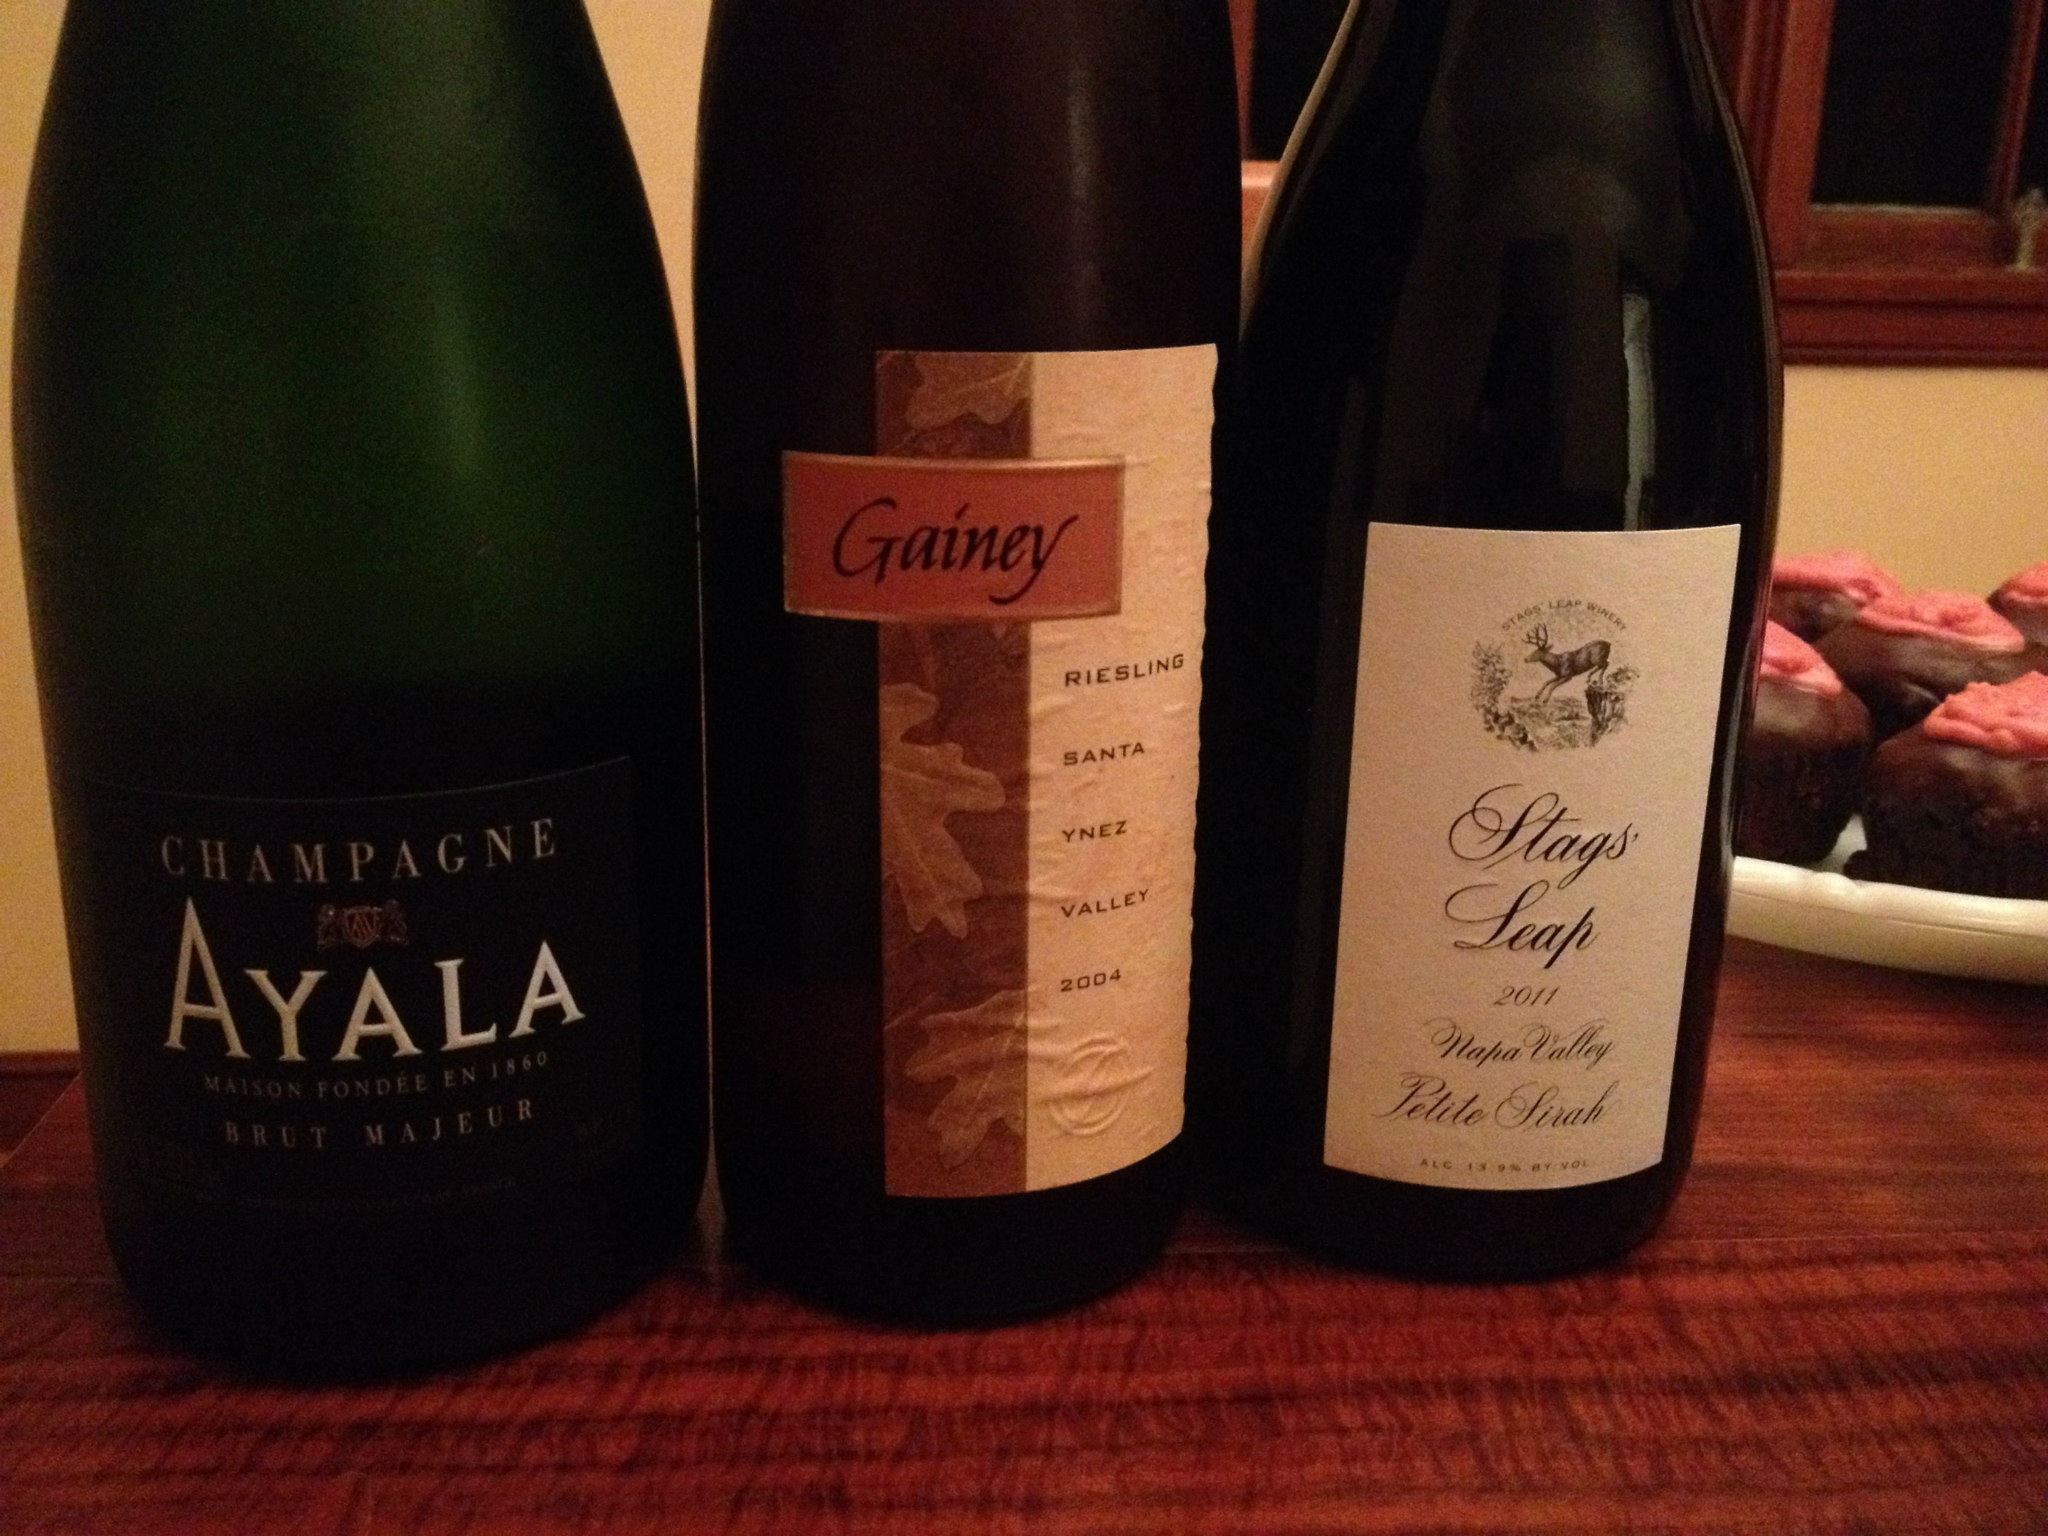
To start things off right, we toasted with a glass of Ayala Champagne. Because you should drink Champagne and not sparkling wine on Valentine’s Day! 😉
The next wine to the right is a Riesling made by Gainey. You can find their current release of Riesling here. The 2004 on the bottle worried me slightly, as I thought it might have been over-the-hill, but it still tasted great and was a perfect match for the Chicken Korma.
Then, with the Eggplant Moussaka, we drank a 2011 Stag’s Leap Petite Sirah (one of Andy’s favorite wines I had bought for him for Christmas). I would say this Petite Sirah is for you if you think you don’t like that particular varietal—because Stag’s Leap makes theirs so…velvety, soft and sophisticated.
You can find Breads from Anna on Facebook here, and on Twitter here.

Thanks again to Nugget Markets for sponsoring our stay-at-home Valentine’s celebration. You can find them on Facebook here and on Twitter here.


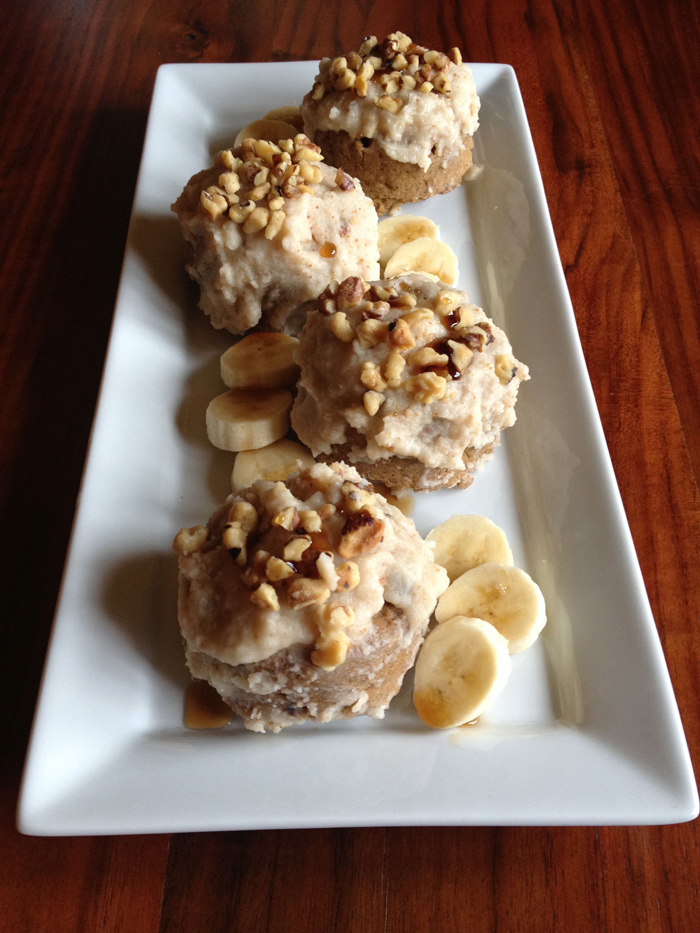
Gluten Free and Vegan Banana Maple Walnut Donuts with Banana Date Filling

I’m having a lot of fun with the donut mixes I was given by Dr. Bob’s Donuts and DoYos. I’ll be working with Dr. Bob’s in some upcoming blog posts to show you how you can transform their mixes (both blonde and chocolate) into your own unique creations.
To begin this series, I made a donut especially for Andy with many of his favorite ingredients. He was happy to find all four of them on the kitchen table after a 10 1/2 mile run! 🙂
Today I’m sharing with you how I made them in case you’d like to buy your own Dr. Bob’s Blonde Mix and try and recreate! 🙂
Important: Make the Banana Date Filling and toast the walnuts first, as you will need some of both in the donut batter.
Banana Date Filling
10 pitted Medjool Dates (soaked in hot water for 10 minutes and drained)
2 tsp agave nectar
1/2 tsp salt
1 1/2 very ripe bananas
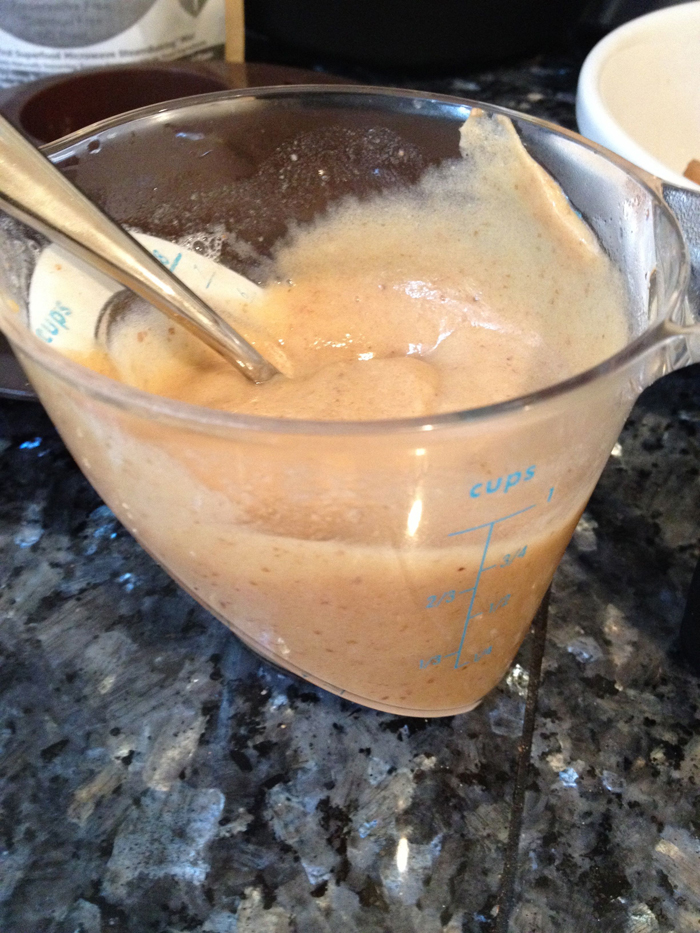
Pulse all ingredients together in a food processor until well blended. This will be your filling for the donuts that will go in the little heart indentation in the donuts.

Banana/Date Water
For the banana and date “water”, measure about 1/2 cup of the banana and date filling into a measuring cup, and fill with 1/2 cup more room temperature water. Mix well.
Donut Mix
1 cup Dr. Bob’s Blonde Mix
1/4 cup toasted walnuts
1/2 tsp cinnamon
1/2 tsp nutmeg
1/2 tsp vanilla extract
1/2 tsp banana extract (optional, but for extra banana kick!) 😉
To make the donuts, stir in the “banana/date water” into the donut mix ingredients and stir until completely incorporated. Divide the batter into the 4 compartments of the Dr. Bob’s silicone pan. (I spray mine with coconut oil spray to make sure the donuts don’t stick to the pan).
Microwave the mixture for 2 minutes, then turn out the donuts onto parchment paper, or a parchment paper lined Mandala cooling rack.

Then poke holes into the top of them and drizzle with maple mixture:
1 Tbs pure maple syrup
2 tsp water
Now you’re ready to make the maple glaze.
Maple Glaze:
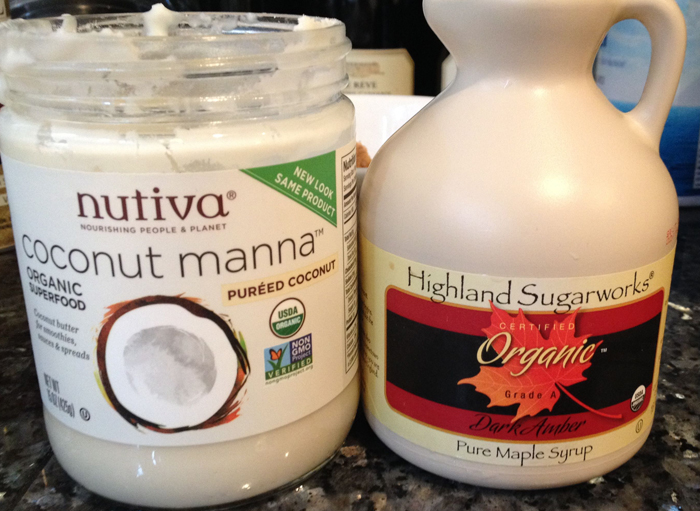
1/2 cup coconut oil or coconut manna (melted)
2 Tbs pure maple syrup
4 packets powdered Stevia
Heat coconut oil until it is in a nearly liquid form. Stir in the maple syrup and the Stevia until well combined.
Fill your donut hearts with the banana date filling, then drizzle/ice each donut with the maple glaze. Then top the donut with the remainder of the toasted walnuts.
For a dramatic and delicious effect, top the donuts with more maple syrup and serve with banana slices.
Check back next week for another great recipe! 🙂

Dr. Bob’s Donuts and DoYos is located at 336 Lincoln Street in old town Roseville. They are open 7 am to 5 pm Tuesday thru Sunday. For more information, you can call them at 916-742-5241. You can find Dr. Bob’s Donuts and DoYos and tons of photos/ideas for donut creations on their Facebook page here and you can follow them on Twitter here. You can also follow them on Instagram here! 🙂
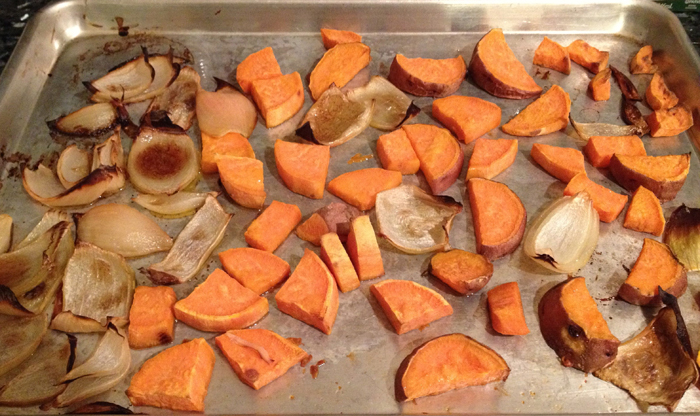
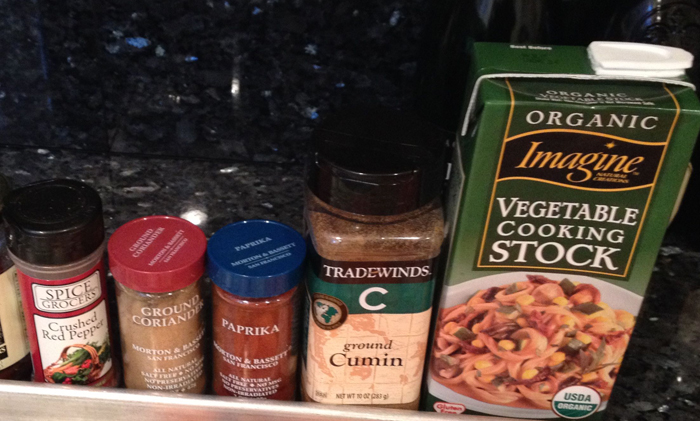
Meatless Mondays: Quick and Easy Roasted Red Pepper Soup
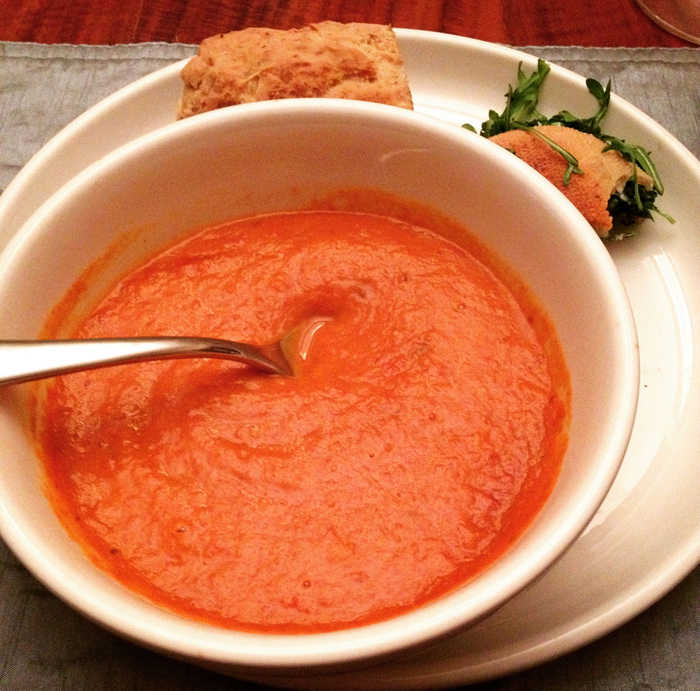
We enjoyed this homemade soup (my own recipe) on Saturday night paired with delicious gluten free and vegan sandwiches from Pushkins Bakery. If you haven’t tried their “adult grilled cheese” or “the buzz”, please do. Both sandwiches are vegan and gluten free and are utterly delicious. It was fun to have a completely vegan meal for a change. 🙂
Ingredients:
1 large sweet potato (peeled)
1 large onion
3 to 4 large red bell peppers
1 head of garlic
2 shallots
4 roma tomatoes
1 quart vegetable stock
1 1/2 tsp cumin
1 1/2 red pepper flakes
1 1/2 tsp coriander
1 1/2 tsp paprika
salt to taste
1-2 Tbs olive oil per baking sheet
Procedure:
Preheat oven to 385°F.
Prepare 2 half sheet trays by greasing them liberally with olive oil.


Chop all vegetables into uniform pieces. Place the onion and the sweet potato on one tray. On the other tray, you should be able to fit the chopped tomatoes, peppers, garlic and shallot. Important because the potato and onion will take slightly longer to bake. Bake the vegetables in the oven for about 40 minutes, checking to make sure nothing is burning and rotating them on the pan to prevent burning.
The peppers and tomatoes will be ready to remove from the oven when the peppers blister slightly and the garlic is roasted and tender. From the time you remove the peppers and tomatoes, leave the potato and onion tray in the oven ten minutes longer.

In a blender, begin to blend all the vegetables. There will be more than one blender can hold, so blend a little at a time with the vegetable stock. Since you will be enjoying the soup, add the stock to the consistency you like (I used all but about 1/2 cup of the stock), as thick or as thin. Empty each round of blended vegetables into a very large bowl so that they will mix together.
Then add all of your spices and flavorings. The crushed red pepper, paprika, coriander, and the cumin and salt to taste. Stir the spices in the bowl manually. Then in batches, return the vegetable mixture to the blender and mix until completely smooth. Pour the smooth soup into a new large bowl.
This soup can be made up to a day ahead of time. Just simply ladle into serving bowls and reheat. I’m confident this will be one of the easiest, yet most tasty soups you will ever make! 🙂 We paired the soup with a 2011 Handley Pinot Noir, Anderson Valley and a 2012 St. Rey Celeste, Candyhill Vineyards (Revolution Wines).

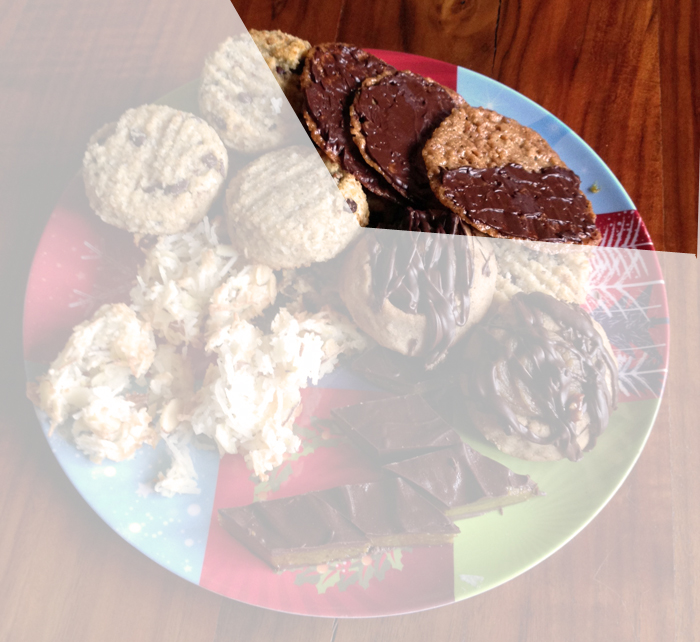
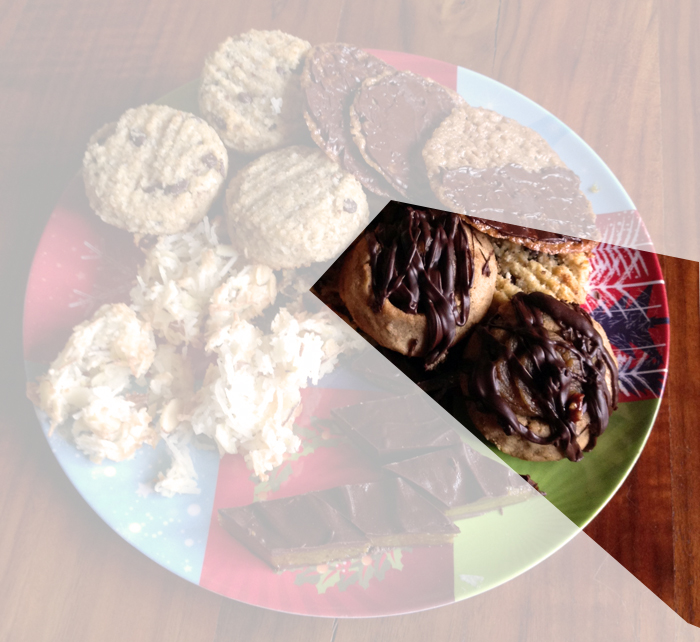
Recipes from the 1st Annual Ladies Holiday Party and Gluten Free Cookie Exchange Sponsored by Challenge Butter and Bob’s Red Mill

Special thanks to the suppliers of our ingredients for the First Annual Ladies Holiday Party and Gluten Free Cookie Exchange: Challenge Butter and Bob’s Red Mill. As you can see above, our ladies put together quite a spread with your line of products.
Challenge Butter sent all baking attendees coupons for their butter and new cream cheese products. Bob’s Red Mill sent 4 packages of coconut, almond and hazelnut flours our way as well. We used these products to make and share the following cookie recipes (I’ll also be sharing other treat and savory recipes using Challenge and Bob’s Red Mill products throughout 2015 as well!):
Grain Free “Oatmeal” Chocolate Chip Cookies

Ingredients
1/4 cup Challenge Butter
1 large egg at room temperature
1/3 cup honey
1 tsp vanilla extract
4 tsp cinnamon
3/4 tsp nutmeg
1 cup Bob’s Red Mill almond flour
2 Tbs Bob’s Red Mill coconut flour
1/2 tsp baking soda
1/2 tsp sea salt
2 tsp finely ground flax seeds
3/4 cup finely shredded coconut
1/2 cup Enjoy Life mini chocolate chips
Procedure
Preheat oven to 350°F
Place the Challenge Butter and the egg in the bowl of a stand mixer and cream for 1 minute on high. If you don’t have a stand mixer you can use an electric hand mixer.
Add the honey and vanilla and mix for another minute.
Place the cinnamon, nutmeg, Bob’s Red Mill flours, baking soda, salt, and flax seeds in a small bowl and stir to combine.
Slowly add the dry ingredients
Gluten-Free Orange-Cinnamon Lace Cookies
1/3 cup Bob’s Red Mill Gluten-Free All Purpose Flour
1/2 cup Bob’s Red Mill almond flour
1/8 teaspoon salt
1 teaspoon ground cinnamon
1 tablespoons grated orange rind (zest)
5 tablespoons unsalted Challenge Butter
1/3 cup Pyure Organic Stevia
2 tablespoons honey
1/4 teaspoon orange extract, optional
melted dark chocolate for drizzling, optional
Procedure
Preheat the oven to 350°F. Line two baking sheets with parchment paper or foil.
In a small bowl mix together the flours, salt, cinnamon, and orange zest until well blended.
Combine the Challenge Butter, Pyure Organic Stevia, and honey in a medium saucepan set over low heat. Stir until the butter melts and the stevia dissolves. Increase the heat to medium and bring just to a boil. Remove the pan from the heat.
Stir in the dry ingredients into the pan, followed by the orange extract.
Drop the batter onto the prepared baking sheet by teaspoonfuls, spacing the spoonfuls 4″ apart from one another. Bake no more than six cookies on a pan.
Bake the cookies for 7 to 9 minutes, until they’re an even golden brown. Transfer the cookies, on their parchment or foil, to a rack, and let them rest until they’re completely cool and crisp.
Bake succeeding batches while the first batch is cooling.
Once the cookies are completely cool, drizzle them with melted dark chocolate, if desired.
Caramel Date Thumbprints

Cookie Base
Ingredients
1 1/4 cups pecan halves
1 cup Bob’s Red Mill almond flour
1 1/3 cups Bob’s Red Mill gluten free all purpose flour
1/2 cup finely chopped plump Medjool dates
1/2 teaspoon kosher salt
2 sticks unsalted Challenge butter, softened
¾ cup Pyure Organic Stevia
1/2 teaspoon pure vanilla extract
Procedure
Pulse all ingredients together in a food processor. Remove dough from food processor and wrap in plastic wrap. Chill for at least an hour to firm up the dough. You can also place in the freezer for 10-15 minutes to speed up the process.
Preheat your oven to 350°F.
Shape cookies into little balls and press your thumb into them to make a deep impression. Bake at 350°F until they are golden brown. Take out the cookies and carefully (as the cookies are still hot) press them back down in the center to make sure the impressions are deep enough to hold the caramel date filling.
Caramel Date Filling
Ingredients
20 medjool dates soaked in hot water and drained
2 Tbs Challenge Butter
sea salt to taste
2 tsp vanilla extract
Procedure
Pulse in a food processor until the filling becomes a caramel texture.
When cookies have cooled, use a pastry bag to fill them with the caramel.
Chocolate Drizzle
Ingredients
2 cups chocolate (chips or semisweet)
2 Tbs coconut oil
Procedure
Melt the chocolate and the coconut oil in the microwave in 20 second bursts, stirring in between. When chocolate is melted, drizzle it over the finished cookies and set aside to dry.
Thanks again to Challenge Butter and Bob’s Red Mill for their awesome product supplies. You can find them on Facebook here and follow them on Twitter here. You can find Bob’s Red Mill on Facebook here and follow them on Twitter here.
If you would like to sponsor the 2015 Ladies Holiday Party and Gluten Free Cookie Exchange, you can contact me here. I am looking for wine sponsors, gluten free cookie ingredients, catered items for guests, and goodie bag items for attendees.
Recipe: Gluten Free, No Sugar Added Büche de Noel
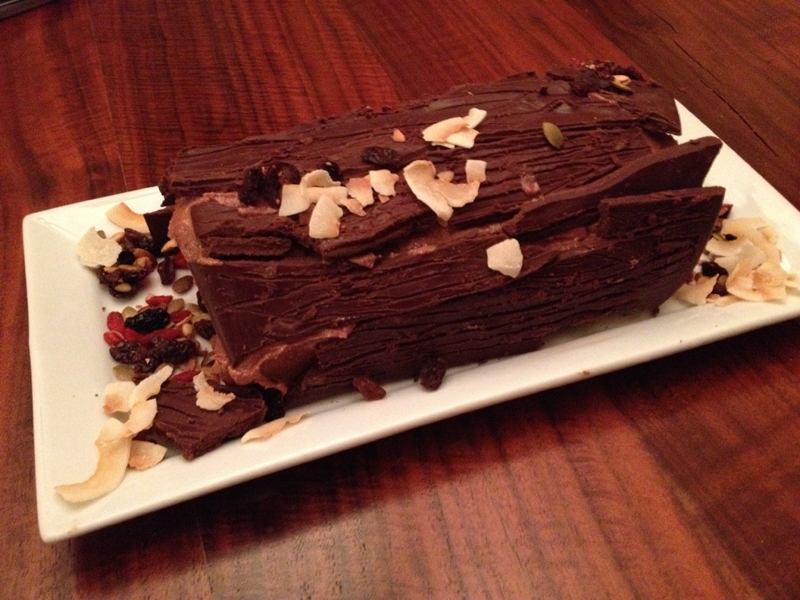
I used to work at The Bonbonerie in Cincinnati, Ohio and the most amazing thing they make (other than their masterpiece wedding cakes—many of them creations by the incomparable Richard Prince) is their Büche de Noel (pictured below).

I never attempted to make one myself until this year, and just to raise the stakes, I made it Primal friendly! 🙂 I used coconut flour and eggs and made a simple sponge cake that would roll without falling apart. I am posting the recipe and hope you will try it yourself because it really is not that hard, but it takes a little effort and patience. And great ingredients.
I’d like to thank Challenge Butter, Bob’s Red Mill, and Pyure Organic Stevia for helping make my Büche de Noel taste amazing. They all sent me products that were used in cookies for my annual Ladies Gluten Free Cookie Exchange, (I’ll be writing about that very soon) and I am continuing to use their ingredients in other recipes that will be featured here on my website throughout the year.
First, prepare your filling and frosting.
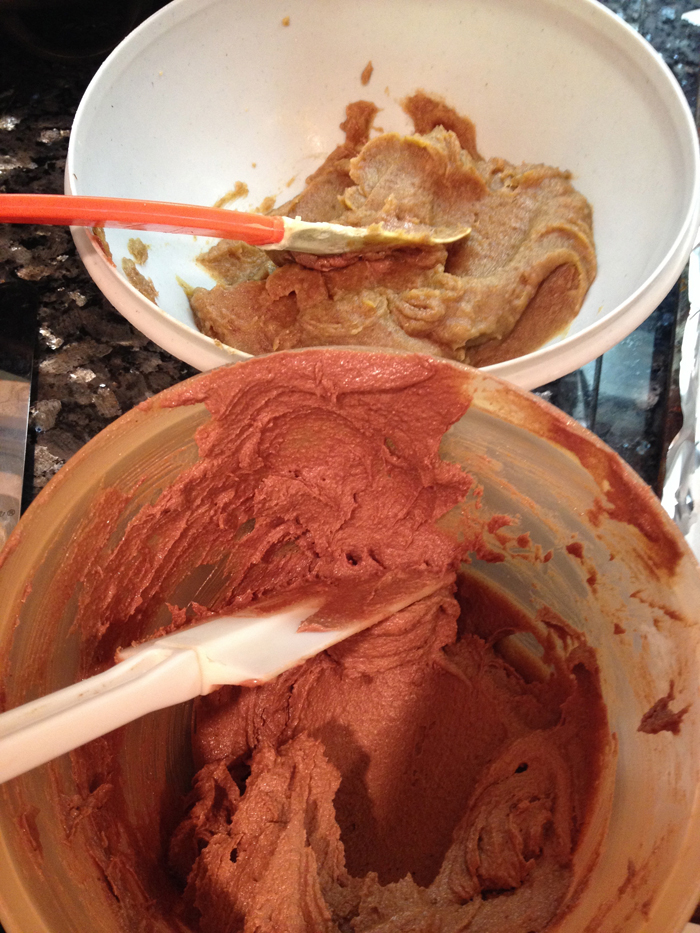
For the Filling
Ingredients:
20 Medjool dates soaked in hot water and drained
2 Tbs Challenge Butter
sea salt to taste
2 tsp vanilla extract
Procedure:
Pulse all ingredients in a food processor until the filling becomes a caramel texture.
For the Buttercream:
Ingredients
1 stick Challenge Butter
1 cup Pyure Organic Stevia
1/2 cup coconut oil (solid, not melted)
1/4 melted semisweet chocolate
1 Tbs unsweetened cocoa
1 tsp vanilla extract
Procedure
This is another food processor item. Start with the Pyure Organic Stevia. Pulse the product in the food processor until it becomes a fine powder. Then add the Challenge Butter and coconut oil and blend together until you have a buttercream-like substance. Add the cocoa and vanilla extract. When ingredients are combined completely, add in the melted chocolate. The chocolate will heat up the butter and coconut oil and mixture will look rather runny. Pour the mixture into a bowl and place into your refrigerator while you make the chocolate bark and the cake. Next, prepare your chocolate “bark”.
Chocolate Bark
Ingredients
2 cups dark or semisweet chocolate (broken into pieces)
1/2-3/4 cup coconut oil
Procedure
Melt your chocolate pieces and the coconut oil in the microwave 20 seconds at a time, stirring after each 20 seconds. Do not overheat. Stir until the mixture is completely smooth and spread on a parchment paper lined baking sheet. Place baking sheet in the refrigerator until semi-solid. Then take out the sheet and with the twines of a fork, drag lines across the chocolate to create a “bark” texture. Then return the pan to the refrigerator to solidify completely.
 Now it’s cake time.
Sponge Cake
Ingredients
8 large eggs (room temperature)
1 tsp lemon juice
½ tsp cream of tartar
2 tbsp Bob’s Red Mill coconut flour
(plus 1-2 Tbsp more for dusting your baking pan)
1 Tbsp unsweetened cocoa
4 tbsp Pyure Organic Stevia
2 tsp vanilla
1 tsp salt
Juice of 1 large orange
Rind of 1 large orange
Procedure:
Pre-heat oven to 350°F. Line a jelly roll pan with parchment paper and grease the sides of it with coconut oil or butter. Then lightly dust with Bob’s Red Mill coconut flour and tap off the excess.
Separate the eggs into 8 yolks and 8 whites. Whip the egg whites with the lemon juice and cream of tartar, until firm peaks can be formed. You can do this with a stand mixer, a hand mixer or you can do it like I did by hand. If you do it by hand it’s quite a workout!
In a separate bowl, whisk together the Pyure Organic Stevia, The Bob’s Red Mill coconut flour, the orange juice, orange zest, salt, vanilla and egg yolks. Once you have combined those ingredients completely fold in 1/4 of the egg white mixture. Once the first 1/4 has been folded in, fold in another 1/4 of the egg white mixture. Continue adding portions of the egg whites, while folding until you have a complete incorporation of the two mixtures.
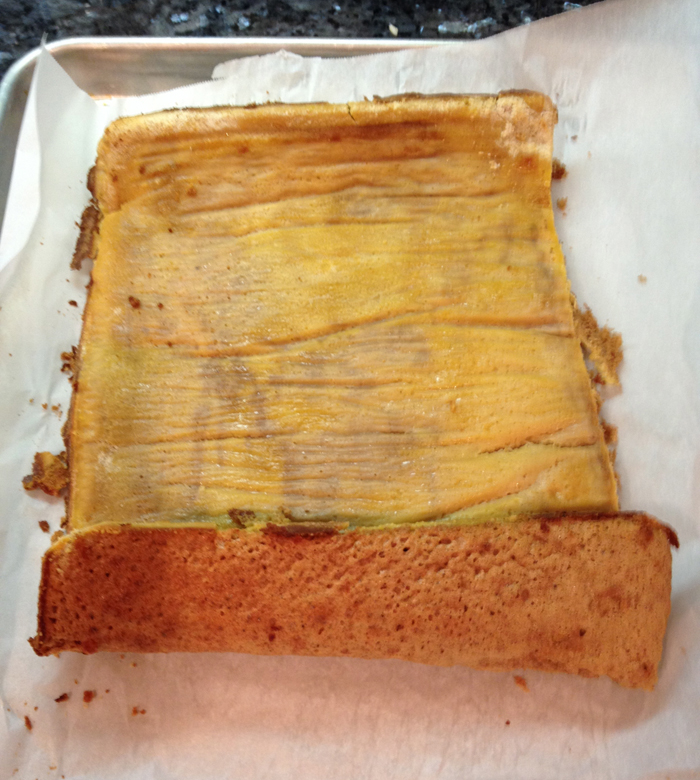
Pour your batter into your prepared pan and bake for 20 minutes, or until golden brown.
Remove from the oven and place a sheet of parchment paper directly over the top. Then roll the hot cake into a “jellyroll” and then let it cool while it’s still rolled tight. Remove your date paste and the buttercream from the refrigerator. The date paste will be a perfect spreading consistency, but the buttercream will be pretty solid. To get it to the right texture, simply stir it around and it will loosen up pretty well the closer it gets to room temperature.
Now it’s time to unroll and fill your Büche de Noel. At this point, the cake should look like this (below):
Fill your cake with the date paste and then spread a thin layer of chocolate buttercream over that. It should look like this (below):
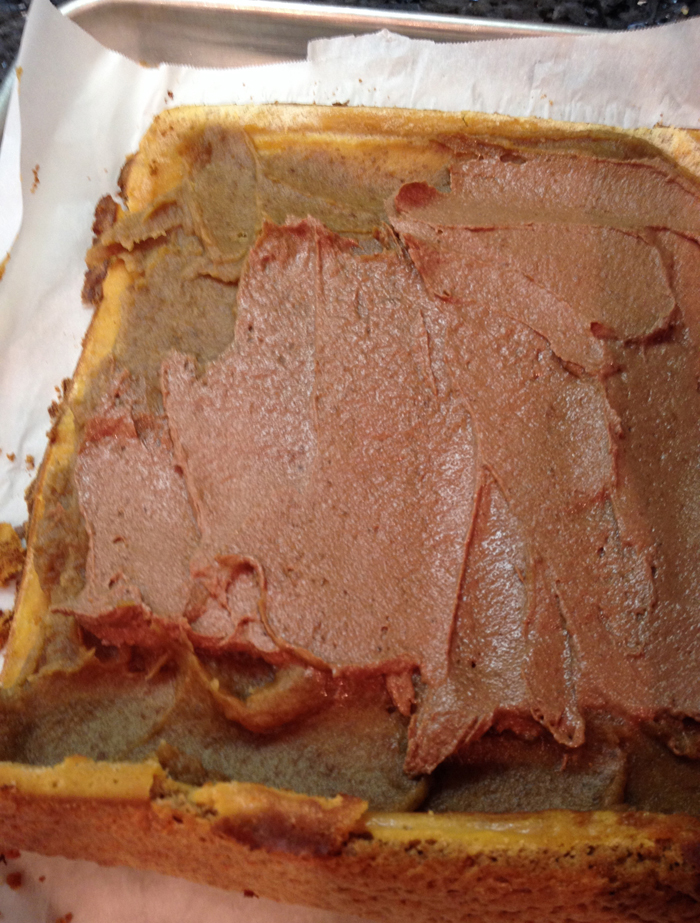
Then roll up cake and frost with the remaining buttercream. Now it should look like this (below):

Next, break up the chocolate bark you made and place it on the cake so that the cake looks like a fallen log. I added some toasted coconut to resemble lichen and some seeds and dried fruit so it really looks like a little forest bed. When you slice the Büche de Noel it will look like this in the middle (pictured below).

I plan on making this cake every year (perhaps with different frostings and fillings, but keeping it free of gluten and added sugar). I hope you will attempt this recipe as it is not too tricky with practice and patience.
I hope all of you had a safe New Year’s and I wish you all the best for 2015! Cheers 🙂
12 Days of Christmas Picks for the Food and Wine Lover: DIY Chocolate and Pistachio Fudge

It’s Day Nine of my 12 Days of Christmas Picks for the Food and Wine Lover, and today’s idea comes from my love of chocolate and pistachios. It’s my recipe for Chocolate and Pistachio Fudge!
It’s a pretty easy recipe to make, and once you’re done you can pick out a nice cookie tin and present it to your recipient (but instruct them against shaking it). Remember to tell your candy lover to store the fudge in the refrigerator (when they are not too busy eating it) 😉
For the Pistachio Layer:
2 cups roasted pistachios
1-2 Tbs coconut oil, softened
1½ Tablespoons agave nectar or honey
1 teaspoon vanilla
1 tsp sea salt
For the Chocolate Layers:
2 1/2 cups semisweet chocolate (whatever your favorite brand happens to be)
1/4 coconut oil, softened
Line a 9 x 13 in. baking pan with parchment paper and set aside.
Begin with roasted pistachios (either roast them in the oven or buy them pre-roasted, but try to get them unsalted, as this will add an unnecessary amount of sodium to the recipe). Pulse the pistachios in a food processor until the nuts begin to stick to the sides (you’ll end up making a pistachio butter by the time you are done blending). Add the coconut oil to help the pistachios turn into a butter. When the mixture is completely smooth, add your sweetener of choice, the vanilla and the salt. Set this mixture aside.
Melt your chocolate with the coconut oil (either in the microwave in 10-15 second bursts and stirs) or over a double boiler on the stovetop. When the chocolate is completely melted, spread half of it onto the parchment lined baking pan. You’ll want the layer to be a little less than 1/4″ thick on the bottom. Let the chocolate harden before you move onto the next step. You can speed things up by placing your pan in the freezer for 10 minutes.
When the chocolate has completely solidified, spread the pistachio mixture over it 1/4″ from the edge of the chocolate. Spread the mixture evenly. Then top the pistachio layer with the remaining melted chocolate and also spread evenly. The idea is to get all layers pretty even so that when you cut it, the pieces of fudge will look elegant and uniform. 🙂 Return the pan to the refrigerator/freezer and allow to harden completely.
The next step is to cut the pieces of fudge in little diamonds. You can do this by making diagonal slices all the way across from left top to right bottom, and then diagonal slices from the top right to the bottom left. You can place the slices directly into your parchment-lined cookie tin with a spatula.
Now you’re all set to give a delicious, addictive homemade gift. You might not want to give it away once you try it. 😉
Join me tomorrow for another 12 Days of Christmas Picks for the Food and Wine Lover (DAY 10!!) Getting sooo close to Christmas now! Cheers! 🙂
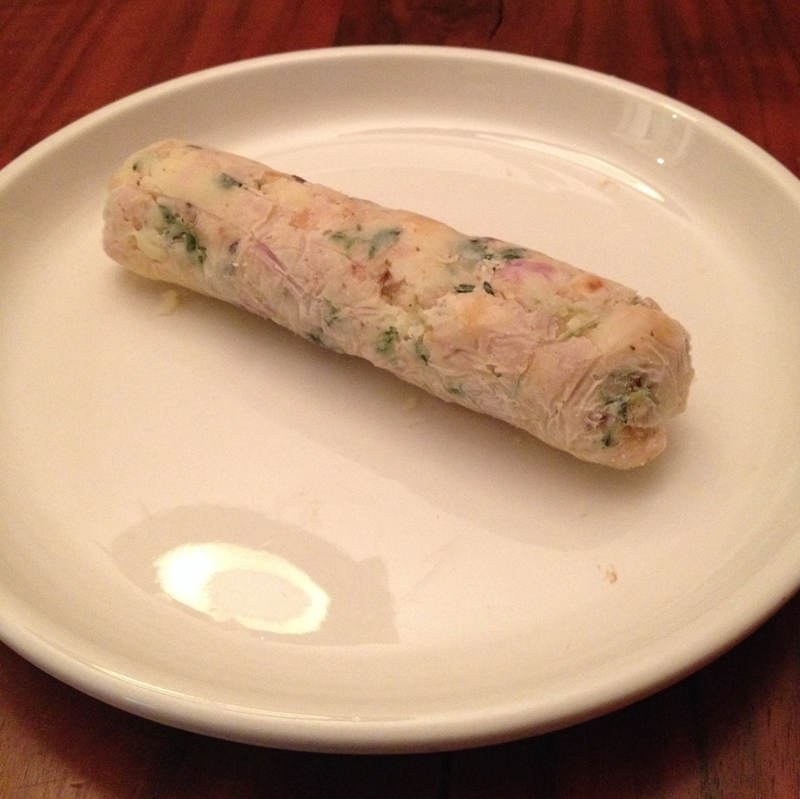
Celebrate Thanksgiving with Sweet Potato Latkes and Beaujolais Nouveau!

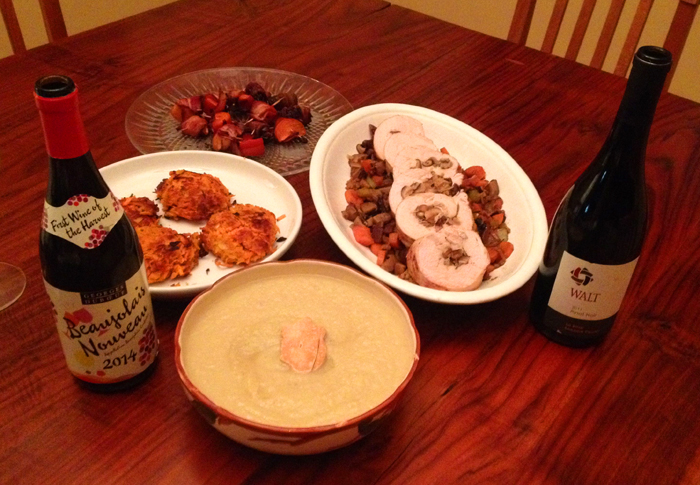
Thanksgiving 2014. Last week, Andy and I celebrated a little early because we will be in Mexico for the actual holiday, and I couldn’t resist making something special to pair with Georges Duboeuf’s new release of Beaujolais Nouveau—the inveterate red wine made from Gamay grapes produced in the Beaujolais region of France, that is only fermented a few weeks before being released for sale annually on the third Thursday of November.
Retailing at $10.99 nationwide, the 2014 Georges Duboeuf Beaujolais Nouveau complements an abundance of holiday dishes, from savory roasts to cranberry sauce. Suggested serving temperature for the Nouveau is between 62°F – 66°F, which is just slightly cooler than room temperature, to enhance the aromas and fruit flavors.
Our spread included:
turkey roulade stuffed with shitake mushrooms, shallots, chorizo and bacon, on a bed of carrots, celery, mushrooms and onions

cauliflower and leek soup with a gluten free shortbread (did not take a closer image, snap!) 😉
sweet potato latkes

bacon wrapped persimmons and bacon wrapped dates

2014 Georges Duboeuf Beaujolais Nouveau
Thanks to Georges Duboeuf for providing the bottle of Beaujolais!
Now the recipe for the latkes—skip the sweet potato casserole and give these a shot!
Sweet Potato Latkes
Ingredients:
3 sweet potatoes
1 yellow onion
2 eggs
2 tsp salt
2 tsp baking powder
1/4 cup coconut flour
1 cup coconut oil (melted)
Procedure:
Preheat oven (425°F)
Peel sweet potatoes and grate them, using the large holes on the grater, into a large bowl—I cheat and use a food processor on the shredder setting.
Grate the onion, too. Then, squeeze out as much liquid from the potatoes as you can and then add the grated onion to the bowl with the potatoes.
Add all other ingredients and combine. Using your hands works best, so keep a towel nearby or work close to the sink.
Prepare two baking sheets by pouring melted coconut oil on them and coating the entire tray.
Then form the potato mixture into 4-inch (or so) discs and place on the baking sheets until you have filled them up.
Brush the tops with a little melted oil and bake to desired crispness. I recommend checking on them and flipping them midway through baking to get both sides crispy.
Remove from oven and drain on paper towels prior to plating/serving.
ENJOY!! Happy Thanksgiving 🙂
Salmon with Hazelnut Shallot Butter and a Cauliflower Sweet Potato Mash

I love September and October in Sacramento. There are so many fun events to celebrate Farm-to-Fork and harvest time. There’s an intoxicating energy all around. The wineries are busy harvesting their grapes and there gets to be a little chill in the air in the mornings and when the sun goes down.
Though the Farm-to-Fork celebration has officially come to a close, it’s certainly not over. So many local restaurants and grocery stores have adopted this theme, and it’s exciting to see the concept take off locally just in the past two years. (Even though Alice Waters was practicing Farm-to-Table 40 years ago!! and Sacramento is not doing anything new.) 😉
I know that ever since I went Paleo (3 ½ years ago), I have made it a point to eat non-processed, local and organic foods when at all possible. I was extremely blessed to meet a partner who had adopted the same healthy eating habits as me and we have continued to be Paleo/Primal in the three years since.
We have made some incredible Paleo meals together with the best ingredients from two of my sponsors: Nugget Market and Whole Foods. We have also used other purveyors: Taylor’s Market and Sunh Fish for our meats and fish.
This Salmon dish is only an example of the kinds of things we prepare on a weekly basis. There is almost always something this special, so many times, it is more tempting to stay in than to eat in a restaurant. Don’t even get me started on all the eclectic wine that we have to pair up with whatever we make. 😉
The recipe was adapted from the Salmon Hazelnut Recipe from the book It Starts with Food by Dallas and Melissa Hartwig. The cauliflower and sweet potato mash was done on a whim and is all my own.
I hope you continue to practice Farm-to-Fork/Farm-to-Table at your house and when dining out beyond this month and celebrate this incredible agricultural paradise we are lucky enough to call home. 🙂
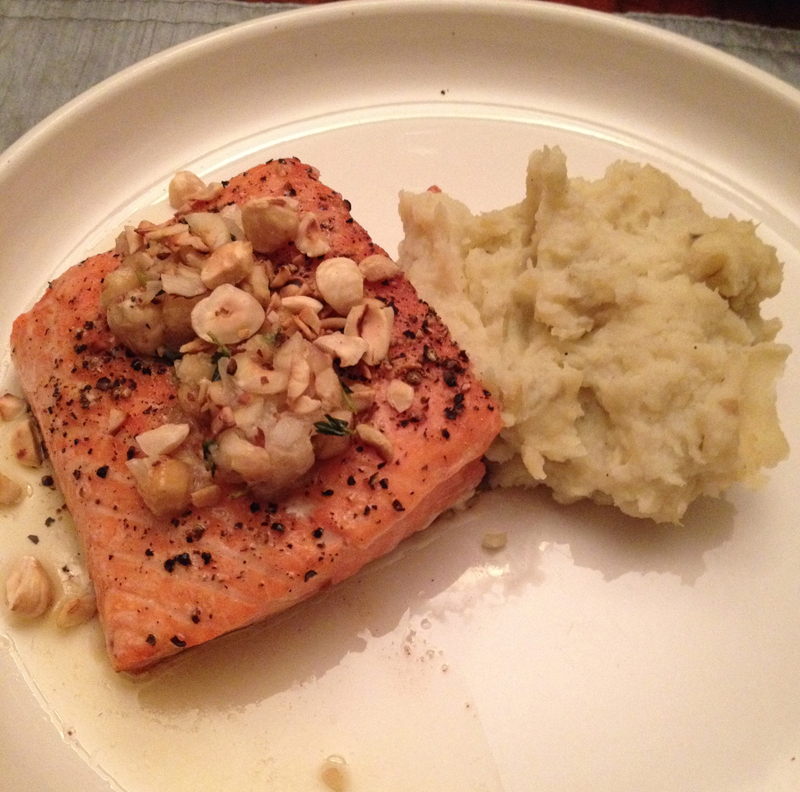
The star of this recipe is the compound butter that tops the salmon after it has been baked. You can use all or some of it, but we had a lot left over (even after using 1/2 of it on 20 ounces of salmon).
Make the compound butter ahead of time (recipe below) and use the freezer to re-solidify it if you happen to be short on time.
For the salmon
Ingredients:
1 Tbsp melted butter
salt and pepper to season
20 ounces wild-salmon (it was easier for us to portion after cooking)
Procedure:
Preheat oven to 400. Cover a large baking sheet with parchment paper and brush with melted butter, then sprinkle with salt. Place salmon in the middle, skin side down. Brush salmon with melted butter and season again.
Place salmon in oven and roast it about 10 min. Be careful not to overcook. To serve, portion your filets and top each with slices of hazelnut butter and additional toasted hazelnuts.
Hazelnut compound butter
Ingredients:
1/2 stick of butter
4 Tbsp hazelnuts, finely chopped
1/2 cup butter
1 small shallot and 1 garlic clove, finely minced
2 sprigs fresh thyme, finely minced
Procedure:
Toast hazelnuts over medium heat until golden, then set aside to cool.
Sauté shallot and garlic in 1 Tbs of melted butter until shallot is translucent. Remove from heat.
Then add shallot mixture to the toasted hazelnuts, along with the remaining butter, thyme, and some salt and pepper.
Place mixture into the freezer for about 10-20 minutes.
Then place a large piece of plastic wrap on flat surface and transfer the butter mixture (after it has set up a little in the freezer) to the center of plastic. Form a log shape like above. Wrap tightly in the plastic and chill until solid. This will take 2 hours in the refrigerator, or about 45 minutes in the freezer.

Spinach salad with red and yellow bell peppers, avocado, mushrooms, and salami from Taylor’s Market.

For the Cauliflower and Sweet Potato Mash
Ingredients:
1 head cauliflower (cut into small pieces)
1 large white sweet potato (cubed)
1 shallot
1 Tbs butter
1 Tbs chopped garlic
1/2 cup chicken stock or water
Salt to taste
Procedure:
Cook cauliflower and sweet potato in boiling water until fork tender. Drain water and set aside.
Chop shallot into thin slices and sauté in melted butter in a small pan. Add the garlic. Cook until shallot is translucent.
Place cooked cauliflower and potato into a food processor with the shallot mixture.
Add the garlic powder and chicken stock and pulse until completely smooth. Season to taste.

Last but certainly not least was the wine pairing. A 2010 reserve Pinot Noir from one of our favorite (and super local) wineries, BellaGrace Vineyards. The grapes are sourced from Sangiacomo Vineyards in Carneros. It is a fairly ripe Pinot Noir, but with the distinctive strawberry flavors unique to the region. The wine is fairly acidic, which perfectly compliments the fatty characteristics of Pacific salmon.
You can find BellaGrace Vineyards on Facebook here or visit them in person at the winery (complete with a cave cellar) at 22715 Upton Rd in Plymouth from 11:00am to 4:00pm, Fri-Sun. They also have a tasting room in Sutter Creek (73 Main St, Sutter Creek) open from 11am-5pm daily.
Cheers! 🙂
Roasted Carrots with Curry and Pecans

Every year Andy and I get together with another family for a nice dinner party on the back deck at our house in Incline Village. We collaborate on a menu for our guests and make a fuss over the food and wine. The first year, we tricked everyone into eating a fully Paleo meal. Since then, all the guests know it’s a Paleo meal, and no one seems to mind. 🙂 No one misses the bread or the sugar!
Typically, I am in charge of two side dishes, and Andy grills the meat (main course), makes a big salad, and makes his classic Bacon Wrapped Dates.
I have to say, Summer Solstice Party Number Three was a success and for one of my sides, I made and served these carrots.
I used a stevia sweetener called Pyure Sweet in the recipe. Many thanks to the manufacturer for sending me the samples.
Ingredients:
(feeds about 8-10 as a side dish)
1 cup pecans
5 pounds carrots
8 Tbs coconut oil (or butter)
1/4 cup Pyure Sweet
1 Tbs molasses
1 Tbs curry powder
1/2 cup lemon juice
Sea Salt to taste
Cracked black pepper
First, you’ll need to toast the pecans. You can do this in the oven or in a skillet on low heat. Whatever works for you. Just be careful not to burn them. Let them cool once toasted, and give them a rough chop. Set aside.
So, I personally choose the oven to toast my pecans, because it heats up the oven for my carrots that go in next. I have the temp at about 375°F for toasting the pecans. I heat it up to about 400°F when it is carrot roasting time.
Before the carrots go in, you’ll need to clean them up by peeling and cutting them into “french fry” shapes. It’s up to you what size you cut them down, but make sure they are uniform so they will cook evenly. Then, put them on a sheet tray (or two) that’s well oiled/greased (coconut oil or olive oil works best), salt liberally with sea salt, and roast until browned. I would tell you how long to leave them in the oven, but it all depends on how thick you have cut them, so I am leaving that up to you.
While the carrots are roasting away, you can make the curry sauce. Melt 8 Tbs of coconut oil (or butter) together over low heat in a saucepan with 1 Tbs molasses, 1/4 cup of Pyure Sweet stevia blend, 1/2 cup lemon juice, and 1 Tbs curry powder. Make sure all ingredients have combined over the heat (without boiling) and set aside.
Remove the carrots from the oven when they are close to being done. Drizzle the curry sauce over the pan/pans of carrots. Return to the oven and roast an additional 5-10 minutes.
Then the sauce has saturated and cooked into the carrots, remove them from the oven, and sprinkled the toasted pecans over them.
Serve the carrots warm or room temperature. A perfect party side dish and a true crowd-pleaser! 🙂
A Trio of Pinots and Food Pairing with Holman Ranch Wines
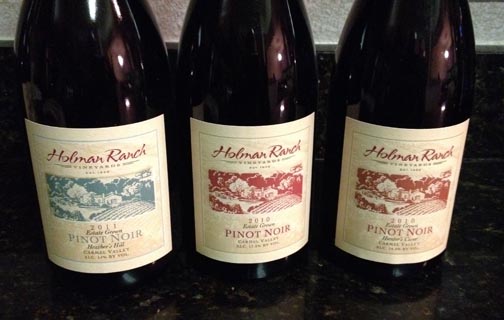
First of all, a big thanks to Holman Ranch for sending me six bottles of great wine to taste and give feedback to all of my readers. Not all wineries are quite that generous, and you make this particular writer feel appreciated for what I do. 🙂
Now, onto the reviews! 🙂
It was a lot of fun to have a varietal tasting last Wednesday night with Andy. We chose to break into the three different Holman Ranch Pinot Noirs I received in my mixed half case.
I also made a dinner to pair with the wines: Pork and beef meatloaf wrapped in bacon (with a mushroom and shallot sauce), hasselback potatoes, and roasted Brussels sprouts.

The first wine we opened was the 2011 Estate Grown Heather’s Hill Pinot Noir.
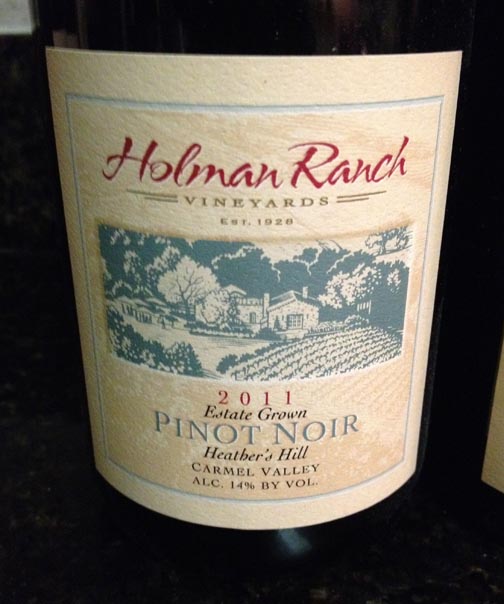
The 2011 Estate Grown Heather’s Hill was the best wine to have with food. It’s lighter in color (ruby) and very tight/tart at first. It has lots of aging capability, as it even opens up in a 20 minute time frame. This wine is not as delicate as most Pinot Noirs I have tasted, but it’s got some good characteristics that will make this wine finer as it ages.
The second wine we tasted was the 2010 Estate Grown Pinot Noir. This wine was Andy’s favorite. It is aged for 12 months in French oak.

It’s lower in alcohol, smokier on the nose and palate, and just a little more… Pinot-y. It was a great wine to me because it was a little more quaffable without food, but was also a great pairing with our meal. The mushroom sauce (we had on top of the meatloaf) and this wine are a great match.
Our final wine of the evening (and my favorite) was the 2010 Hunter’s Cuvee Pinot Noir.

This wine was my favorite! I could drink it with or without food. It’s earthy/leathery, but lots of fruitiness as well. It’s the highest in alcohol of all three wines we tried, so no wonder I like it best. Hmmm…
To make the meatloaf, I blended 1 part grass fed ground beef and 1 part ground pork. I seasoned the meat with garlic infused alderwood salt, added two eggs, one 1/2 cup of almond flour, 1 Tbs crushed garlic, and 2 Tbs Bragg’s liquid aminos. Then I wrapped the loaf in slices of bacon and baked it at 400°F until the bacon showed signs it was getting crispy. Test the loaf with a meat thermometer and don’t let it get past 125°-130°F, or you’re gonna be hosed and you might as well use that loaf as a door stop or paperweight. Take the loaf out of the oven just BEFORE or as you reach that temperature range, and it will be perfect.
I topped the finished loaf with a mushroom sauce (for the Pinot Noir pairing, naturally). The sauce was made of shallots, mushroom, white wine, butter, garlic. No recipe there, I just wing it.
You can find Holman Ranch on Facebook here and follow them on twitter here.
If you represent a winery and would like to be featured in a wine/food pairing on my website, please contact me here.
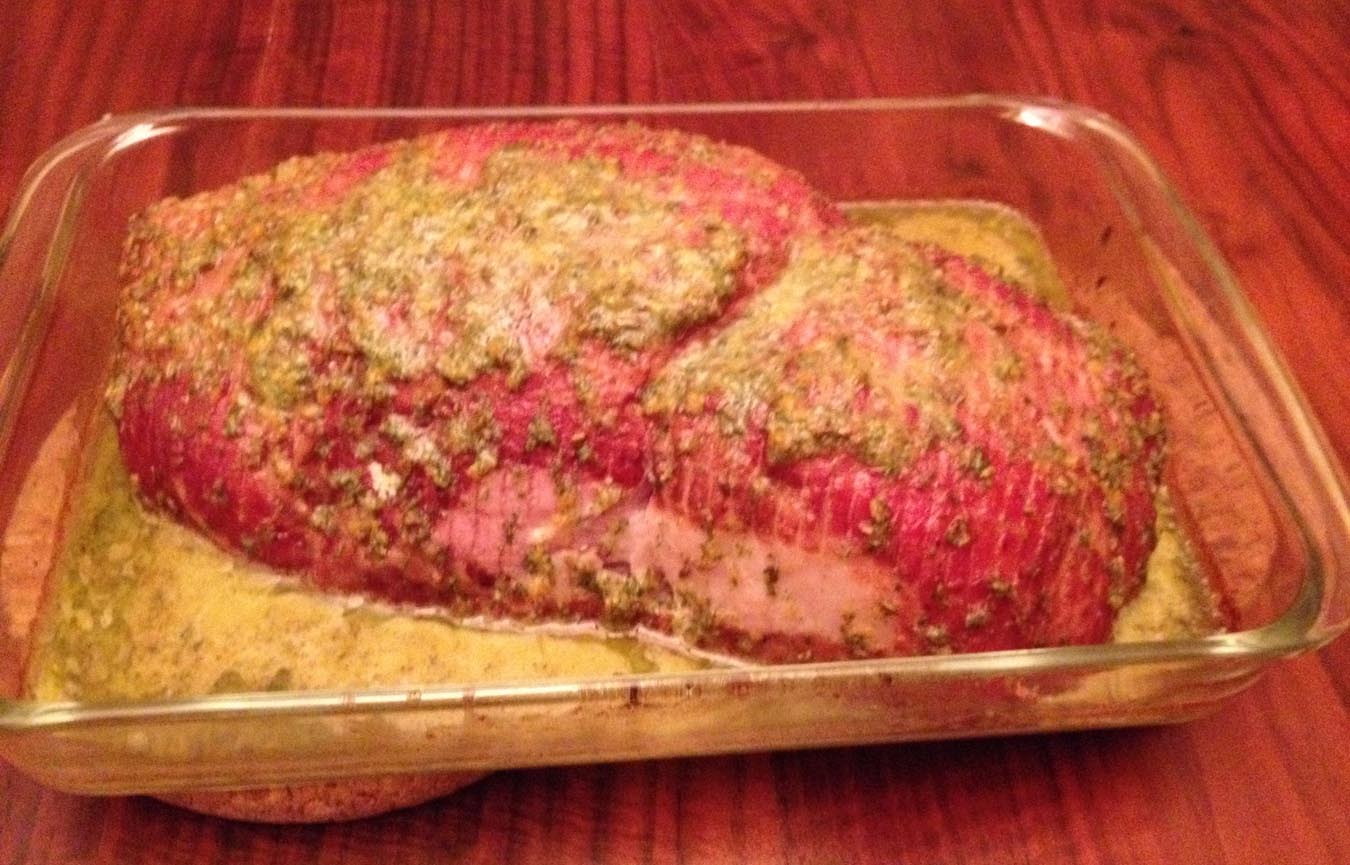
Wellshire Farms Holiday Ham: Herbed Orange Ham Recipe

Having a ham on the table during a holiday gathering is pretty much a tradition in my family. Especially on Christmas Eve. They are great on their own, with a side of mustard, or my favorite is leftover ham chopped into cubes and reheated in a saute with onion and kale or chard and some dried cranberries. In this blog however, I developed a recipe to make the ham the star of the show. It’s got all the wonderful herbs present in a holiday meal, with orange and zest that compliment the ham’s saltiness.
A big thanks to Whole Foods Market for allowing me to try one of their delicious holiday products, a ham from Wellshire Farms. I ended up with a (half) traditional boneless ham. I liked this ham because I was able to create my own recipe to heat the ham, as well as carve to my liking. (I liked. A LOT). 😉

Here’s how I prepared the ham, as well as the side dishes I made to complete last weekend’s Sunday dinner.
Preheat oven to 325°. To reheat your ham, I recommend using a roasting pan with a rack, one with a bottom that you can pour some water in to help the ham retail moisture while it reheats. A meat thermometer is a pretty good thing to have as well. (Tip: A 4-pound boneless ham will serve about 12 people, and this marinade will be enough for that size).
Marinade ingredients:
4 Tbs fresh rosemary
2 Tbs fresh sage
2 Tbs toasted fennel seed
2 Tbs chopped garlic
2 Tbs orange zest
1 Tbs black pepper
1/2 cup orange juice
1/2 cup olive oil
Combine all the ingredients in a food processor and pulse until completely blended (mixture will be a pretty bright green). Paint the ham with the mixture using a BBQ brush. (You can also pour it over or use your hands, but a brush will coat the ham nicely. Set aside while you prepare your side dishes.
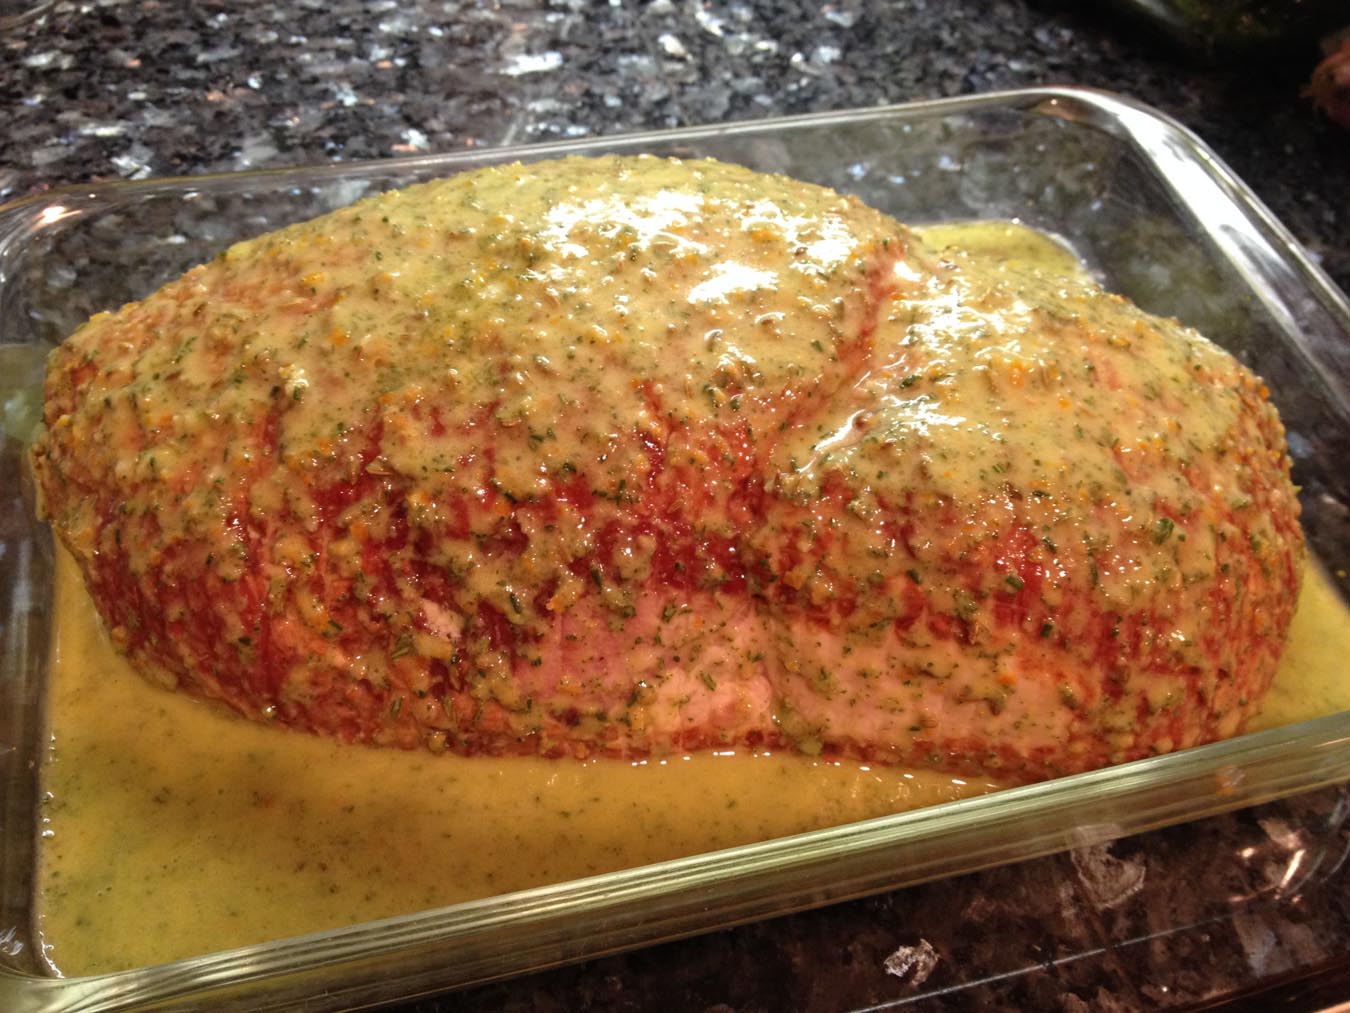
Cover the ham with aluminum foil and place in the oven. Bake until the internal temperature reaches 140° (Allow 7-8 minutes per pound). Remove the foil and place the oven on broil. Leave in for 2 minutes. This will give the top of the ham a nice finish.
Here is a link with videos to Wellshire Farms entire line of hams.
Wellshire Ham Details (traditional boneless ham)
Wood smoked
60% less fat
No preservatives and no antibiotics
Free of nitrates, no artificial ingredients or preservatives!
The natural wood smoke and rich tasting ham make a savory combination.
You can get creative with your own unique glaze.
Ham lays flat for ease of cooking and carving.
(This ham is wrapped in clear packaging, other varieties of Wellshire Hams are wrapped in red, gold, and silver foil).
For other great ideas and information on ham, you can check out the Whole Foods Market recipe ideas here. You can find Wellshire Farms on Facebook here.
To save yourself time, you can order your ham online by heading to Whole Foods Market’s online shopping cart here.
The other dishes in the photo above will be forthcoming over the next week (hopefully): Pommes Anna and a wilted spinach & kale, chestnut, & cherry salad with roasted shallots. Happy holidays!
Persimmon, Hazelnut and Arugula Salad with Honey Citrus Dressing

OK, sometimes I trick people into eating Primal/Paleo. Such is the case when I am invited to or Andy and I throw potluck-type parties. And this was the case last Saturday. Being Paleo/Primal at a party can be as scary as Halloween itself! 🙂
So here’s the great salad (I have named the FALL-iday/Holiday Salad!) brought that served both as a conversation piece, and the main part of dinner for Andy and myself. 🙂 You can use the ingredients below in pretty much any ratio you want––I’ll just give you the framework of what I used. And don’t miss out on the dressing. It really makes the dish!
Salad:
16 oz container of Organic Girl Arugula (you can also use a little spinach or spring mix if you’d like, but I think arugula tastes the best in this particular salad).
4 medium-sized fuyu persimmons, cubed
Arils of 1 pomegranate
4-6 slices of bacon (thick-cut, Applewood smoked)
1 cup toasted. skinned, and chopped hazelnuts
2-3 ozs. parmesan cheese–shaved…not the POWDERED kind for crying out loud 😉
Combine all ingredients in a large bowl, or in my case, a catering pan if you are taking the salad to a large party. 🙂
Dressing:
1 part lemon juice
2 parts grapefruit juice
3 parts extra virgin olive oil
2 parts honey
1 tsp crushed garlic
1 tsp crushed ginger
pinch salt
Combine all ingredients in a small bowl and whisk until well incorporated. Dress the salad and serve. If you are transporting the salad to an event like I did, wait until you arrive at the event to dress the salad.
Thanks to Whole Foods Market for sponsoring the food used in this recipe!! 🙂 You can find Whole Foods on Facebook here and on twitter here. My local store is in Roseville on Facebook here.
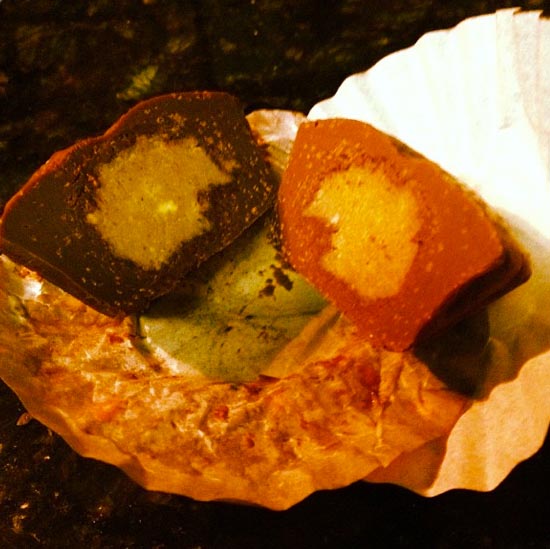
Trick or Treat? Treat!! Four-Ingredient Hazelnut Butter Cups (sponsored by Nugget Markets)

Hey you! Yes, I’m talking to you. You’re the one who bought the institution-sized bag of Halloween candy “for the neighborhood kids”… Like, back sometime near Labor Day. Yes, and I know you put it away in the pantry for safe keeping. Hmmm, but somehow it seems to have all disappeared.
I’m not going to judge you. I like treats myself. The only difference is that I would never buy name brand candy. When I reward myself with a treat, I prefer to know what’s actually in it, and I prefer it to be non-poisonous. I used to really dig Reese ‘s Peanut Butter Cups until I found out how much sugar and other crap are in them…and that they are GMO–Ingredients: Milk chocolate (sugar, cocoa butter, chocolate, nonfat milk, milk fat, corn syrup solids, soy lecithin, PGPR) peanuts, sugar, dextrose, salt, TBHQ. Thus, making them COMPLETELY un-Paleo friendly.
So now I compromise with hazelnut butter cups. You’ve heard of Nutella, right? Well this is about the same thing with way less sugar and all the flavor.
Thanks to Nugget Market for supplying the ingredients.
Hazelnut Butter:
2 cups toasted organic hazelnuts (skins removed)
2 Tbs raw honey
2 Tbs organic coconut oil
Place all ingredients in a food processor and grind until the mixture becomes a paste. Set aside.
Chocolate:
16 oz box E. Guittard Bittersweet Chocolate 72% Cacao Disc Wafers (Melted)
You’ll also need mini cupcake liners, a mini cupcake pan, and some non-stick cooking spray.
1. Place the liners in the pan and spray them with some non-stick cooking spray.
2. Then pour the melted chocolate in the liners until filled 1/3 full.
3. Take a small spoonful of the hazelnut butter mixture and form in into a small ball.
4. Drop it into the 1/3 full liner of chocolate. Repeat for each candy.
5. Set the pan in the freezer for 5 minutes to set the chocolate and filling.
6. When filling is set, cover the rest of each candy with more melted chocolate. Repeat for each candy.
7. Return the pan to the freezer to set all the hazelnut butter cups.
Here’s what they look like when you cut them open! 🙂 Happy Halloween, friends!! 🙂
You can find all the ingredients in this recipe at Nugget Market.
You can find Nugget Market on Facebook here and follow them on twitter here!
Scary Good Pesto and Blue Cheese Potatoes (sponsored by Whole Foods Market)

Last Saturday, Andy and I went to a Halloween party and I took these potatoes. They were inspired by a dip that Andy buys for us (occasionally as a treat) at Taylor’s Market. The dip/spread is called Walnut Basil and Blue Cheese Spread, and it’s rather addictive. I thought I would take the same flavor components and make them into bite-size little party treats. It was a big deal that I make a good culinary impression at this party, and I knew these would be well received. PS: They were all gone within a half an hour! 🙂
Ingredients:
2 pounds red, blue, & yellow mini potatoes–if you can’t find these, red ones will do.
1 jar 365 (Whole Foods private label) Pesto Sauce
1/4 cup So Delicious Coconut Milk (or sour cream)
1/2 cup Crumbled blue cheese
1/4 cup olive oil
salt/cracked pepper to taste
Preheat the oven to 400°F and slice the potatoes into bite sized pieces. Generously oil a baking sheet and place the chopped potatoes it. Drizzle some oil over the potatoes (how much you use is up to you). Bake the potatoes until they are golden and crispy. Set aside while you prepare the pesto and blue cheese mixture.
For the blue cheese/pesto mixture, combine the pesto and the blue cheese in a bowl large enough to eventually hold the potatoes, too) and mix together with the back of a spoon, add the coconut milk (you can also use sour cream) to thin the mixture so that you can easily spread it on the potatoes.
Then add the potatoes in the bowl with the pesto/blue cheese mixture, and fold them in until the potatoes are well covered. Then place the potatoes back on to their original baking sheet and turn the oven on to the broil setting.
Broil the potatoes until the pesto and blue cheese mixture forms a crust and they look browned/crispy.
Go forth and be the hit of your party!! 🙂
Thanks to Whole Foods Market for sponsoring the food used in this recipe!! 🙂 You can find Whole Foods on Facebook here and on twitter here. My local store is in Roseville on Facebook here.
Grocery Trip and Dinner from Whole Foods Market (Nike Women’s Half Marathon Series)
Sorry for the delay on this post! I have been pretty behind on writing. 😉 It’s race week! Here’s another healthy recipe brought to you by Whole Foods! -cg 🙂
====================
First of all, I’d like to again thank Whole Foods Market of Northern California for sponsoring me for the Nike Women’s Half Marathon Series, and giving me a gift card to spend on food during training.

This week, my grocery trip/list was light. I had already stocked up (hoarded food, LOL) from a grocery trip a few days ago. So the above was really all I needed to make it through to the weekend.
1 pound of Brussels sprouts
1/2 pound of pork sausage
2 pears
1 cantaloupe
1 butternut squash
1 acorn squash
1 onion
1 avocado
1-6 pack of Zevia Ginger Ale
1 bottle of Roger d’ Anoia Cava (fueled by the grape!)
For dinner that evening, I made a stuffed acorn squash with onions, sausage, kale, and basil, with a side of roasted Brussels sprouts.

For the Brussels Sprouts:
1 Pound Brussels sprouts
1/4 cup olive oil
Slice the Brussels Sprouts and drizzle them with olive oil, then bake at 385°F until they are golden brown and crispy.
Now for the squash! You’ll need:
1/2 pound of pork sausage
1 acorn squash
1 onion (sliced)
1 bunch of fresh basil leaves
4 cups kale (shredded)
1 egg
1/4 cup grated parmigiano reggiano cheese (or parmesan cheese)
Split, de-seed and place your acorn squash on a cookie sheet and drizzle with a little olive oil. Prebake the squash at 400° for 30 minutes then remove from oven. Set aside to cool.
Cook the pork sausage in a medium skillet until it is about halfway done. Remove from the pan. Then sauté the onion in the fat from the sausage. When the onion is browned/translucent, add the sausage back in with the kale, and wilt the kale in the mixture over low heat. Then add the basil last, and wilt it a little as well. Remove the mixture from the heat, and add the egg and the cheese. Mix until completely incorporated. Then divide the mixture into two parts, and stuff each half of the acorn squash. Then return the squash to the oven (385°) and bake the squash until the stuffing is set and the acorn squash is fully baked.
You can find Whole Foods on Facebook here and on twitter here. My local store is in Roseville on Facebook here. The Nike Women’s Series is on Facebook here.
Pig of the Month: The Gift that Keeps on GIving
At cavegrrl.com headquarters, I frequently get emails from different marketing representatives offering to ship me samples of their client’s product, hoping I will love it and tell all of you about it. Often, I get pitched for products that are gluten-free (but not grain-free) and still get several offers from people to send me candy, cake and the like from my old blog, which I rarely even update. So, it’s refreshing to get a request from a company that offers a line of products I really love. And this time it’s worth the extra miles on the treadmill.
I bring to you the Pig of the Month.
Pig of the Month has taken your favorite meats and snacks and made them even better. Pig of the Month is an online retailer specializing in world famous barbecue. Their products have been featured in several top national media outlets AND personally endorsed by The Chew’s Iron Chef, Michael Symon, and now, me! 🙂
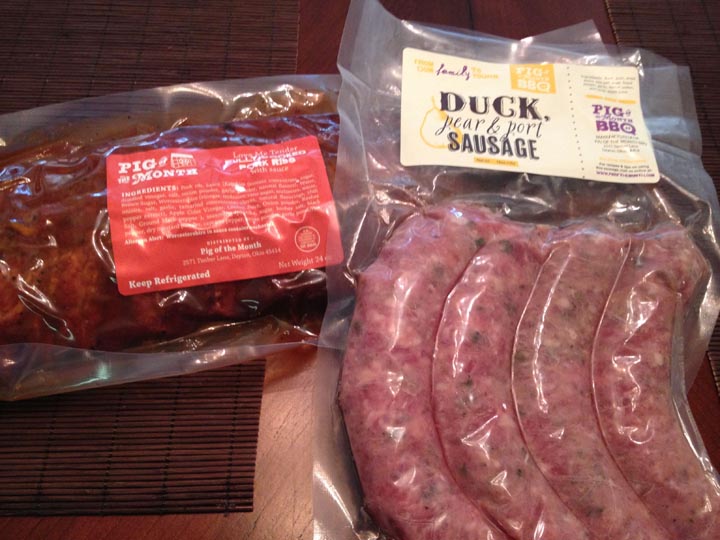
I have now had the chance to try 3 of the products sent to me by Pig of the Month. Here’s the care package I received about a month ago:
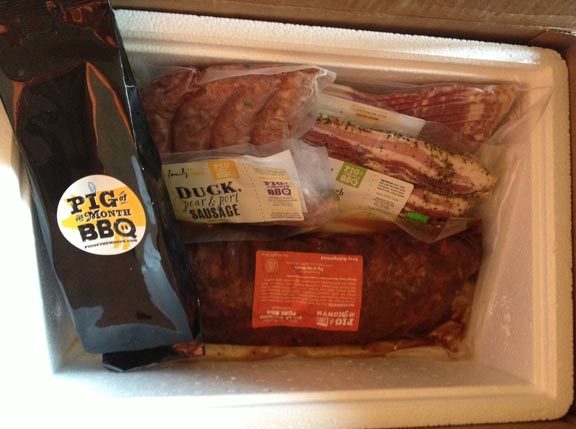 It contained:
1. 1 pound of Duck, Pear, and Port Sausages
2. 1 package of 6 slices chocolate covered bacon
3. 1 pound Applewood Smoked Bacon
4. 1 pound Garden Herb Bacon
5. 1 rack (2 lbs.) Memphis Style Baby Back Ribs
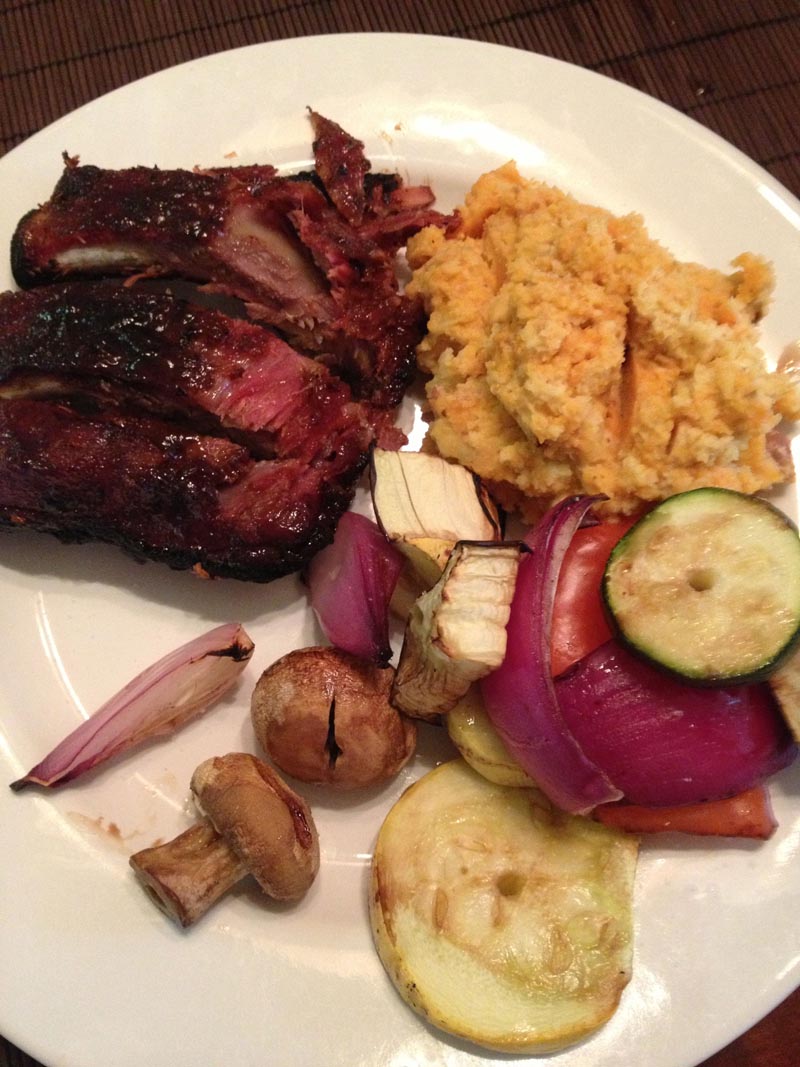
The first item Andy and I tried were the ribs.
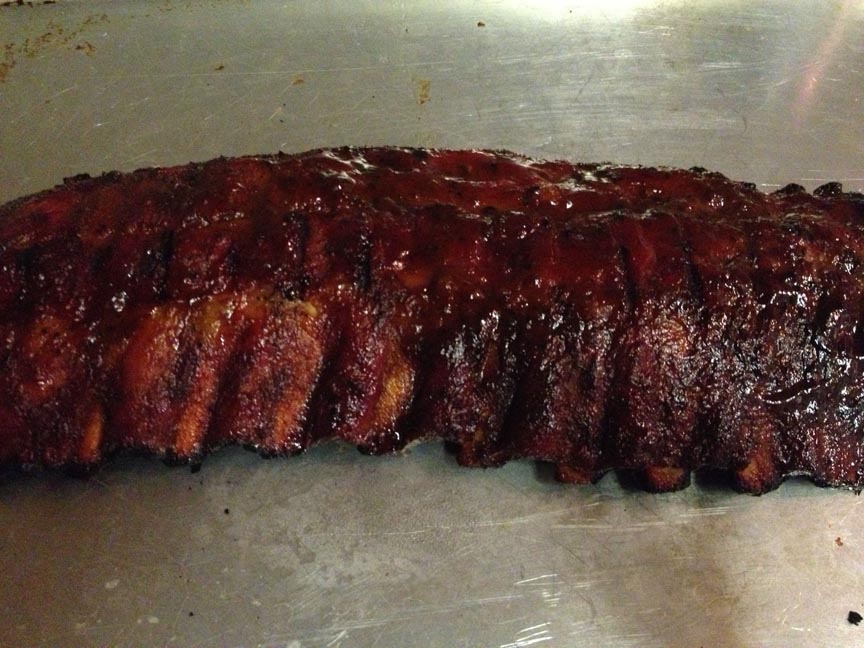
We put together a little dinner around them with mashed sweet potato & cauliflower, as well as grilled vegetables:
Then we tried the Duck, Pear & Port Sausage. I also made Brussels sprouts l’orange and sweet potato wedges with a grapple balsamic ketchup.


With the Garden Herb Bacon that came in the package, I made an apple, bacon, toasted walnut and arugula salad. I made the dressing with: 1 tsp crushed garlic, 1 part lemon juice, 2 parts apple cider vinegar, and 2 parts extra virgin olive oil, salt to taste.
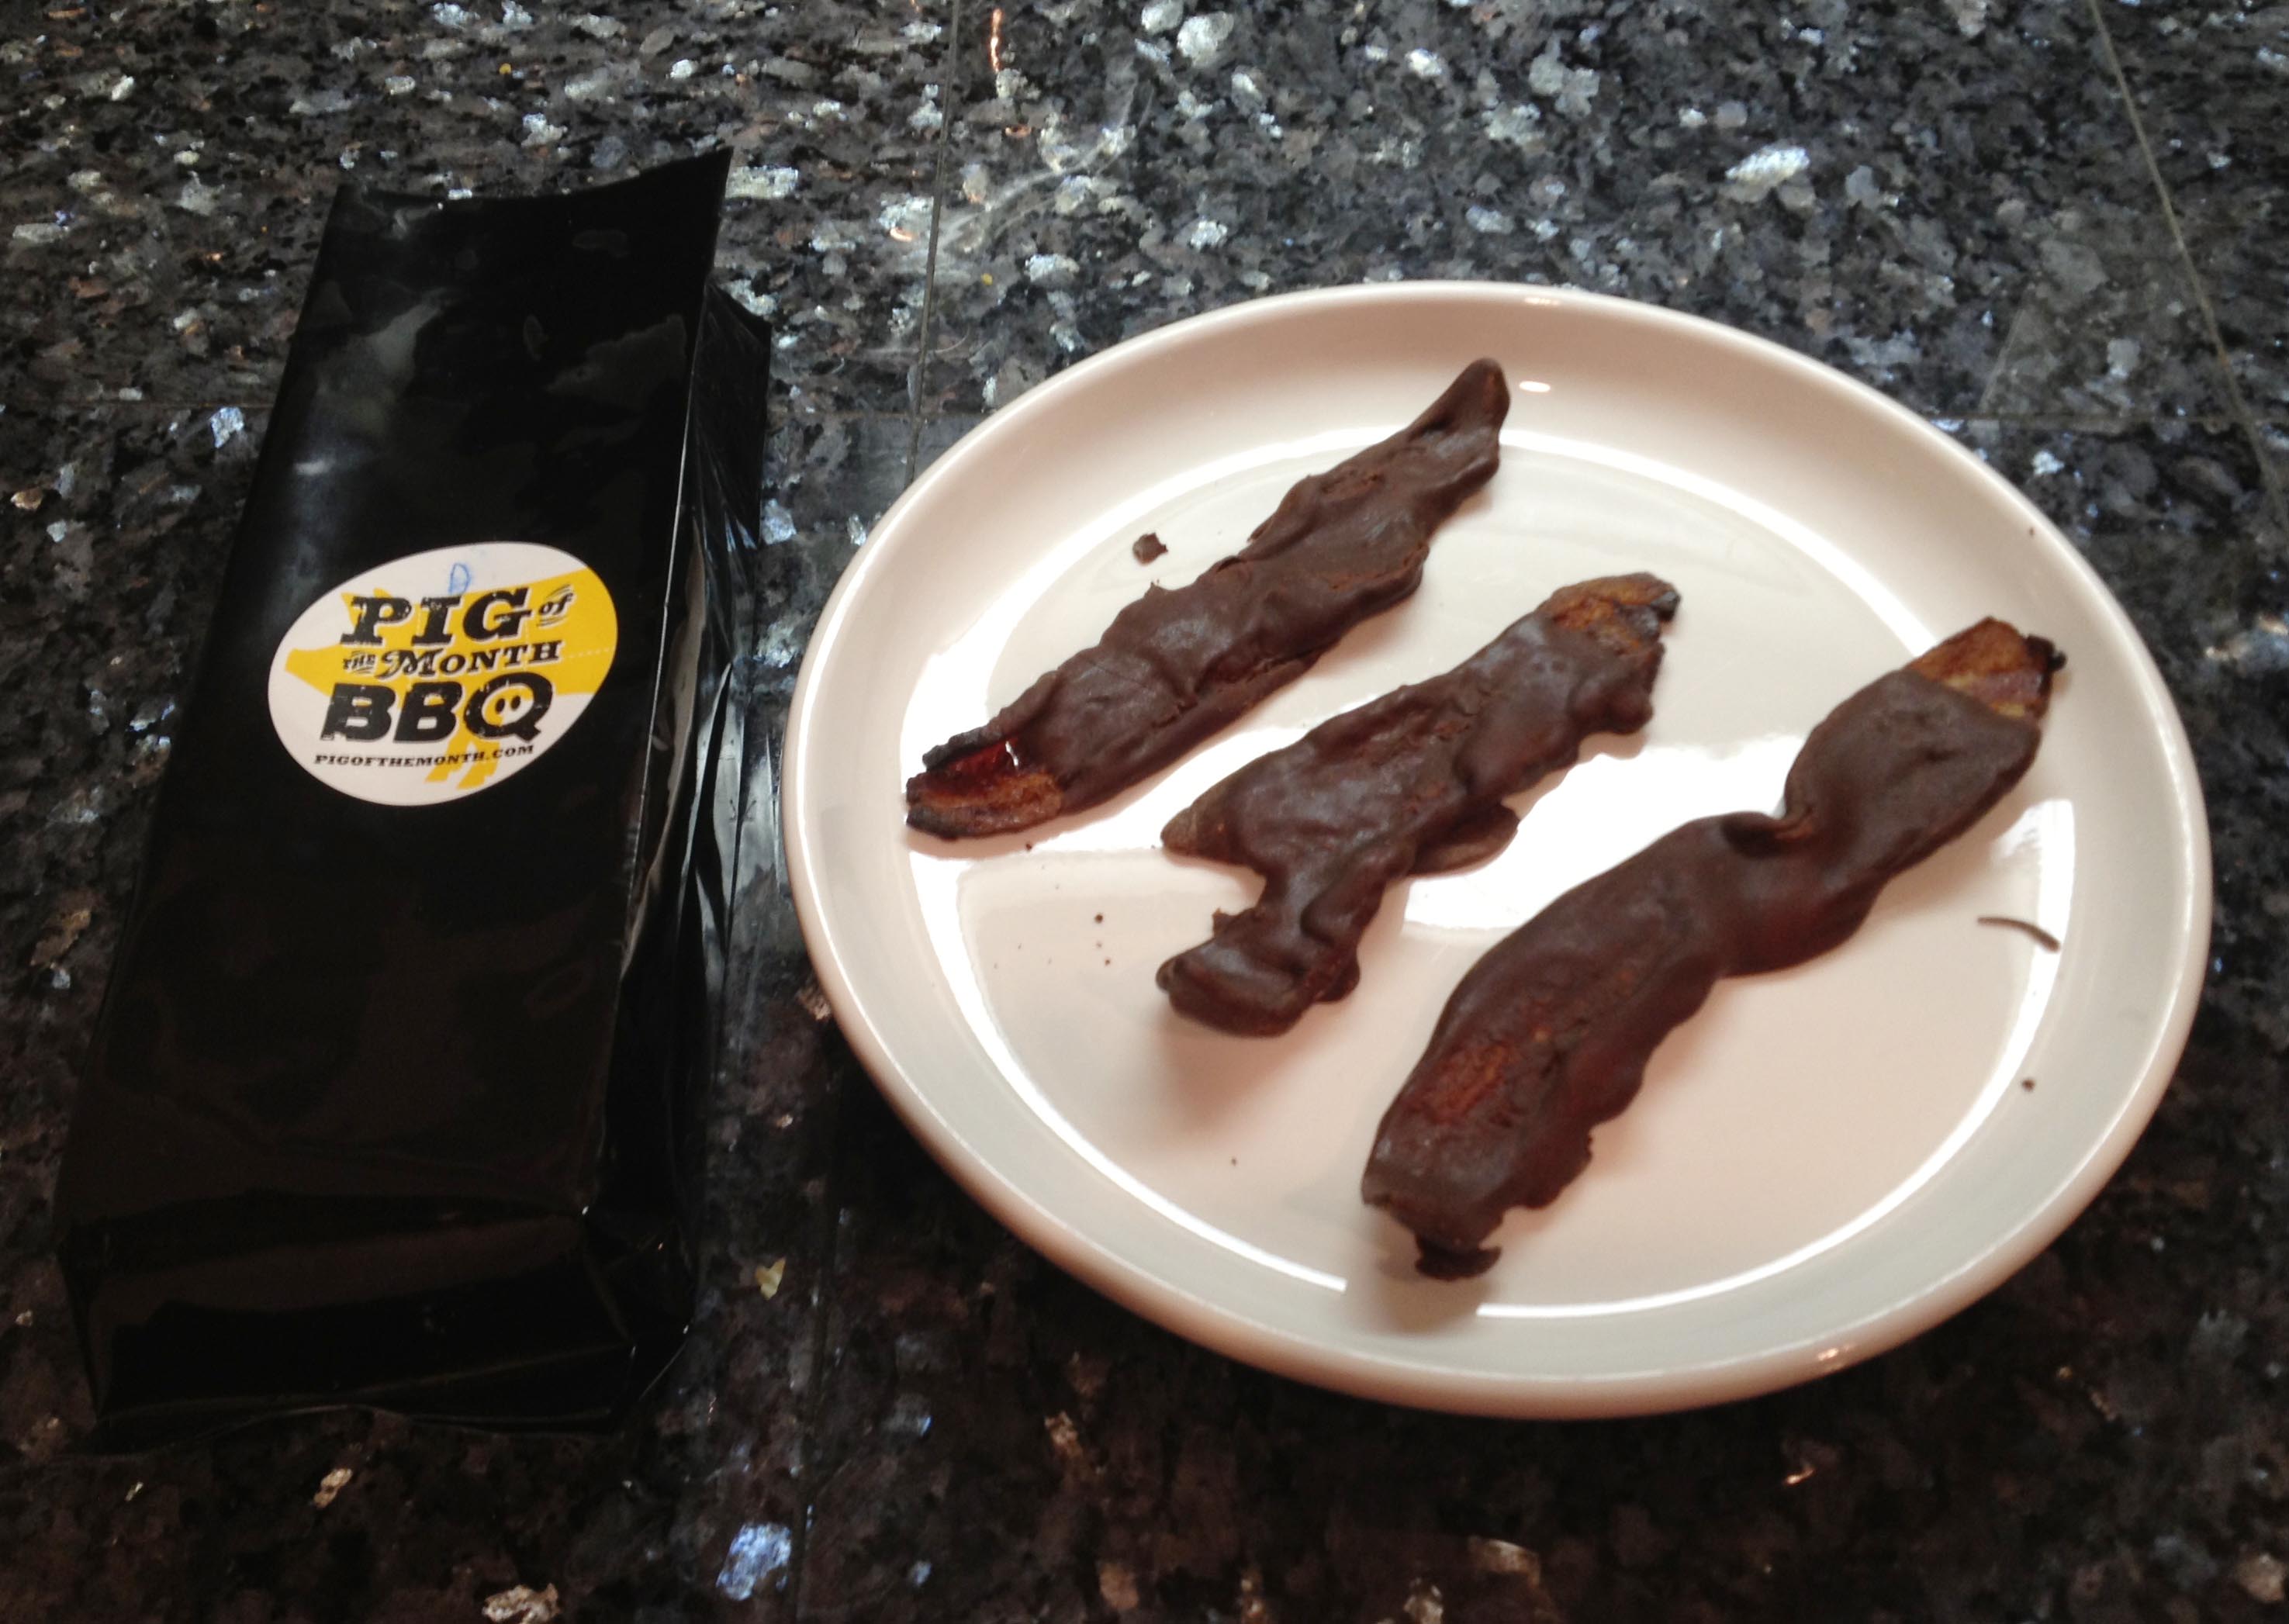
I gave the Chocolate Covered Bacon to Andy for a part of his birthday present. The bacon is made of nitrate free applewood smoked bacon, draped in a layer of 72% Swiss chocolate.
Other bacon cooking ideas include:
1. Use the bacon as a wrap around your favorite items when grilling: asparagus, scallops, meats.
2. Wrap around a feta-stuffed fig or pecan stuffed date and bake in the oven to create an amazing appetizer.
3. Lay on a rack inside of a baking pan, coat with date sugar, cinnamon, and a little maple syrup or honey and bake at 375° for 15-20 minutes: candied bacon!
For more ideas, there are a ton of recipes on the Pig of the Month recipe page here. Use the coupon code “ILOVEPIG” for 15% off your next order. PS: If you live in Dayton, Ohio (where I happened to spend the first 25 years of my life) or the surrounding area, you can pick up your order at their facility!!
You can find Pig of the Month on Facebook here and on twitter here.


