
Hungry Root: You Won’t Push These Vegetables Aside!
A few months ago, I was introduced to a company called Hungry Root. Hungry Root’s mission, via their website is to: Unleash the flavor of vegetables, bring them to the center of your plate, and make them craveable.
OK picky people. I know what you are thinking… Vegetables and craveable are oxymorons! Not anymore. 🙂
Since going Paleo in 2011, I have been a proponent of obtaining most of my carbohydrates from fruits and especially vegetables. 🙂 🙂 🙂
Yes, I am the person who will roast root vegetables like carrots and parsnips until they are caramelized, and eat them for dessert! Maybe that sounds a little nutty, but when you start a true Paleo diet, you omit all processed sugars and so even vegetables when roasted can actually taste sweet!
I was really interested in Hungry Root, because they are making similar things with vegetables that we do on a daily basis, and yet, Hungry Root can ship meals pretty much really to cook with no prep involved other than heating oil in a pan, which is the perfect thing for busy people who need a quick and healthy meal! 🙂
So, the folks at Hungry Root sent me a 3-pack sampler of some of their most popular items to try them out:

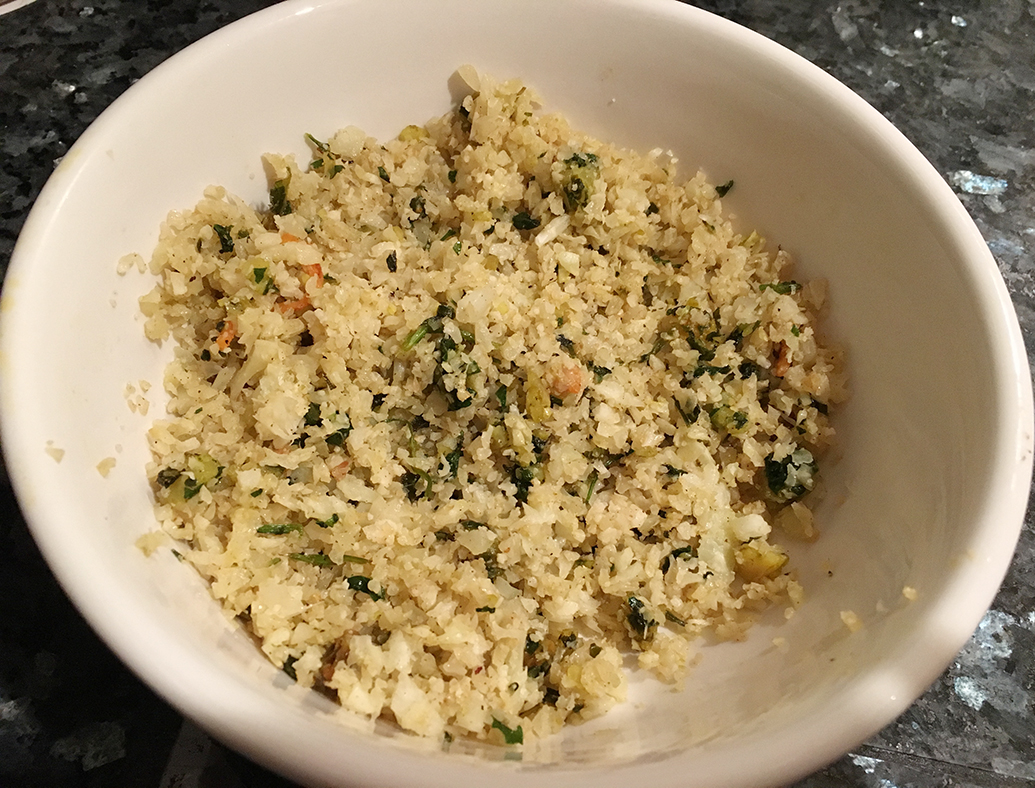
This is the Cauliflower Coucous with Moroccan Almond Curry ($6). This VEGAN side is finely chopped raw cauliflower with a container of Moroccan almond curry made from fresh cilantro, parsley, mint, almonds, raisins and madras curry in the package. It’s super easy to prepare and you can eat the WHOLE container for only 121 calories. I don’t know about you, but I am a whole container kind of gal. 😉
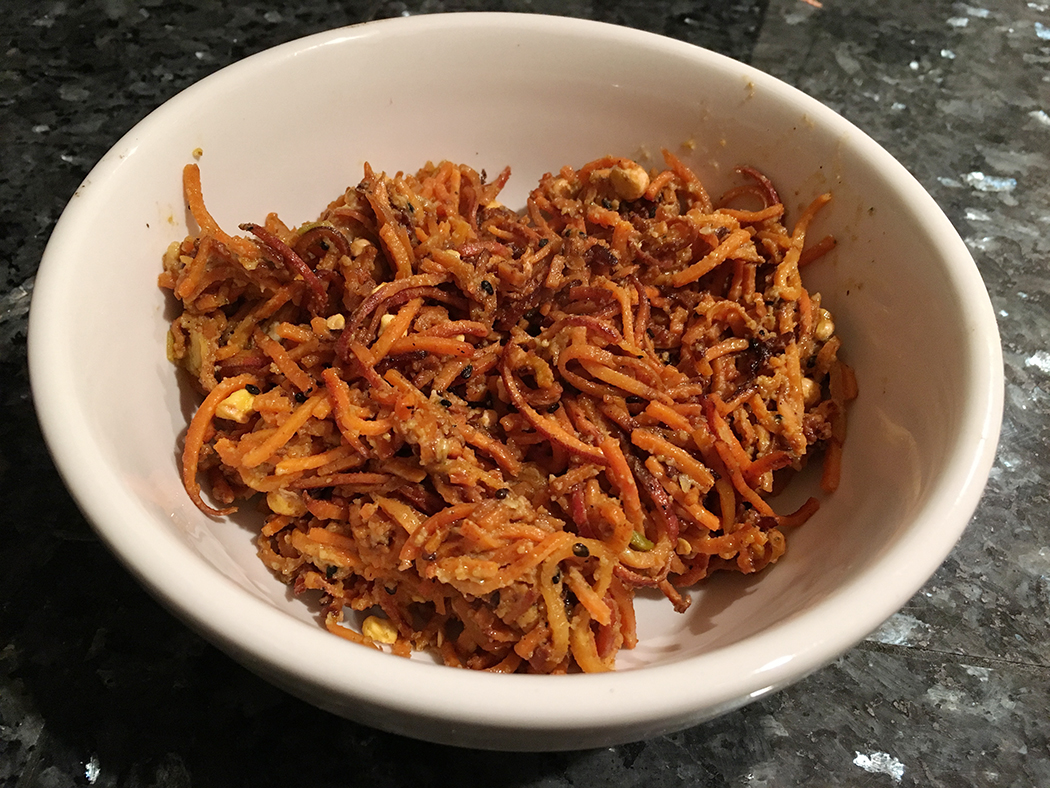
And THIS is the Sweet Potato Noodles with Creamy Cashew Alfredo which contains Fresh-cut sweet potato noodles with creamy cashew alfredo (cashews, sesame tahini, garlic, Dijon mustard, Kosher salt, lemon juice, black pepper), tossed with curried carrots and chopped, roasted chickpeas. The cashew alfredo is absolutely ADDICTIVE. And BOOM, another vegan dish. P.S. There’s so much Vitamin A in the house in this dish, your eyes and skin will thank you just as much as your tastebuds!
The third item we tried was the Almond Chickpea Cookie Dough. Ingredients: Chickpeas, sweet potato, almond butter, sesame tahini, maple syrup, organic cane sugar, vanilla extract, baking powder, baking soda, sea salt, vegan chocolate chips. And we loved it so much, we ate it raw. Because it was so HARD CORE yummy that way—and only 60 calories per serving!! 🙂 YAY. Cookies for everyone!!

Want to try out Hungry Root? Well, you’re in luck! The marketing team at Hungry Root sent me a special code to pass along to you so that you can save 20% OFF your order. Just type in KRISTY20 in the promo code field at check out. Also, they are currently running a promotion of FREE shipping for orders over $40. Click here to start shopping!
You can find more information on Hungry Root here, find them on Facebook here, and follow them on Twitter here. 🙂
Meatless Mondays: Quick and Easy Roasted Red Pepper Soup
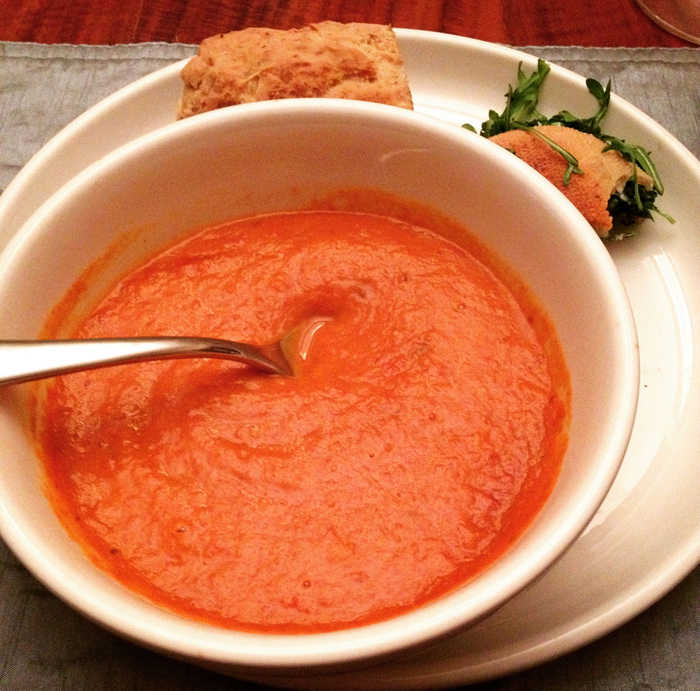
We enjoyed this homemade soup (my own recipe) on Saturday night paired with delicious gluten free and vegan sandwiches from Pushkins Bakery. If you haven’t tried their “adult grilled cheese” or “the buzz”, please do. Both sandwiches are vegan and gluten free and are utterly delicious. It was fun to have a completely vegan meal for a change. 🙂
Ingredients:
1 large sweet potato (peeled)
1 large onion
3 to 4 large red bell peppers
1 head of garlic
2 shallots
4 roma tomatoes
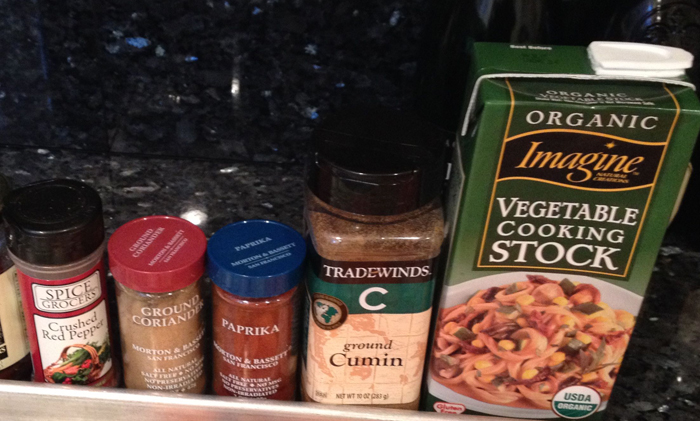
1 quart vegetable stock
1 1/2 tsp cumin
1 1/2 red pepper flakes
1 1/2 tsp coriander
1 1/2 tsp paprika
salt to taste
1-2 Tbs olive oil per baking sheet
Procedure:
Preheat oven to 385°F.
Prepare 2 half sheet trays by greasing them liberally with olive oil.


Chop all vegetables into uniform pieces. Place the onion and the sweet potato on one tray. On the other tray, you should be able to fit the chopped tomatoes, peppers, garlic and shallot. Important because the potato and onion will take slightly longer to bake. Bake the vegetables in the oven for about 40 minutes, checking to make sure nothing is burning and rotating them on the pan to prevent burning.
The peppers and tomatoes will be ready to remove from the oven when the peppers blister slightly and the garlic is roasted and tender. From the time you remove the peppers and tomatoes, leave the potato and onion tray in the oven ten minutes longer.
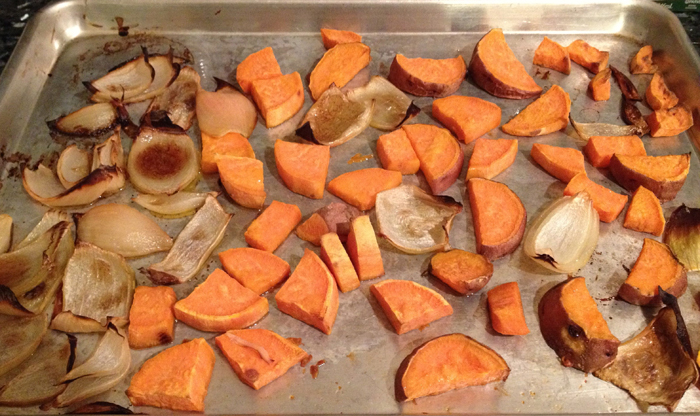

In a blender, begin to blend all the vegetables. There will be more than one blender can hold, so blend a little at a time with the vegetable stock. Since you will be enjoying the soup, add the stock to the consistency you like (I used all but about 1/2 cup of the stock), as thick or as thin. Empty each round of blended vegetables into a very large bowl so that they will mix together.
Then add all of your spices and flavorings. The crushed red pepper, paprika, coriander, and the cumin and salt to taste. Stir the spices in the bowl manually. Then in batches, return the vegetable mixture to the blender and mix until completely smooth. Pour the smooth soup into a new large bowl.
This soup can be made up to a day ahead of time. Just simply ladle into serving bowls and reheat. I’m confident this will be one of the easiest, yet most tasty soups you will ever make! 🙂 We paired the soup with a 2011 Handley Pinot Noir, Anderson Valley and a 2012 St. Rey Celeste, Candyhill Vineyards (Revolution Wines).

Roasted Carrots with Curry and Pecans

Every year Andy and I get together with another family for a nice dinner party on the back deck at our house in Incline Village. We collaborate on a menu for our guests and make a fuss over the food and wine. The first year, we tricked everyone into eating a fully Paleo meal. Since then, all the guests know it’s a Paleo meal, and no one seems to mind. 🙂 No one misses the bread or the sugar!
Typically, I am in charge of two side dishes, and Andy grills the meat (main course), makes a big salad, and makes his classic Bacon Wrapped Dates.
I have to say, Summer Solstice Party Number Three was a success and for one of my sides, I made and served these carrots.
I used a stevia sweetener called Pyure Sweet in the recipe. Many thanks to the manufacturer for sending me the samples.
Ingredients:
(feeds about 8-10 as a side dish)
1 cup pecans
5 pounds carrots
8 Tbs coconut oil (or butter)
1/4 cup Pyure Sweet
1 Tbs molasses
1 Tbs curry powder
1/2 cup lemon juice
Sea Salt to taste
Cracked black pepper
First, you’ll need to toast the pecans. You can do this in the oven or in a skillet on low heat. Whatever works for you. Just be careful not to burn them. Let them cool once toasted, and give them a rough chop. Set aside.
So, I personally choose the oven to toast my pecans, because it heats up the oven for my carrots that go in next. I have the temp at about 375°F for toasting the pecans. I heat it up to about 400°F when it is carrot roasting time.
Before the carrots go in, you’ll need to clean them up by peeling and cutting them into “french fry” shapes. It’s up to you what size you cut them down, but make sure they are uniform so they will cook evenly. Then, put them on a sheet tray (or two) that’s well oiled/greased (coconut oil or olive oil works best), salt liberally with sea salt, and roast until browned. I would tell you how long to leave them in the oven, but it all depends on how thick you have cut them, so I am leaving that up to you.
While the carrots are roasting away, you can make the curry sauce. Melt 8 Tbs of coconut oil (or butter) together over low heat in a saucepan with 1 Tbs molasses, 1/4 cup of Pyure Sweet stevia blend, 1/2 cup lemon juice, and 1 Tbs curry powder. Make sure all ingredients have combined over the heat (without boiling) and set aside.
Remove the carrots from the oven when they are close to being done. Drizzle the curry sauce over the pan/pans of carrots. Return to the oven and roast an additional 5-10 minutes.
Then the sauce has saturated and cooked into the carrots, remove them from the oven, and sprinkled the toasted pecans over them.
Serve the carrots warm or room temperature. A perfect party side dish and a true crowd-pleaser! 🙂
Paleo Panzanella Salad Featuring Julian Bakery’s Paleo Bread

What do you eat when it’s this hot outside? Salad! This is a great meal for the current weather.
Since going gluten and grain-free, I have denied myself one of my favorite dishes: Panzanella Salad. I was surprised to find out that Andy had never had the salad before.The people at Julian Bakery make Paleo Bread, and they kindly sent me samples of the almond and coconut to use as I pleased––I had the salad in mind. The Paleo Bread™ Almond is Gluten Free, 60 Calories, 1 Net Carb, 7g Protein and 5g of Fiber Per Slice. Grain Free, Soy Free, Corn Free and GMO FREE.Panzanella Salad
6 cups Paleo Bread cubed (I used the almond variety, but the coconut variety will work, too!)
1 teaspoon kosher salt
2 large, ripe heirloom tomatoes, cut into 1-inch cubes
1 cucumber, unpeeled, seeded, and sliced 1/2-inch thick
2 red bell peppers, seeded and cut into 1-inch cubes
1/2 red onion, cut in 1/2 and thinly sliced
20 large basil leaves, coarsely chopped
3 tablespoons olive tapenadeDressing Ingredients:
1 Tbs finely minced garlic
3 tablespoons balsamic vinegar
1/4 cup extra virgin olive oil (we use Frate Sol)
1/2 teaspoon kosher salt
1/4 teaspoon freshly ground black pepperCut the Paleo bread into cubes and toast in the oven until browned. You can also toast the cubes in a pan in some olive oil.
To make the dressing, whisk all the ingredients together. In a large bowl, mix the tomatoes, cucumber, red pepper, red onion, basil, and tapenade. Add the Paleo bread cubes and toss with the dressing. Season liberally with salt and pepper. Allow the salad to blend it’s flavors for about 30 minutes to an hour.

You can find Julian Bakery on Facebook here and on twitter here. You can buy Julian Bakery Almond Bread in stores at these locations or online here.
Primal-Friendly Gluten-Free Bleu Cheese Pecan Bread
If you never make anything else from this website, make this recipe. It is a spin on an old recipe I used to make called “crack bread”. I call it that because it will turn you into an addict. 😉 If you don’t mind eating wheat or sugar, you can look up & make the old recipe here. If you’re ready to have an amazing Primal-friendly meal, (with way less calories) read on:
I came up with the old recipe after tasting an appetizer called Billy Blue Bread at The Owl Grill in Grass Valley. It’s still on the menu there, but since I have cut wheat and sugar from my diet, I wouldn’t dare indulge. Instead, I tweaked my old recipe to make it gluten free and so that no added sugar is necessary! I even ditched the butter in the new recipe and replaced with with an onion “jam” of sorts. There’s so much flavor in the onion “jam”, you won’t miss the butter.
Special products I used in this recipe include Extra Virgin Olive Oil (everyday variety) made by California Olive Ranch and Pamela’s Products Gluten Free Artisan Flour Blend. I’d like to thank both companies for sending me product samples. If you want to be truly primal, you can leave out the gluten-free flour blend (it contains rice), but I recommend leaving it in the recipe to help give your bread a better texture. It’s a really great product.
Primal-Friendly Gluten-Free Bleu Cheese Pecan Bread with Balsamic Reduction
Before you begin, you’ll want to line a baking sheet with parchment paper, and toast and chop your pecans so they are both ready to use. Also, if you don’t want to hassle with making a balsamic reduction, there are several you can buy to use instead.
For the Cauliflower Bread
2 heads of cauliflower
4 eggs
4 egg whites
1/3 cup almond meal
1/4 cup Pamela’s Products Gluten Free Artisan Flour Blend
1 Tbs California Olive Ranch Olive Oil
pinch salt
Prepare: Preheat oven to 375°. Cook cauliflower either by boiling it or microwaving until it is almost falling apart. Allow to cool and then place in a food processor. Pulse the cauliflower with the eggs until completely smooth. Transfer the mixture to a large mixing bowl and add the almond meal, the flour blend, and salt. Stir until completely blended and spread on a parchment lined baking sheet. Bake in oven until golden brown and bread has set completely. (About 30 minutes). While bread is in the oven, you can prepare the onion jam.
For the Onion Jam
3 large red onions
1-2 Tbs olive oil (I used California Ranch Olive Oil)
1 tbs minced garlic
2 tbs balsamic vinegar
pinch salt
Slice onions and sauté in 1-2 Tbs olive oil. Add the salt. When the onions turn translucent, add the balsamic vinegar. Continue cooking slowly until onions caramelize, then add the garlic at the end. Incorporate fully until the onions are cooked. This should take about the same time the bread will take to bake. When the onions are finished, allow to cool a bit and then place them in a food processor. Pulse the mixture until it turns into a paste or “jam”. Set aside. At this point, the bread should be ready to remove from the oven. Now you’re ready to make the balsamic reduction.
For the Balsamic Reduction
2 1/2 cups balsamic vinegar
In a saucepan, heat the vinegar until it is simmering and reduce it until it is the consistency of molasses. This will take about 20 minutes. You will be looking for something thick and viscous that will stick to the back of a spoon.
For the Finished Product
3/4 cup bleu cheese crumbles
1 cup chopped toasted pecans
Keep oven temperature at 375°.
Spread the onion jam over the bread, and top with 3/4 cup crumbled bleu cheese crumbles, then sprinkle the pecans over that.
Place bread back in oven, and bake for 10 minutes, allowing the cheese to melt. Remove from oven and allow to cool slightly. Then, drizzle the reduction over the bread. Serve immediately with a big glass of merlot! 🙂 Also, I really enjoy dipping the bread in the Arbequena variety of oil that California Olive Ranch makes.
You can find California Olive Ranch on Facebook here and on Twitter here. Pamela’s Products Facebook page is here and follow them on twitter here.
Vegetarian Recipe: Saag Paneer featuring Karoun Dairies
On Saturday night, Andy and I stayed in for a change and I made another vegetarian meal with some products that were sent to me by Karoun Dairies. I decided I was in the mood for Indian cuisine and the Yanni grilling cheese I received from Karoun on Friday was the perfect thing to use in my own little version of saag paneer. 🙂
For fun, I added some boiled potatoes and parsnips into the finished stew and I also made the cauliflower breadstick dough (from a few posts back) into a thick sort of naan bread. Phenaanamal!! 😉
Ingredients:
4 cups baby spinach leaves
1 tablespoon olive oil
1/2 pound Yanni grilling cheese, sliced or cubed
2 tablespoons olive oil
2 teaspoons cumin
1 onion, thinly sliced
1 cup mushrooms, sliced
1 Tbs fresh ginger
3 Tbs crushed garlic
2 tomatoes, diced
1 cup tomato sauce
2 teaspoons garam masala
1/2 teaspoon ground turmeric
1/2 teaspoon cayenne pepper
1/2 cup Karoun Kafir lite cheese
3 parsnips, cut into half moons
2 potatoes, cubed
salt to taste
Bring a large pot of water to a boil. Cook spinach in the boiling water until wilted, about 3 minutes. Drain well and transfer to a food processor. Puree until finely chopped. Set aside.
Cut potatoes and parsnips into uniform pieces and boil them until they begin to soften. Do not overcook. Stay on the firmer side, as they will do their last part of cooking in the finished stew.
Next, sauté the onion and mushrooms together until the onion is translucent/cooked through. Add the tomato and the tomato sauce, along with all spices (ginger, garlic, tomato, garam masala, turmeric, and cayenne pepper). Allow to simmer on low to medium heat so that the tomatoes will break down.
Heat 1 tablespoon olive oil in a large skillet over medium heat. Fry the Yanni cheese, until browned on all sides, about 5 minutes. Set aside.
Return to the tomato sauce, and stir in the spinach purée. Salt to taste. Cover and cook for about 5-10 more minutes, stirring occasionally. Lastly, stir in the Kefir cheese to thicken the sauce. Then add the boiled parsnips and potatoes and coat them with the spinach and tomato sauce. Heat through and make sure the potatoes and parsnips have fully cooked through. Serve the fried Yanni on the side (to retain the cheese’s crispy edges!) 🙂 Happy to report I did not miss meat that night! Thanks to Karoun Dairies for the great product samples!
To find Karoun products, you can enter your zip code in the store locator here.
You can find Karoun Dairies on Facebook here and follow them on twitter here.
Recipe: Veggie February, Redwood Goat Milk Cheddar Cheese Stuffed Mushrooms
For our first seafood & vegetable dinner this weekend, I made stuffed mushrooms and used three different products I picked up or were sent to me from vendors at the San Francisco Winter Fancy Food Show.
Redwood Hill Farm sent me three different products to taste, and one of them was a goat milk cheddar cheese. I was instantly intrigued because I love cheddar cheese. I had bought a few dozen crimini mushrooms earlier in the week, and needed to use them. So, I thought I could use the cheese somehow to make stuffed mushrooms. Another important element I used was a gluten-free seasoned coating mix from Hodgson Mill I also brought home from the food show. The final result was amazingly good, and I didn’t even use any eggs as a binder. Andy sautéed some shrimp (a wonderful departure from red meat) and I made a big salad to round out the meal.
My recipe for the stuffed mushrooms is below. I’d like to thank Redwood Hill Farms for the cheese samples and for the coupons for some of their other products that were sent to me.
Stuffed Mushrooms with Redwood Hill Farms Goat Milk Cheddar Cheese
Ingredients:
12 medium to large crimini mushrooms
1 diced onion
2 Tbs crushed garlic
1/3 cup almond meal
1/2 block of Redwood Hill Farms Goat Milk Cheddar Cheese (finely grated)
1/4 cup Hodgson Mill Gluten-Free Seasoned Coating Mix
2 Tbs Karoun Dairy Lite Kefir Cheese (Labne)
1 Tbs olive oil or butter
cracked pepper to taste
Preheat oven to 385°F. Remove stems from mushrooms and chop finely. Lightly oil a 13×9 pan and place mushroom caps gill side down on the pan. Roast the mushrooms while you are preparing the stuffing filling (10 minutes once oven has come to temperature.)
Then heat a pan with your oil of choice and sauté the onion with the mushroom stems. You probably won’t need any salt in this dish because the seasoning mix and the cheeses are salty enough on their own. Cook until the onions are translucent and the mushrooms have cooked through. At this point, the mushroom caps should be ready to take out of the oven. Remove the caps from the oven and flip them over, allowing them to cool as you prepare the rest of the mushroom filling.
Add the crushed garlic, almond meal and the seasoned coating mix to the mushroom stem/onion mixture and coat evenly. Then add the kefir cheese and stir until well combined. Lastly add about 3/4 of the shredded goat milk cheddar (save 1/4 of it to top the mushrooms once they’ve been filled). Add a little bit of cracked pepper to your mushroom filling and then fill the caps. I find it is easier to pick up the caps and scoop filling into them rather than trying to fill them with a spoon. Then once I have scooped some filling into a cap, I dip it into the extra shredded cheese so that the cheese sticks to the top of the mushroom rather than a bunch of cheese ending up on the pan.
Once you have filled the mushrooms and topped them with cheese, return the pan to the oven and bake at 385°F for about 25 minutes. The cheese will turn a nice golden brown on top and the mushrooms will develop an even more roasted flavor. I was so happy with the way they turned out and I hope you will give them a try!
For some fun cheese and wine pairings, you can go to Redwood Hill Farms’ website here.
You can find Redwood Hill Farms on Facebook here and follow them on twitter here.


