
Air Fryer Recipe: Hot Honey Bacon Wrapped Chicken
AIR FRYER RECIPE Hot Honey Bacon Wrapped Chicken with WINE PAIRING: Clerget Grande Cuvée Sparkling Wine
Recipe:
Serves 8-10 people
(depending if you are eating as an appetizer or main course)
Ingredients:
3 Pounds Chicken Breast Tenders
24 ozs. (about 2 packages) Applewood Bacon
2 Teaspoons Paprika
2 Foil Lined Pans
Air Fryer or Oven Set to 350°F
Hot Honey Sauce
1 Cup Honey
2 Teaspoons Yellow Mustard
1 Teaspoon Garlic Powder
1 Teaspoon Onion Powder
1 Tbs Red Pepper Flake
Steps:
Pat the chicken dry with paper towels. Coat the chicken breast tenders with the paprika, then wrap each piece with one slice of bacon. Put each wrapped piece on a tray you have lined with aluminum foil (prep tray). Continue until you have wrapped all the pieces.
Place bacon wrapped chicken in the air fryer at 350-360°F or bake in the oven. It will take about 10 mins in the air fryer and about 20 in the oven.
While the chicken is cooking, prepare the hot honey sauce by combining honey, mustard, garlic powder, onion powder, and the red pepper flakes. Stir until well combined.
Remove all the chicken from your air fryer and place on to the other foil-lined tray. Then brush the hot honey sauce generously over each piece.
I like to serve the chicken on a nice platter over a bed of arugula.
Wine Pairing:
For the wine pairing, any dry to off dry sparkling wine will do. I found the Clerget Grande Cuvée (a French bubbly made in the Charmat method) at Grocery Outlet for $5.99. A Spanish Cava or an Italian Prosecco would also be an excellent pairing. Cheers!
TICKETS FOR PEACEMAKING HAPPY HOUR WITH ZAMIR GOTTA on July 16th:
https://www.eventbrite.com/e/peacemaking-happy-hour-with-zamir-gotta-tickets-156145412131
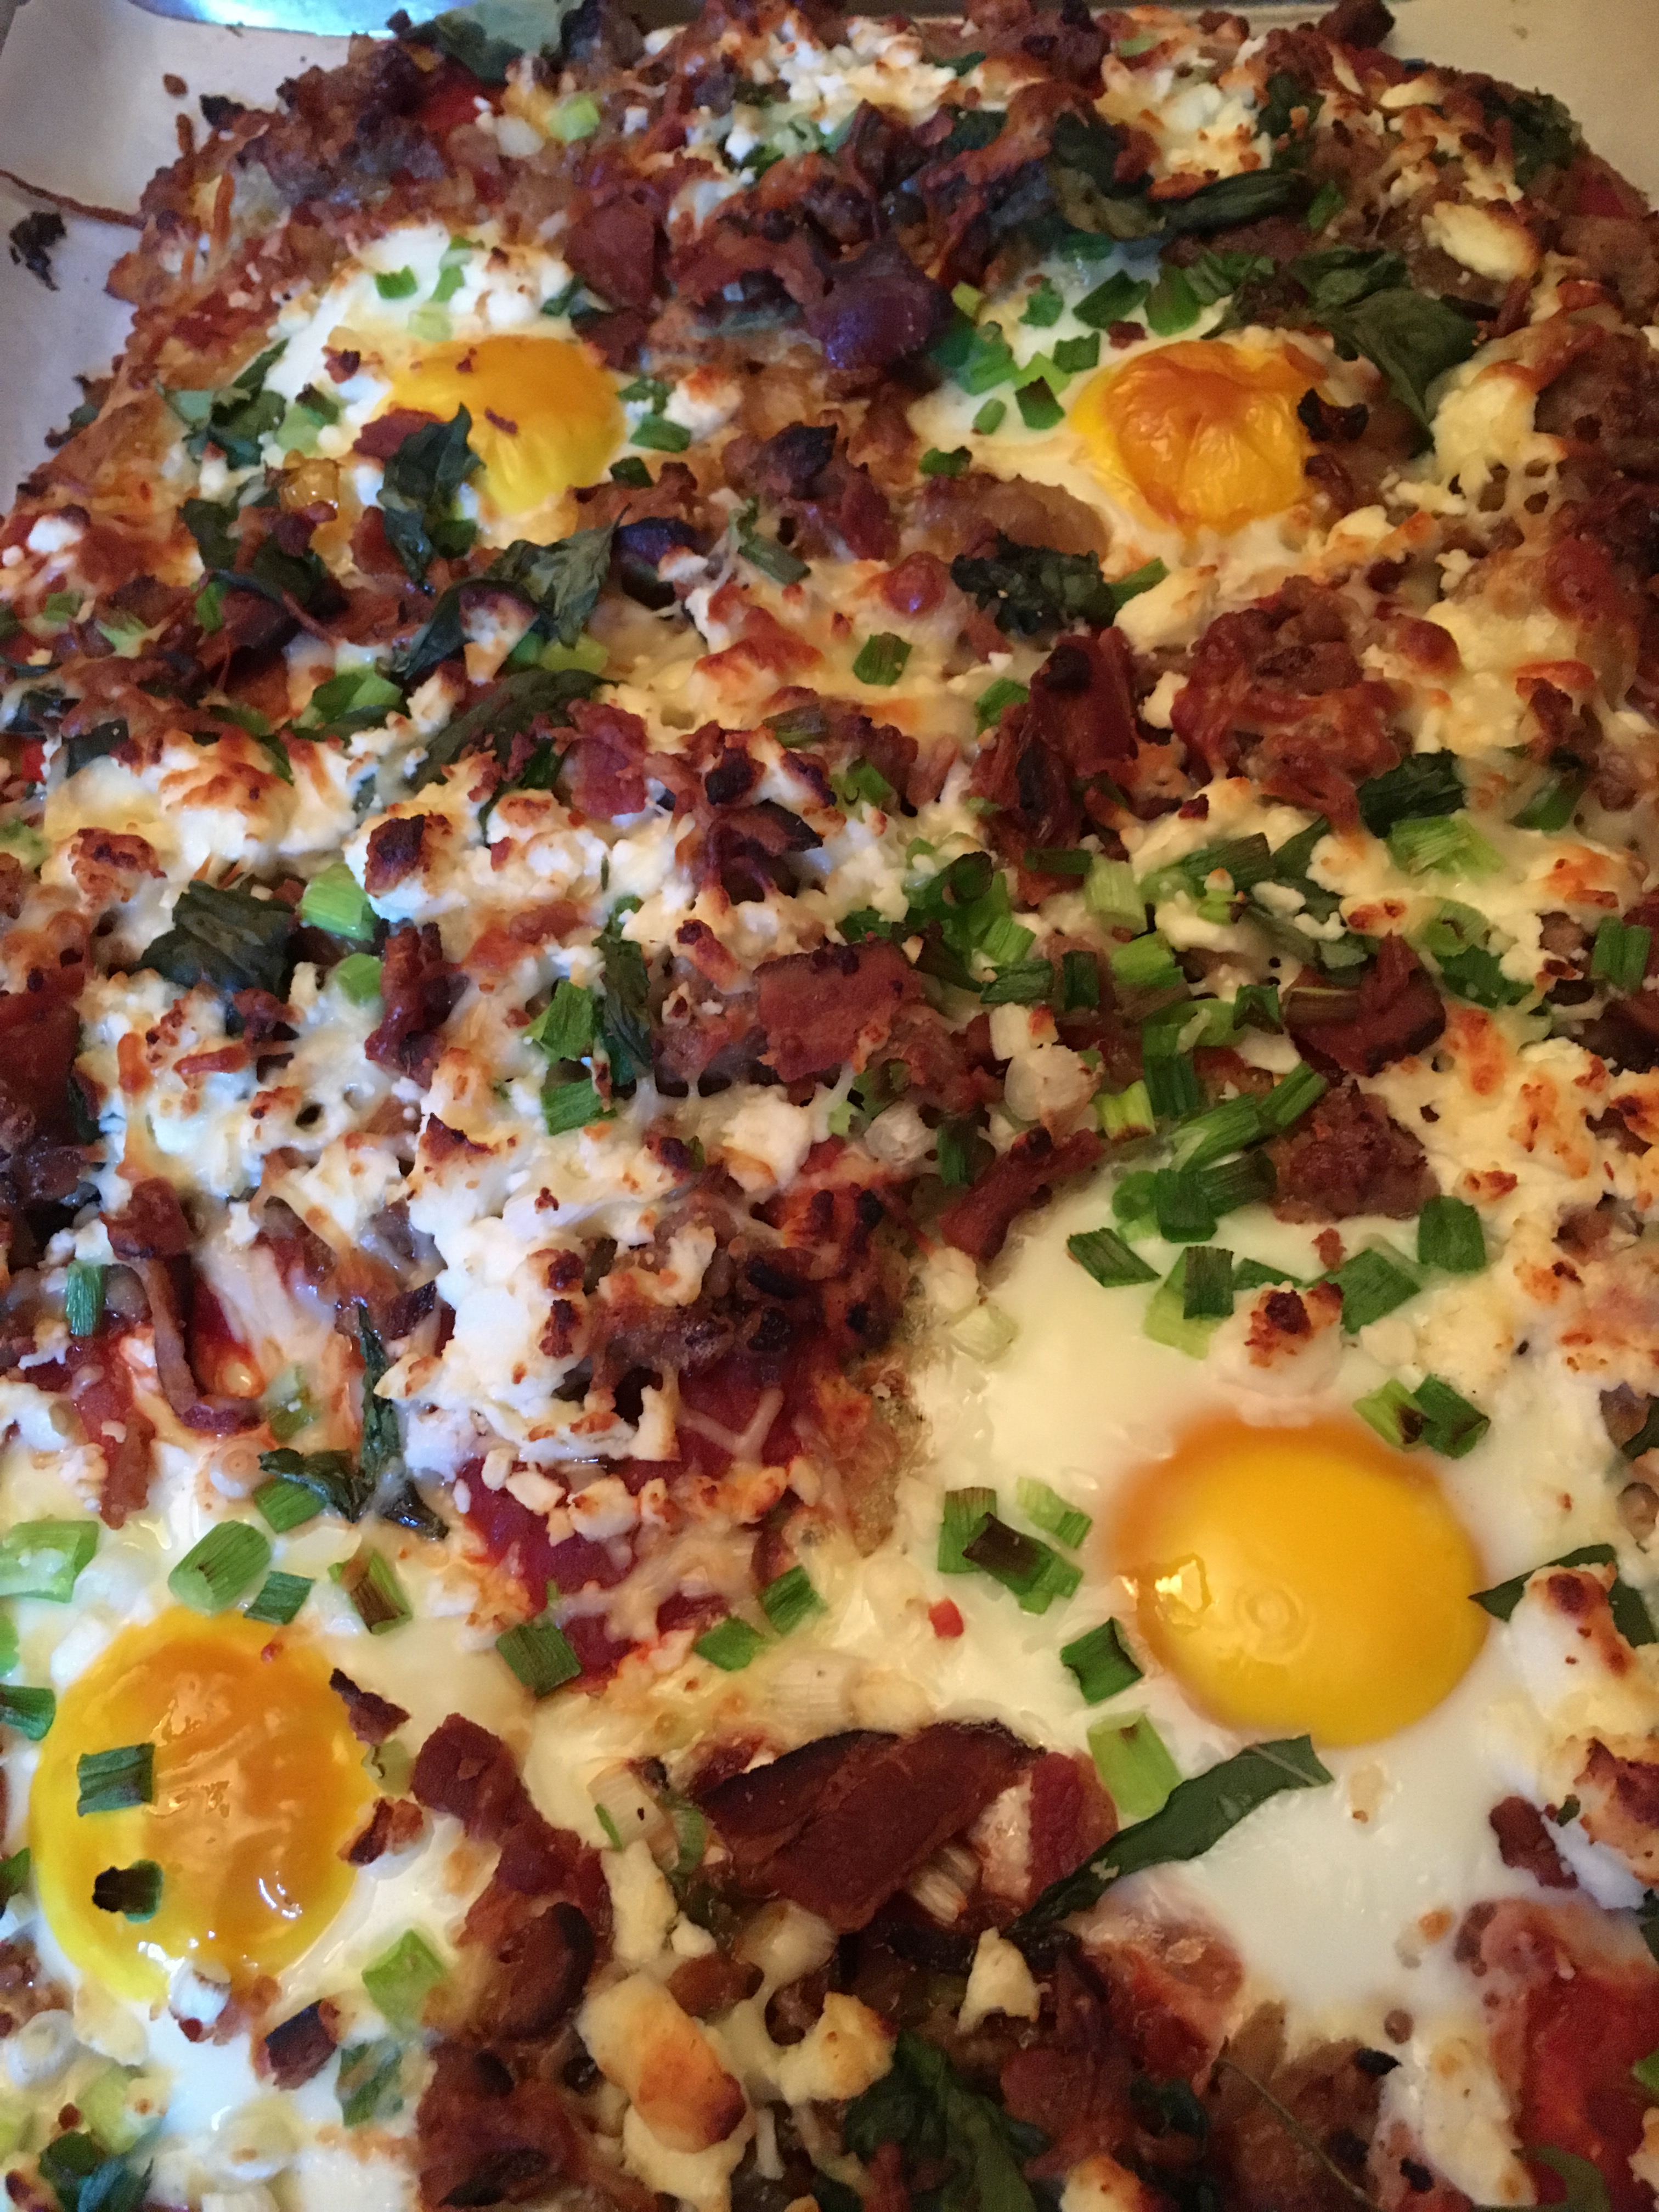
Gluten Free Breakfast Pizza with Sweet Potato Crust
One of the things I miss the most being on a Paleo/Primal diet is BREAD. In that category would also be a nice, not too thin pizza crust that I have never been able to replicate with cauliflower. I also wanted to be able to PICK UP the slice of pizza and not have to use a utensil. A lot of gluten free pizza recipes require and knife and fork and leave me feeling like I am eating some sort of soggy polenta dish with tomato and cheese on top.
I finally came up with a ratio/blend of ingredients that make a great gluten free crust, and I will probably never make a cauliflower crust again. I felt confident enough about the crust recipe’s texture and flavor that I made it at the 2017 California State Fair Cooking Demo on the last morning of the fair. Try for yourself, and use the following crust recipe as a base for any kind of pizza you want to make. I am posting the exact recipe below that I made at the California State Fair. 🙂
PS: You’ll need a food processor, 3 sheet pans (at least 9 by 13) a cook top of some kind, and an oven to make this! (Just throwing that out there!) For the oven, place one rack in the middle and one nearer to the top.
Crust Ingredients:
2 large sweet potatoes (you can use orange or white, whatever you prefer)
1 1/4 cup nut flour of your choice (I used a ground pistachio/almond blend)
3 eggs
3/4 cup grated parmesan cheese
1/4 water
1/4 cup olive oil
1/2 Tbs garlic powder
1/2 Tbs dried oregano
1/2 tsp sea salt

Step One
Peel and cut your sweet potatoes into roughly 1-2 inch squares and pre-cook them. You can do this any way you want, but I would stay away from boiling them because this will leave them waterlogged and soggy. My shortcut is the microwave. Cook them until they will mush between your fingers with almost no effort. You can also bake them if you want. Tip: Cook potatoes the night before, or even a few days before to shave a little bit off your pizza prep time.
Step Two
If you are making the breakfast pizza, this is the part where I go ahead and PREHEAT the oven and cook my bacon for the topping at the same time. Even if you’re not making the breakfast version, SURELY you’ll want bacon on your pizza anyway! 🙂 This is an easy way to get the bacon super crispy without burning it. I use a sheet pan lined with parchment paper to cook the bacon. While you’re at, go ahead and line THREE sheet pans with parchment paper. Two you will need for the pizza crust, so parchment paper line them and set them aside for now. The remaining pan will get a layer of parchment and then your 6-10 slices of bacon. Don’t crowd the pan too much, or the bacon won’t cook evenly and it won’t render (get crispy). Once you’ve put the bacon on the sheet pan, place it in the oven and THEN turn the oven on. Heat it to 400°F. You’ll want to cook the bacon slow, so a cold oven is OK to begin with. By the time you’re ready to put your crust in the oven, your bacon will be almost ready and your oven will be the temp you need it. Now on to the crust!
Step Three
Grind the nuts of your choice (I used a mixture of pistachios and almonds–1 cup ground pistachios, 1/4 cup ground almonds) until they look like coarse sand/start sticking to the sides of the food processor bowl (we don’t want nut butter, just finely ground). Pulse in your parmesan cheese. Add the salt, garlic powder and the dried oregano. Then begin adding your sweet potatoes in stages. You will need to add the water, olive oil, and 3 eggs in between adding the potato pieces so that the mixture continues to blend well. Depending on the size of the potatoes, you might not need to add all of them. Consistency-wise you are looking for a thin cookie dough, but thick cake batter. It won’t be the consistency of pizza dough from a pizza parlor, it will be more loose than that.
Step Four
Spread the dough mixture onto the other parchment-lined pan. Spread evenly across the pan, no thinner than a 1/2 inch thick. At this time, you can check your bacon. It may or may not be done depending on the thickness of the bacon slices. If it is not done, you can leave it in on the top rack and set the timer to remind you to check it (I go in 5 minute increments). Also, make sure to pour any excess grease off of the pan. Pour the grease into a coffee cup or something you can retrieve it from for later use (I will get to that later!) Place the dough pan on the middle rack and bake for 10-12 minutes.
Sauce Ingredients:
15 oz can crushed tomatoes
3 Tbs tomato paste
1 Tbs chopped garlic
2 Tbs chopped fresh oregano
1/3 cup chopped fresh basil
1/2 tsp salt
Step Five
If you want, you can buy a jar of pizza sauce and skip this step all together. I do this when I am pressed for time. If not, add your crushed tomatoes, paste, and herbs and salt to a saucepan and cook together while the pizza crust does it’s first bake for the 10-12 minutes. You will be simmering the sauce until you need to use it. Also, the bacon should be getting done by now, so check it again and take it out if necessary.
Sausage and Shallots Preparation Ingredients:
2 shallots
Reserved bacon grease
1 lb ground turkey
Step Six
While the sauce is cooking and crust is baking, dice up the shallots. Then, in another saucepan separate from the one you used for the tomato sauce, pour some of the bacon grease you reserved from earlier, heat it up, and sauté the shallots until they are translucent. Add the ground sausage (turkey or pork, whatever your preference) and cook with the shallots, allowing the meat to cook through and brown. When the meat is browned, turn off the heat and set aside. At this point, the first bake of the crust is probably done, so go ahead and take out the crust and place the pan on a heat safe surface.
Step Seven
At this point, fetch the third parchment lined pan, and invert it, making sure the parchment paper stays put. Place it on the top of the crust and flip it over. This is so the pizza crust will cook through/dry out, and you will be able to pick up the pizza/not eat with a fork! Your oven should still be at 400°F. If you are making the breakfast pizza, this is the part where you will peel the parchment off the top of the crust, use the back of a spoon and make little “wells” on the pizza. I make 4 wells for 4 eggs. The wells I am describing are little indentations so that when you crack the egg on the pizza crust, it will not run all over the top. Instead, it will be captured in the little bowl you made for it. Once you have made the wells and cracked the eggs into them, carefully place the crust into the oven for another 10 minutes. This time, use the rack that is higher in the oven, so the eggs will set.
Toppings:
1 bunch green onions
½ cup sun dried tomatoes
6-10 slices bacon
2 cups grated mozzarella cheese
Step Eight
OK, we’re almost done! For final prep, chop the green onions and set aside. Also, chop the bacon you prepped earlier and set aside. I also like to measure out the sun dried tomatoes and the cheese and put everything in a row (so I don’t leave anything out). It’s like a little pizza assembly line. 🙂
Step Nine
Take the crust out (the eggs on top should be almost set). Turn the oven temp up to broil (low), you will need to use the oven one last time after you top the pizza (so that the cheese will melt). Begin with the tomato sauce and spread around the crust, being careful to avoid the eggs on top. Then add the sausage, bacon, sun dried tomatoes, green onions, and top with the mozzarella cheese. You should still be able to see the eggs through the toppings.
Step Ten
Place the pizza back in the oven until the cheese on top melts and browns. I like to keep an eye on the pizza through the window on the door of the oven to prevent over-browning. Once the cheese on top is melted, take the pizza out, allow to cool 5-10 minutes before cutting. This is the part where I set the table. By the time I am finished setting the table, the pizza is ready to cut and serve!
Did I leave out anything? Do you have questions? Contact me here!
For other adventures in gluten free pizza, you can click here and here. There’s even here.
If you don’t already, please follow me on Facebook here, on Twitter here, and on Instagram here. Thank you, and please enjoy the recipe! 🙂
Flights By Night #3: Pork Chop with Apple Gastrique and a Duo of Pinot Noir
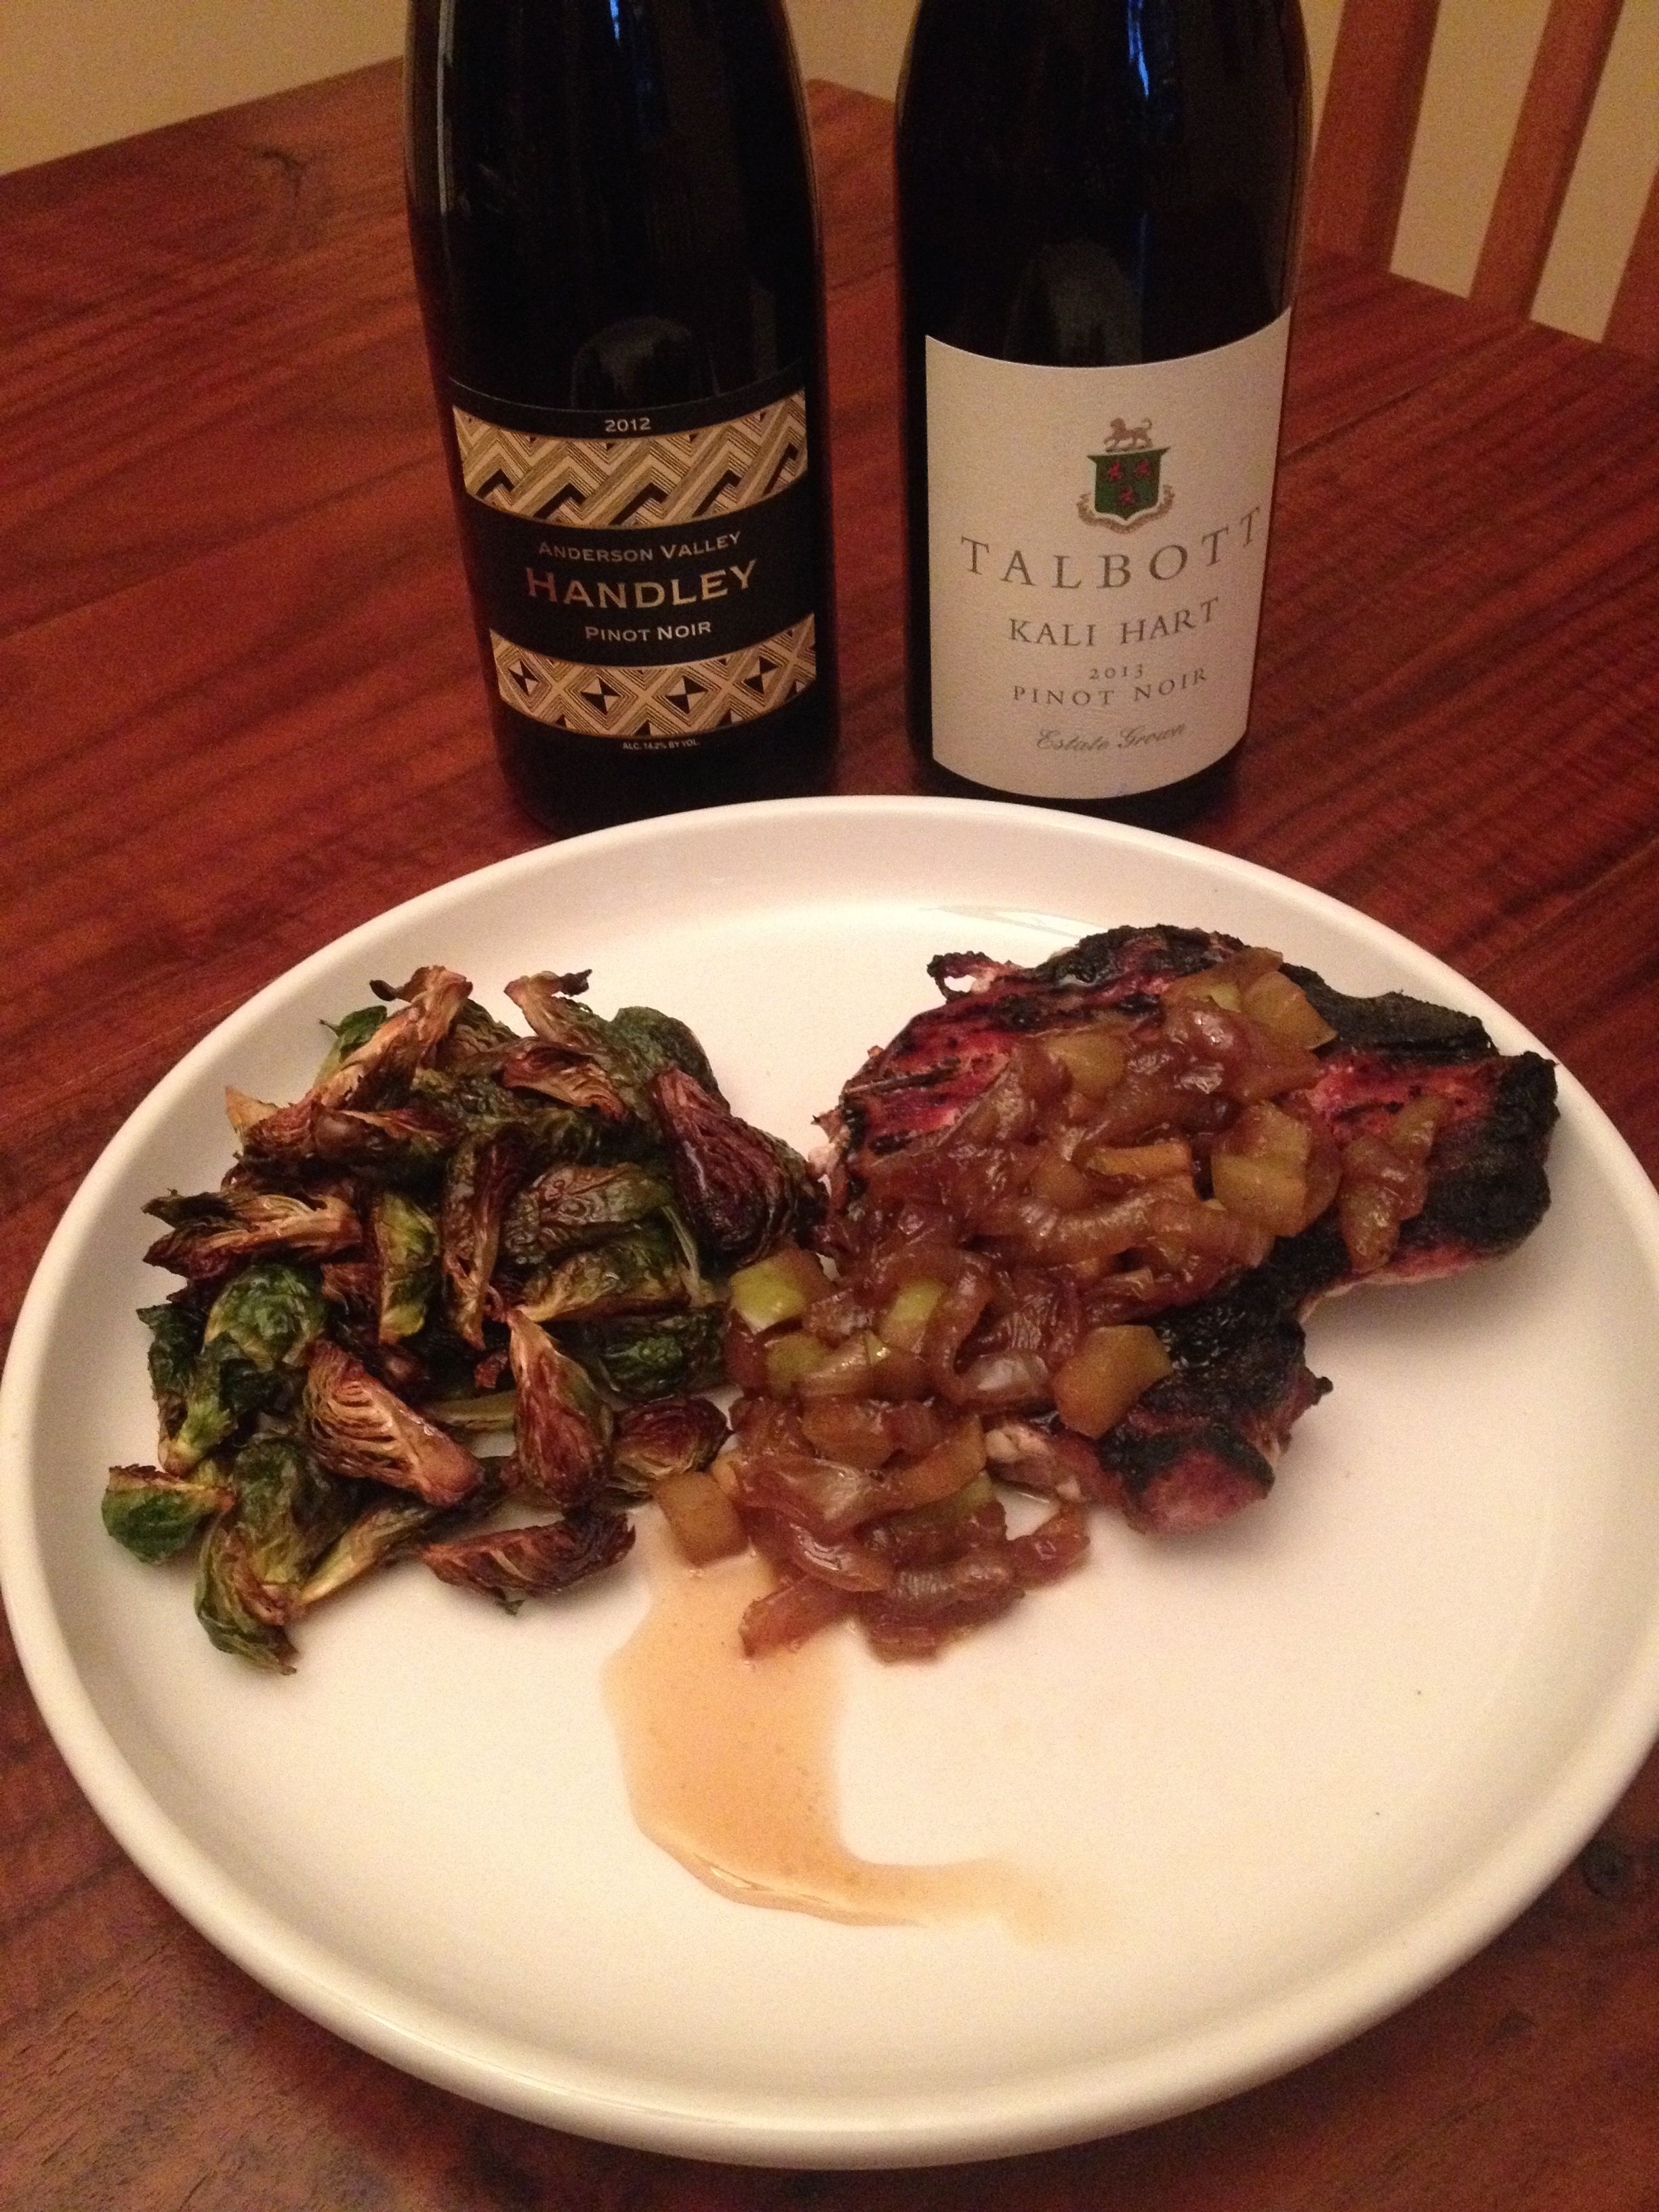
In this edition of Flights By Night, we bring you a classic pairing of pork and Pinot Noir. A bone-in pork chop with an apple and onion sauté and an apple gastrique. Served with roasted Brussels sprouts.
The Pinot Noirs that Andy chose are some of the most delicious Pinot Noirs I have ever tasted and they are very reasonably priced. Wine number one is Handley’s 2012 Anderson Valley Pinot Noir (their self-titled “flagship wine”) and wine number two is Talbott’s 2013 Kali Hart Pinot Noir (which is my personal favorite red wine right now, because of it’s drinkability with or without food).
As for Handley, they couldn’t make a bad wine if they tried. Case in point, their Gewürztraminer ($20), but that is another pairing for another time. 😉 Handley’s Anderson Valley Pinot retails for $32 via their website and Talbott’s Kali Hart Pinot Noir goes for ($21). However, you can find the wines at lower prices if you do a google search for them. 😉
The food pairing was a no-brainer because pork is always a perfect match for Pinot Noir. I quartered the Brussels sprouts and roasted them in olive oil. For the apple and onion sauté, I sliced the onions and cooked them in olive oil, seasoned them with salt, and then added 2 Tbs coconut sugar to help caramelize them. Then I added some chopped apples, and cooked the onions and apples down together until the mixture was browned and thickened.
Andy was busy with the pork chops on the grill and meanwhile I made the apple gastrique. It was such a simple preparation. I just used one part honey to two parts apple cider vinegar. I started with the honey in a small saucepan, and roasted over low heat until the honey turned darker. Then I added the apple cider vinegar and brought to a simmer, then turned down the heat slightly and reduced until the gastrique stuck to the back of a spoon (gastrique will thicken even more as it cools). Tip: You can serve the gastrique with pork, duck, or chicken. 😉
That’s it for today’s Flights By Night! Check back in a few days for another great food and wine pairing!
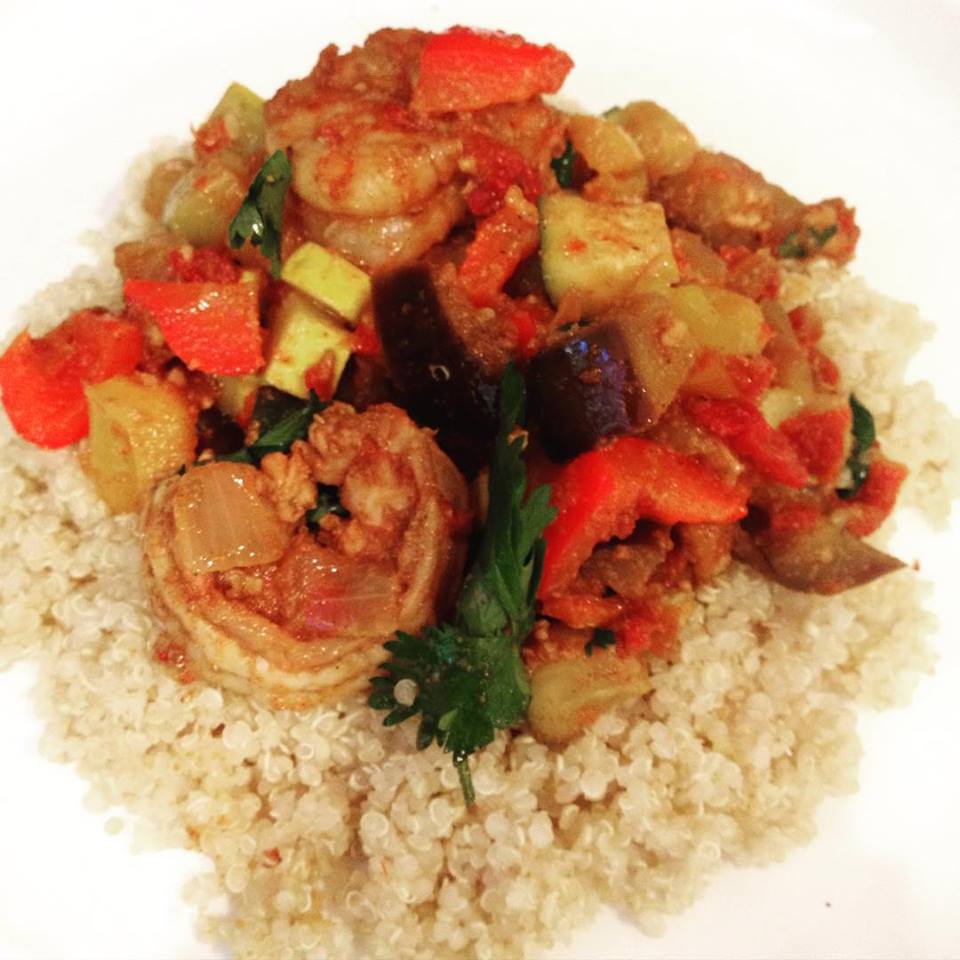
Recipe: Chili Lime Shrimp with Vegetables and Quinoa
Last Monday, Andy and I attended a hospitality professionals meeting and I won a bag of groceries from Whole Foods Arden (Sacramento). They are also members of the group and brought the bag to give away at the meeting through a raffle of business cards of all the attendees.
We rarely buy quinoa, because it is a grain and not technically Paleo, but since it is a gluten free grain that is high in protein and the box was in the bag of groceries, I decided to make good use of it and post the recipe here as my thanks to Whole Foods! 🙂
Chili Lime Shrimp with Vegetables and Quinoa
Inspired by a Kaiser Permanente recipe
(serves 4)
Shrimp Marinade:
2 tsp chili powder
2 tablespoons olive oil
1 Tbs teaspoon cumin
1 tsp red pepper flakes (this will make the recipe moderately spicy, omit if you don’t prefer heat)
1 clove garlic, crushed
Juice of one lime
Salt and pepper
20-24 uncooked, peeled and deveined medium-sized shrimp (roughly one pound)
Note: If you can’t find peeled and deveined shrimp, it’s pretty easy to do at home, it just takes about 15 more minutes to do it. After you peel back the shell, use a small knife to make an incision right on top of the vein and down to the tail. The vein will come practically on its own under running water. I also removed the tails for this recipe.
Mix marinade ingredients in a bowl and add the shrimp, tossing them in the bowl until they are coated. Set aside and work on your vegetables.
Vegetable Sauté:
2 Tbs olive oil or coconut oil
1/2 of a large red bell pepper
1/2 of a large yellow bell pepper
1/2 of a large yellow squash
1/2 of a large zucchini squash
1/2 of a large eggplant
1/2 of a large onion
1 1/2 cups of your favorite tomato (I used some cherry tomatoes left over from a veggie tray and one large heirloom tomato)
2 tsp garlic powder
2 tsp salt
1/2 of one bundle of cilantro
After you wash and chop up the vegetables (cube or cut each into bite sized pieces), set them aside and prepare the quinoa.
Quinoa Base:
1 1/2 cup 365 Organic Quinoa
 First, for a nuttier flavor, toast the quinoa in a skillet until it turns a little brown in color. Then prepare according to package directions. For even more flavor, cook the quinoa in a vegetable or chicken broth (substituting the water and using the same amount of broth in the directions on the package).
Prepare Vegetable Sauté:
While the quinoa is cooking, begin your vegetable sauté by heating the olive (or coconut oil) in a skillet and cooking the onion until it is translucent and then adding both the red and yellow bell peppers. Cook for 5 minutes on medium heat, then add the squashes, and then the eggplant. At this point the pan will be getting dry, so add a little water or white wine (1/2 cup), add the tomatoes and the garlic powder, and cook until vegetables are tender and the alcohol has cooked out of the mixture. Lastly, remove the pan from heat and add the cilantro leaves allowing them to wilt into the vegetables.
By this time the quinoa will be done or nearly done. Drain any excess water (or broth) out of the quinoa and set aside.
Cook the Shrimp:
Heat a pan big enough to accommodate the 24 shrimp and get the pan really hot. Place your shrimp in the pan, along with all the marinade and cook the shrimp 3-4 minutes (until they sear and turn color). Then add the shrimp to the vegetable pan, and place the vegetable pan back onto low heat. Fold all the ingredients together until everything is well combined and heated through.
To Serve:
Begin with the quinoa, and place the amount of your liking in a circle shape on a large plate. Make a nice big crater in the center of the plate, and fill it with the shrimp and vegetable sauté. Then garnish with a little more cilantro if you’d like.
You can also make this recipe with chicken if you don’t like seafood. I would marinate and cook it in the exact same fashion. 🙂
You can find Whole Foods Arden (Sacramento) on Facebook here and follow them on twitter here.
Everyday Paleo: Recipes for Real Life!!


I made the meal (pictured above) last night and the main course (stuffed portobello mushroom) was inspired by a recipe in the new book Everyday Paleo by Sarah Fragoso.
I began a Paleo diet at the end of March after about 2 years of reading about eating Paleo and resisting, insisting the way I was eating and living was ok with my body and just peachy with the environment around me. (I will expound on both of these topics in later posts.)
Then after I gained 33 pounds that I had lost last year, and my clothes no longer fit me, I decided enough was enough. I had to DO SOMETHING. I remembered all the reading I had done on Primal/Paleo and still had a blog subscription to one of my heroes: Mark’s Daily Apple author Mark Sisson. Even though I repeatedly turned away going completely Paleo, a lot of information he wrote about on his website really struck a chord with me. It made so much sense. So, I joined a website to start logging my calories daily (note: many Paleo people do not log calories or measure portions), and decided this time I would follow Paleo.
I googled “Paleo recipes” and also looked for podcasts about Paleo. It was then I found a podcast called “Everyday Paleo”! Everyday Paleo is hosted by Sarah Fragoso, and Chrissy Gower (blog author of Growing Up Paleo). and I also discovered that it was recorded practically in my own backyard!! I am located in Sacramento, and the Everyday Paleo hosts hail from Chico! I was encouraged to have likeminded people, not to mention Paleo experts so nearby. At the time I became a listener, Everyday Paleo only had 10 episodes under their belt, so I was able to listen to all the archived shows. In the shows, Sarah talked about her upcoming book, which is the very book I am now recommending!
So, I have to tell you at first glance Paleo eating seems very restrictive. But, if you look closer, you will see that it’s more about what you CAN eat. Everyday Paleo gives you a shopping list if you have no idea where to start, and if you are already a Paleo pro, it gives you fresh recipe ideas. If you are not Paleo, but you are someone who is gluten intolerant, BOOM! a whole book you can eat from!
The great thing about Everyday Paleo is that it is so accessible for anyone at any fitness level. One reason is because Sarah herself was not the most fit person. There are before and after photos of Sarah and the results are spectacular! You would never know she has three children and that one of them is in high school!
Speaking of kids, Sarah has made the recipes kid-friendly. There are dishes in the book for all ages, and ones that can be prepped ahead of time and reheated. None of them are difficult to make, and the average prep time for the recipes are 30 mins.
I also love that Sarah put exercise “recipes” in the back of the book. It’s not all about cardio anymore. I am excited because I am a beginner with resistance training (after always having been a chronic cardio fanatic) , and this book serves as a good starting point for me.
Oh yes, I almost forgot… About that meal I have pictured above: It was inspired by a recipe out of Sarah’s book! It is a spin off of her recipe for “Giant Stuffed Portobellos” I made mine with a 1/2 pound grass-fed ground beef, 1/4 pound nitrate-free ground sausage, a sautéed mixture of shredded carrots, onions and green and red bell peppers, and the insides of the tops of the mushrooms and their stems.
To prepare the stuffed mushrooms, I browned the meat, then sautéed the vegetables in some of the fat to cook them. I should note that when I prepare stuffed mushrooms, a vital step for me is to roast the mushrooms in the oven before stuffing them. This really brings out the richness of the mushrooms. I brush the caps with a little olive oil and brown them while I am preparing the stuffing. I place the side where the stem was down to roast.
I seasoned the cooked meat and vegetables with salt, garlic, fresh sage, and black pepper. I then added one egg to the mixture to bind it. In the recipe from the book, Sarah also uses coconut flour as a binder. I suspect that this takes the place of breadcrumbs in a regular stuffed mushrooms recipe. I did not use either. I piled the meat and veggies in the roasted mushrooms and pressed them to compact. Then I placed them in the oven again (I used a lower temperature of 350°). The finish product should be browned and bubbly when you take it out of the oven.
I topped mine with a tomato sauce I made from Muir Glen Organic Fire Roasted tomato products. I pulsed a can of the fire roasted tomatoes and a little tomato paste in the food processor, along with salt and minced garlic. Then I cooked it down to reduce some of the liquid. To obtain a “ketchup-like” meatloaf effect on the mushrooms, I put the sauce on as they were roasting in the oven. Yum!
The side dishes I made were: Mashed Cauliflower & Acorn Squash, and Kale with Nitrate-Free Bacon and Toasted Walnuts. I will post the recipes separately to come, because I want to this post to focus on Sarah’s book.
I am still reading through it, but I can tell you the price ($17) is completely worth it for the amount of information you get. Not only that, but there are HUGE illustrations for every recipe, along with easy-to-read type. This is a bonus if you are in your kitchen actually making a dish. You can still read it at a bit of a distance, and your kids will be able to read it, too. For anyone who is already acquainted with Paleo, there is a foreword by Robb Wolf.
The book officially releases Monday, but you can pre-order, even though it says “temporarily out of stock”. Just ignore that and click on the “add to cart” button anyway. 🙂